
Lighting, Composition and Subject
Lighting Part 1: Introduction and Types of Lighting
by Roger N. Clark
Lighting, Composition, and Subject are the key factors in great photography.
All the technical know how and gear mean little without great light, good composition
and a nice subject. This article starts a series on the little know but all
important factors in photographs with impact.
The Lighting, Composition and Subject Series:
All images, text and data on this site are copyrighted.
They may not be used except by written permission from Roger N. Clark.
All rights reserved.
If you find the information on this site useful,
please support Clarkvision and make a donation (link below).
Introduction
"Light makes photography. Embrace light. Admire it. Love it.
But above all, know light.
Know it for all you are worth, and you will know the key
to photography."
- George Eastman
It is light that reveals, light that obscures, light that communicates. It is light I "listen"
to. The light late in the day has a distinct quality, as it fades toward the darkness of
evening. After sunset there is a gentle leaving of the light, the air begins to still, and a
quiet descends. I see magic in the quiet light of dusk. I feel quiet, yet intense energy in
the natural elements of our habitat. A sense of magic prevails. A sense of mystery. It is
a time for contemplation, for listening - a time for making photographs.
-John Sexton
Light glorifies everything. It transforms and ennobles the most commonplace and ordinary subjects.
The object is nothing; light is everything.
- Leonard Misonne
Amateurs worry about equipment, Professionals worry about time, Masters worry about light.
- Anonymous
"I knew, of course, that trees and plants had roots, stems, bark, branches and foliage that reached up
toward the light.
But I was coming to realize that the real magician was light itself...."
- Edward Steichen
There is no closed figure in nature. Every shape participates with another.
No one thing is independent
of another, and one thing rhymes with another, and light gives them shape.
- Henri Cartier-Bresson
I am often asked by new photographers what it takes to learn photography.
Here is what I think is most important.
I'm going to advise a non-traditional approach to learning
photography. The traditional view to learning is to start out
manual and learn all the settings. But the problem with this
approach is it is highly technical and difficult for many
to grasp. People new to photography can become so frustrated
at the technical details that they never get to real photography.
Or they become adept at making the perfect exposure, but do not
understand light and fail to make photographs with impact or emotion.
The core of photography is lighting, composition and subject.
- Repeat: lighting, composition, and subject.
- Repeat: lighting, composition, and subject.
- Repeat: lighting, composition, and subject.
And you can't fix it in photoshop. If the lighting, composition,
and subject are poor, no photoshop work can fix it.
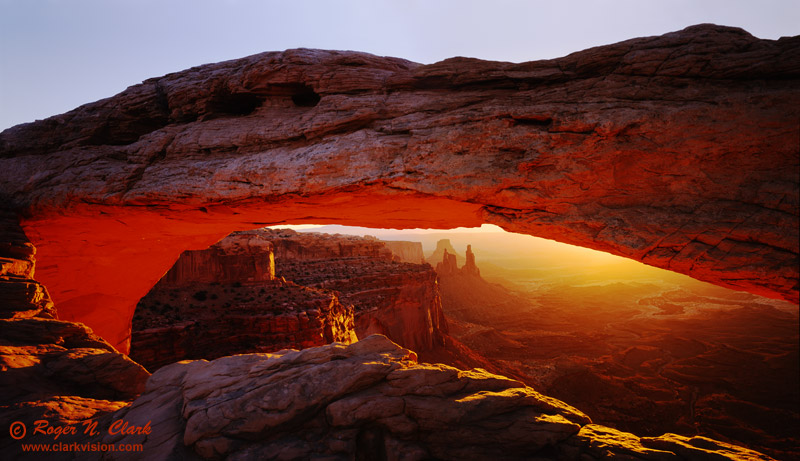
Figure 1. Mesa Arch Sunrise, Canyonlands National Park, Utah.
An example of directional light from the sunrise, reflected
diffuse light illuminating the underside of the arch, and diffuse light
illumunating the shadow areas.
Now, I do not mean one should not learn the technical stuff, like exposure,
ISO and depth of field, but modern cameras, even in program or other
automated modes do a very good job of making good settings in many, but not
all situations. For the beginning photographer, let the modern camera do that
job while you learn the more important details of lighting, composition, and subject.
Once you learn some about lighting, composition, and subject, you can start to
include learning about exposure meters and when they might estimate poorly so you can correct
it and make a better image. You can learn when to boost ISO and about depth-of-field.
It matters not what the f/stop ISO and exposure time are if
you don't have great lighting, good composition, and an interesting subject.
When the three of these come together, the photo has impact (assuming
exposure is good, but most modern cameras automatically make good exposures).
So my advice is to read books and online tutorials on
lighting, composition, and subject. Set your camera to program
or auto everything to start out. Don't get bogged down
in the technical details of f/stops, exposure, depth of
field, ISO. Most modern cameras have sports, portrait,
landscape and other modes. Use them first and learn
lighting, composition, and subject.
After you are getting pretty good with lighting, composition,
and subject, then you can start to learn what those different
modes mean. After learning f/stops, ISO, exposure time,
depth of field and other technical details, you can push to
new heights in your photography, and perhaps making those "WOW!"
photographs.
Once you learn the technical details, there are pretty much
only two modes to use: aperture priority and manual.
I was on a shoot when I wrote the first draft of this
article. I did probably 90% of my
images in manual, 10% in aperture priority.
I do not use shutter priority because it can underexpose
on some cameras, and I can
control shutter speed by ISO and f/stop. (If this is over your
head, it's OK; do not worry about it now; just concentrate on
lighting, composition and subject.)
Some say shoot, shoot, shoot. I disagree. Others give some
good advice: take notes and slow down. While getting out and
making photographs is very important, there is a major difference
between getting out and "shooting" versus getting out and making
every image count.
After reading about lighting, composition, and subject,
go out at different times of day. Start with one subject and
try different things to make a great image. Different
angles to the sun. If you read the right books and follow
and understand lighting, composition, and subject, you will
have a big head start. Now, the key in this study is to
NOT take a lot of pictures. Learn to see: if it is not a
great image in the viewfinder, don't take the picture.
Make every image you take a winner (generally even the
top pros with years of experience can't make every image
a keeper). But the more experience and the more you understand
lighting, composition, and subject, the more keepers you will
have.
If you go out and the lighting, composition, or subject is not
great, don't take a picture. Learning when not to take the
picture is just as important as learning when to take the picture (Figure 2).
Have you gone out with your camera gear and not taken
a picture? This is the hardest thing for the novice to learn.
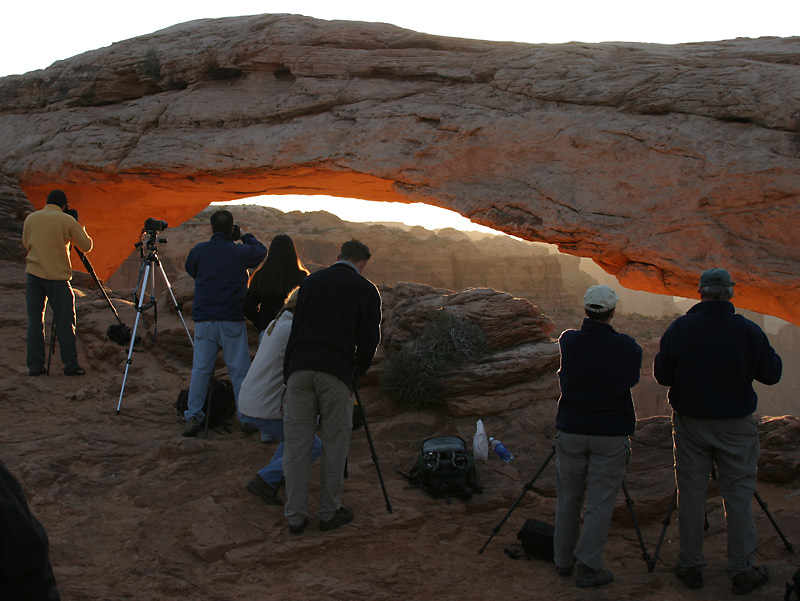
Figure 2. Poor light at a Mesa Arch Sunrise, Canyonlands National Park, Utah.
An example of when the light is poor even though it is sunrise
when the light is often great. Compare with Figures 1 and 3.
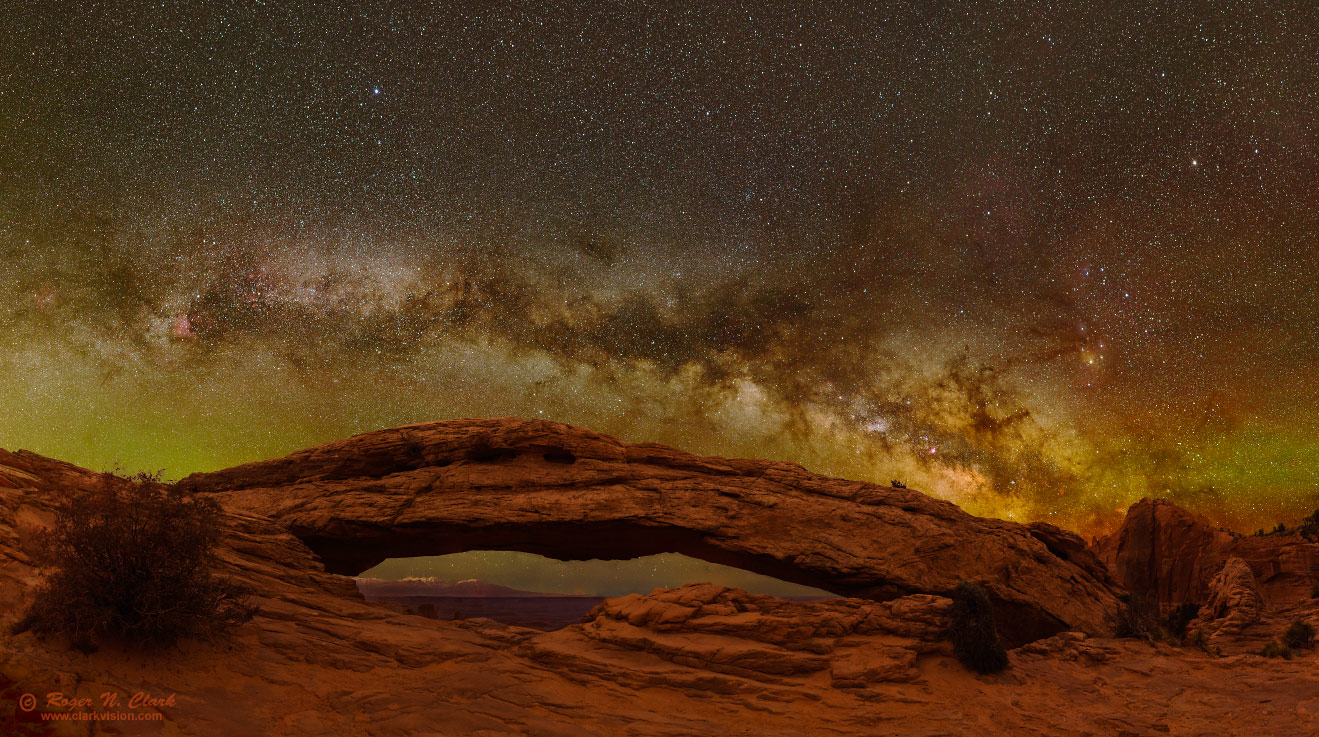
Figure 3. Amazing light at Mesa Arch, Canyonlands National Park, Utah.
The Milky Way rises over Mesa Arch late in the night.
This scene is all natural light: the light of the night sky includes
stars and nebulae shining on the landscape. Other light is red
and green banded airglow, most prevalent near the horizon on
each side of the arch. The red+green airglow imparts a warm
yellowish light on the landscape. No artificial lights
were used to illuminate the arch.
I have surveyed dozens of books in bookstores in addition
to the few dozen photo books I have in my house. It is a rare
book that really treats lighting well. There are books that
discuss studio lighting, but natural light is rarely discussed
for more than a few pages, and often with significant errors.
For example, here is one book: Bill Fortney's Great Photography
Workshop, 2003 where he states "there are two basic kinds of light:
specular and diffuse." Well, there are many other kinds of light.
Specular light is light that is reflected in
predominantly one direction. Diffuse light is reflected over many
directions. There is also absorbed light, transmitted light, emission
line light, polarized light, and continuous spectral emission light,
to name a few. The light incident on a scene or subject may be directional,
as in direct sunlight, or diffuse, as in light from a cloudy sky.
In the following series, I'll describe many concepts that are rarely
known. Some master photographers seem to know these things
but can not describe it, and may never have heard of the technical
terms, like phase angle, but they understand the subtleties
of the phase angle and intuitively use it to make great images.
Hopefully with the information I present, you can use the knowledge
to improve your photography faster.
The Lighting, Composition and Subject Series:
http://clarkvision.com/articles/lighting.part1/
First Published May 5, 2009
Last updated November 1, 2014.