
Exposure and Digital Cameras, Part 1
What is ISO on a digital camera? When is a camera ISOless?
ISO Myths and Digital Cameras
by Roger N. Clark
ISO on a digital camera does not change sensitivity! Digital cameras have only one sensitivity.
It is the lens aperture and exposure time that determines exposure, not ISO.
That means if the downstream camera electronics are good, the camera can be ISOless.
Exposure and Digital Camera Series:
What is ISO on a digital camera?
Reading manufacturer literature, review sites, and online
discussions, one is led to believe that ISO changes sensitivity,
and changes exposure. These ideas are both incorrect.
Myth #1: ISO changes sensitivity. False!
Digital cameras have only one sensitivity, given by the quantum efficiency
of the sensor, and the transmission of the optics and filters over the
sensor. ISO is simply a post-sensor gain applied to the signal
from the sensor.
Myth #2: ISO changes exposure. False!
When you change ISO on a digital camera, two things are changed if the
camera is in one of several auto modes. ISO changes only one thing in
manual mode. In an auto mode, either exposure time, or f/ratio, or both
are changed. F/ratio changes the diameter of the iris diaphragm which
controls how much light gets through the lens. Exposure time limits
the time light is collected by the sensor. It is the lens aperture and
exposure time that determines exposure, not ISO. The second thing that
changes with ISO, whether in manual mode or an auto mode is the range
of light that is digitized.
All images, text and data on this site are copyrighted.
They may not be used except by written permission from Roger N. Clark.
All rights reserved.
If you find the information on this site useful,
please support Clarkvision and make a donation (link below).
A Savings Account Analogy
Say we have a bank savings account and we want to know how much money is
in the account. Say one can count only 100 units. If I choose dollars,
I can count from 1 to 100. If I use 10 dollar bills, I can count by
tens from 10 to 1000. I can count in pennies, but then my range is
only $0.01 to $1. Which level one chooses to count will be dictated
by the amount of money in the bank account if one wants to know the
full amount of money in the account. If we have $623.47 in the account,
we must count by tens, and we would determine we have $620 in the account.
We could count by twenties, and still find we have $620. If we count by
fifties, we would find $600. We can never get a precise amount in the
account, but we can get a close approximation.
Digital Cameras
So too with digitizing light recorded by a digital camera: ISO chooses
a range to digitize. A given lens
delivers so much light per second to a pixel in a given scene, and the
exposure time sets the total amount of light that could be recorded.
We choose the ISO as a signal range in which to digitize the light the
sensor captured (Figure 1). Low ISO is like choosing counting by tens with the
bank account. High ISO is like counting by pennies in the bank account.
Changing ISO is only changing the way we count, not how much light the
sensor actually captured. If we choose too high of an ISO, we can't
count high signals and we say the image is saturated.
Figure 1. The blue represents the maximum signal in a pixel. Higher ISOs
record proportionally less signal. There is no change in sensitivity
with changing ISO. The camera digitally fakes increased sensitivity
by saying the pixel is full (image value 255 on an 8-bit scale) at proportionally
lower levels as ISO is increased. This is a conceptual diagram, in real
pixels the electrons in the physical pixel are stored in a relatively
thin layer, more like a pancake relative to the area of the pixel.
So why not set the ISO low to capture the full signal range?
Electronics in current cameras, especially DSLRs which have
sensors that can capture light over a very large range, are not
capable of digitizing the full range of signals. Further, some
camera electronics add fixed pattern noise into the image and
the human eye-brain finds such noise more objectionable than
random noise.
But you may say when I change ISO in my camera, I record different
amounts of light (in an auto mode). Let's say you are working in
aperture priority mode where you choose the aperture and the camera
meters the scene and choose the exposure. Let's say you are at
f/5.6 and 1/500 second at ISO 100. You change ISO to 200 and the
camera changes the shutter speed to 1/1000 second. Thus, the sensor
now records half the light. So the ISO change instructed the camera
to shorten the exposure time, thus recording less light, and then
instructed the camera electronics to amplify the signal from the
sensor and digitize a smaller range (see ISO 100 and 200 in Figure 1).
That amplification fools photographers that the pixel is full again
(the 0 to 255 scale). So what the camera says is max signal (255 on the
8-bit scale) is actually changing with ISO. If sensitivity changed
with ISO, the number of photons recorded would change and all the
pixels in Figure 1 would be like the ISO 100 pixel: the pixel would be
full.
The amplification process also means that any noise will be amplified
too, and that is why we see more noise at higher ISOs as we shorten
exposure time to fit in the smaller digitization range. But at the same
time, noise from camera electronics decreases relative to the subject
being photographed. So the bottom line is the higher ISO decreases
true exposure for metered scenes, recording less light, and amplified the smaller signal
to compensate but camera electronics noise improves with no simple rule
on which ISO is better. But if we kept exposure time and f-stop fixed
and raised ISO to brighten the image, as one might do in night Milky Way or aurora
photography, noise will decrease as ISO is increased.
Another example: indoor low light photography: fixed f-stop for depth of field,
fixed exposure time to minimize subject movement, then raising ISO
will not increase noise nor change how much light is collected.
More specifics.
There are two main noise sources in any digital camera image: 1) noise
from the light, which is proportional to the amount of light collected,
and 2) noise from camera electronics (Figures 2a, 2b). As you change ISO the relative
contribution of these noise sources change, with the contribution of noise
from camera electronics decreasing as ISO increases. The noise we perceive
is the signal to noise ratio (S/N or SNR). SNR decreases with the square
root of the amount of light collected. As you increase ISO and adjust
exposure shorter to compensate, the amount of light collected decreases,
so SNR form your subject decreases making making more perceived noise,
but camera electronic noise decreases. So where the balance of these
two produces the best image is not simple and depends on the amount
and character of the camera electronics noise on a viewer's overall
perception of noise in the image. For example, random noise is more
pleasing than pattern noise, especially banding (Figure 2a). For cameras displaying
banding, which most larger pixel cameras do from all manufacturers,
the banding is worse at low ISOs. So a better overall image may be had
by increasing ISO to improve shadow noise over brighter parts of the
image where the SNR is already high.
The top digital cameras have an incredible range of light that
can be recorded. For example, the Canon 1D Mark IV can digitize
up to about 55,000 photons at ISO 100, but the sensor read noise
is only 1.7 electrons, making a dynamic range of 55000/1.7, or over
32,000 (15 photographic stops).
A 14-bit analog-to-digital converter (A/D) can only digitize a range
up to 16384 (14 stops) but the noise in the A/D and other electronics
in many DSLRs limits the effective range to less than 4096 or less than 12 stops.
This means we must choose ISO to digitize the range of light we want
to record. To digitize a lot of light we use low ISO (low gain),
and use longer exposure times or larger apertures to gather more light,
but we lose the fine intensity (tonality) details, similar to not being
able to count pennies in our bank account analogy when we had a lot of
money to count, and we risk seeing more pattern noise in shadow areas.
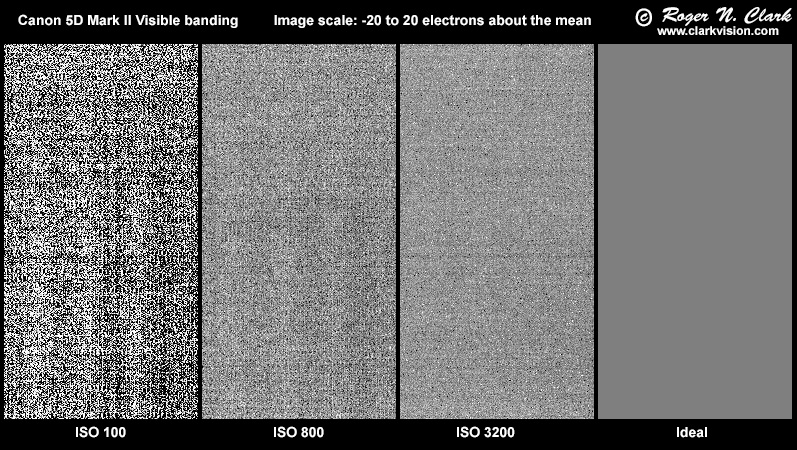
Figure 2a. The camera electronics noise for a Canon 5D Mark II digital camera.
The noise is a combination of sensor read noise and downstream electronics
camera noise. The downstream electronics noise decreases relative to
the sensor read noise and photon noise as ISO increases.
Figure 2b. Dynamic range as a function of ISO for a Canon 5D Mark II.
The gray zone represents where the post sensor electronics is
limiting dynamic range and shadow detail. The white zone starting at
about ISO 1600 is the sensor limited zone. There is no point in
increasing ISO above 1600 to 3200 on the 5D Mark II as dynamic range
is dropping. This sensor limited zone is where cameras are "ISOless" or "ISO invariant."
The cyan dashed line is an ideal model response with no added noise from
downstream electronics. The faint banding in the gray zone represents
possible banding in images, and the level in the diagram is 1/5 the
intensity of the solid gray, showing that low level banding can be
annoying in images. On my 5D Mark II, I need to raise ISO to 3200 so
that sensor read noise swamps the banding.
Figures 2a and 2b show noise and response of dynamic range versus ISO.
(Newer cameras are better, but still show the same basic characteristics.) At low
ISOs, the dynamic range is limited by downstream electronics from the sensor.
At a sufficiently high ISO, the read noise from the sensor
dominates over noise in the downstream electronics.
In the gray zone, noise from the electronics, including
fixed pattern noise (banding), may dominate the details in shadows or other
low signal areas of an image.
In the sensor limited zone, downstream electronics, and banding noise
(if any) will not be apparent, as sensor read noise will dominate the
noise in the shadows or dark areas of an image (for short exposures;
in long exposures, many seconds, another noise source comes into play: heat
causing noise from dark current).
The point at which sensor read noise dominates over downstream electronics
noise varies with the camera. Fixed pattern noise, if present, will also
affect the sensor limited ISO. For example, in Figure 2, we see the
sensor limited area intersects the ideal model line at ISO 1600. However,
some low level banding still appears in many 5D mark II images (at least
for my camera), thus ISO 3200 is needed to boost the sensor read noise
higher to mask most of the fixed pattern noise in the 5D Mark II. So each
camera needs to be evaluated for its best high ISO. Most review sites do
not characterize pattern noise because it is difficult to make a metric
that describes the impact on perceived image quality. Circa 2019: many new cameras
have such low read noise that fixed pattern noise and in-camera raw data filtering
sometimes impacts image quality more than read noise.
ISOless Camera (ISOless sensor zone) (ISO invariant)
At ISOs above the high ISO value where the images become sensor
read noise limited (the white zone in Figure 2), is the region where
cameras are "ISOless." In this region, increasing ISO has little to no benefit to
image quality. Remember, increasing ISO does not capture more light,
but in the sensor limited high ISO zone, one compromises dynamic range
as ISO is increased. Loss of dynamic range can reduce star colors
in night sky photography, or similarly in city photography at night.
Night photography of stars and cities are some of the highest dynamic
range situations one encounters in photography.
All cameras from all manufacturers become "ISOless" above a certain
ISO. That point varies from camera to camera.
The sensor limited (ISOless) zone in Figure 2 has an interesting property.
There is no benefit to increasing ISO from the low ISO side of the zone.
One can choose exposure time and adjust the image in post processing.
Effectively, this could be called digital ISO: one chooses how to
scale the image intensity in post processing. As camera electronics
become better, we will no longer need an ISO setting on the camera, as
we can effectively choose it later (in 2020, we are still not there).
"ISOless" does not mean there will not be any improvement by increasing
ISO to detect a very faint signal. For example, a very faint light source
that happens quickly like the flash from a
lightning sprite. If your camera is "ISOless" at ISO 800 with
read noise of 1.6 electrons, but at ISO 3200 it has 1.2 electron read noise,
that small improvement in noise could produce a better image at ISO 3200
as long as the signal is not saturated at the higher ISO. Check your camera's
noise versus ISO a:
Photons to Photos Input Referred Read Noise Charts.
Note the Photons to Photos read noise does not include pattern noise.
Expose to the Right (ETTR)
To maximize signal-to-noise ratio, one should use the lowest ISO (that
does not have detrimental banding noise) and shutter speed to collect as
much light as possible, filling the pixels as much as one can. Again,
ISO does not change how much light one records, only the range that
is digitized. Popular on the web is the idea that one should always
expose to the right, meaning watch the histogram on the camera and set
the exposure to have some pixels with enough signal that it shows on
the histogram at the right edge, but without clipping signals one does
not want clipped (e.g. the white feathers on a black and white bird).
The region where this is important is in the camera electronics limited
region in Figure 2. The reason for this is not only lower apparent
noise in highlights and mid-tones, but getting as much of the low end
out of the noise from the camera electronics. If one does not expose
to the right in the camera electronics limited region (low ISOs), and
if one underexposes an image. trying to fix it in post processing will
likely show too much of the electronics noise.
However, ETTR is irrelevant in the sensor limited high ISO region
in Figure 2. In that high ISO region, one is "light limited" and
ETTR is irrelevant. If you need to record a faint signal, once
at ISO 1600 to 3200 (as above, but different on each camera),
forget the expose to the right idea. Simply set your shutter speed
and f/ratio and expose the image, then adjust to the desired level
later in post processing. if your camera has auto ISO, one could
set shutter speed and f/ratio and set an upper limit to auto ISO of
just in the sensor limited region (e.g. ISO 3200 in the Figure 2, 5D Mark II camera),
and when the upper limit is reached, fix the image intensity in post
processing with no quality loss (assuming 16-bits/channel processing or better).
So too with night and star photography. There is no need to expose to
the right in the sensor limited high ISO region. Simply set your
exposure time, f/ratio, and the ISO at the optimum for sensor
noise limited region with maximum dynamic range. Adjust scene
intensity in post processing.
Camera Dependent ISO Definitions
To add further complications, camera manufacturers define ISO
differently for each camera. It is a relative level of light
compared to the maximum signal a pixel is capable of recording.
Smaller pixels generally have lower holding capacities, and it goes
roughly by the area of the pixel. So a pixel with half the area,
will generally have a maximum holding level half that of the larger
pixel. An analogy is two buckets of different sizes: the larger
bucket can hold more water. But the larger bucket only holds the
water poured into it. With cameras, the lens is "pouring" the light
onto the sensor. The lens and exposure time determines true exposure,
not the size of a pixel nor ISO.
Let's examine some real capacities. The data are from my
digital sensor performance web pages at:
http://www.clarkvision.com/articles/index.html#part_4
                  Table 1

        Canon       Canon       Canon
         7D        1D Mark IV  5D Mark II
       4.3-micron  5.7-micron  6.4-micron
       pixels      pixels      pixels

       Maximum     Maximum     Maximum
 ISO    signal      signal      signal
      (electrons) (electrons) (electrons)

   50                           65700
  100   24800       55600       59400
  200   16300       27800       29700
  400    8150       13900       14800
  800    4080        6900        7425
 1600    2040        3400        3710
 3200    1020        1700        1860
 6400     510         860         930
12800                 430         460
25600                 215         230
51200                 108
10240                  54
So let's say you have lenses that on each of the above 3 cameras
that deliver the same photons per second to a pixel. Then if we
set the exposure time the same on all three, each camera gets
the same true exposure. Let's say that the lenses and exposure
time deliver 30,000 photons to the sensor and each sensor captures
40% of the light, so each sensor gets 12000 photons.
The ISO needed to record that range (0 to 12,000 photons) is:
7D: ISO 200,
1DIV: ISO 400, and
5DII: ISO 400.
Note that even though the ISO is set differently on the 7D,
it is still digitizing very close to the same signal range of light,
and regardless of the ISO setting, the true exposure is the same.
In Table 1, Canon could have set the gains in the electronics
such that all 3 cameras recorded the same signal range at the same ISO.
That would mean, however, that the 7D would not have an ISO 100,
because the pixels are not large enough to hold more than about
25,000 electrons. It would mean, however, that when people compared
results from the cameras, and used the same ISO, they would be comparing
the same true exposure. However, since the gains are not equal,
most comparisons one sees on the internet use the same ISO,
which biases against the 7D as it gets less true exposure and comes
out noisy, but such conclusions are in error and a result of
unequal exposure.
Example of How ISO Does Not Change Sensitivity
If ISO changes sensitivity, more photons would be collected as ISO is
increased. Because the signal-to-noise ratio we see in digital camera
images is the square root of the total light collected, we should be able
to measure the effect of changing ISO through exposures at different
ISOs and directly measure any sensitivity change. Figure 3 shows such
a test using a portion of a low light night image of a mountain scene.
Light is only that from the night sky. The measured signal-to-noise
ratios are the same in both the ISO 1600 and ISO 6400 images, proving
no change in sensitivity.
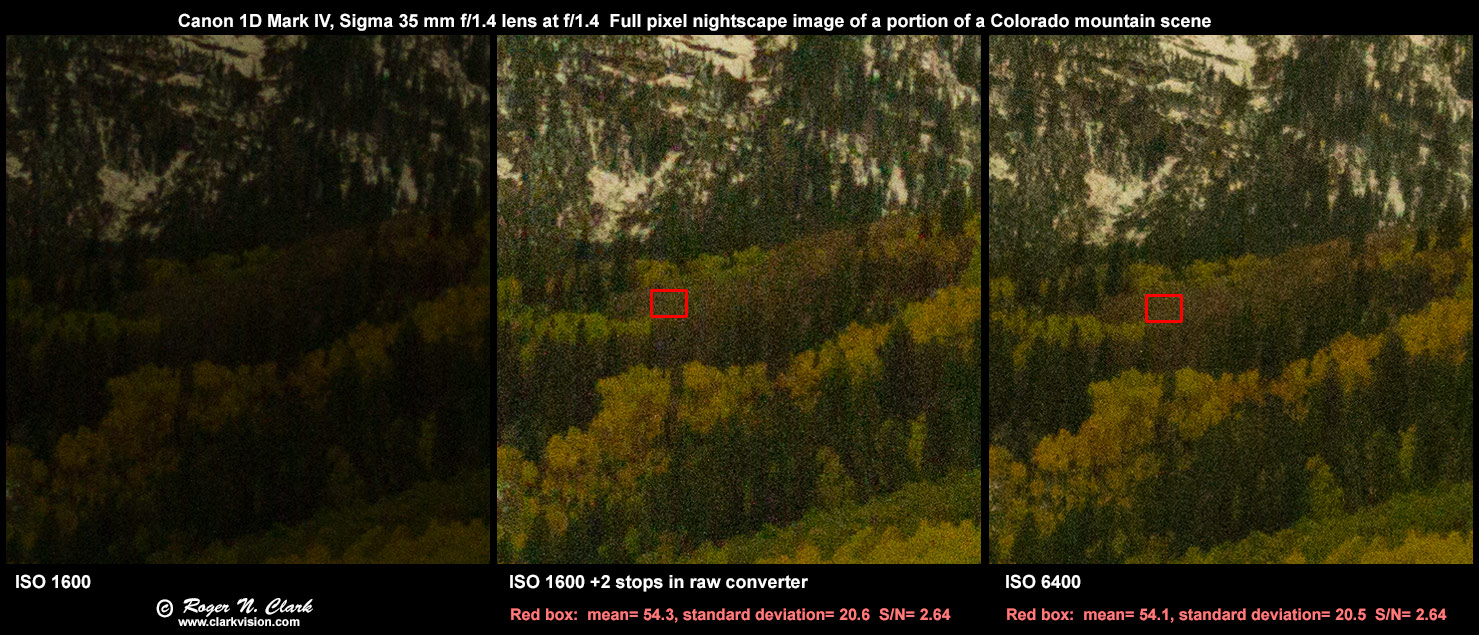
Figure 3.
Comparison of an ISO 1600 image (left panel), the same ISO 1600 image
boosted by 2 stops in the raw converter (middle panel), and an ISO
6400 image (right panel) made within a minute of the ISO 1600 image
are compared. The red square shows where statistics were measured.
The two ISO images have the same signal-to-noise ratio indicating no
change in sensitivity as ISO is changed. Visually, the noise in the right two
panels appear to be very close, another indication of no change in sensitivity.
Discussion and Conclusions
ISO is a relative gain, varying by camera and has nothing to do with
sensitivity of the sensor or true exposure: how much light the camera
collects. ISO is simply a post sensor gain and digitization range.
Higher ISOs digitize smaller signals and reduce the effects of noise
from downstream camera electronics after the sensor, but with a possible
side effect of reducing dynamic range.
High ISO applications are light limited applications: one is choosing
to record less light because of a time limitation. For example, one
needs high depth of field, and working at f/16 rather than f/4 with a
given lens delivers less light. The exposure time must be kept short
enough so that subject movement does not blur the image. Once ISO is
boosted into the sensor limited zone (the ISOless zone), there is no
need to increase ISO beyond the beginning of the white zone in Figure
2, the so-called "ISOless" zone. Going higher than that point reduces
dynamic range. A good strategy is often to work in manual mode and set
the desired shutter speed and f/ratio and adjust image brightness in
post processing.
High ISO night star photography is an example case where one is light
limited and exposure time must be kept short if one does not want stars
to trail from a fixed tripod-mounted camera. Increasing ISO beyond the beginning of the sensor limited
zone reduces dynamic range and destroys star colors. I see many recommendations
on the web to use the highest ISO one can use, and the images made with those
recommendations lack nice colors in the stars. Again, set the ISO at the
lowest end of the sensor limited zone. expose for the desired time, and adjust
brightness in post processing. In post processing, never adjust brightness
with exposure in the raw converter, nor with the levels tool in an image editor
as both these increase the brightness and clip the high end, again destroying
color, the same as increasing ISO too much. I only use the curves
tool to change image brightness of the mid and low end and keep the high
end pinned so stars do not get clipped. For star photography, the typical maximum
ISO I use on a Canon 6D, 6D2, 7D, 7D Mark II, and 1D Mark IV is ISO 1600.
On a 5D Mark II, I use ISO 3200 because banding problems show as illustrated in Figure 2.
For night sky photography, see:
Nightscape Photography In The Field Setup
and for post processing, see:
Nightscape and
Astrophotography Image Processing Basic Work Flow.
Expose to the Right (ETTR) is only relevant in the camera noise limited
region. Above that region, in higher ISOs (in the ISOless region),
one can underexpose and correct the image in post processing with no
loss of quality (assuming one is working with at least 16-bits/channel
images in the image editor). Note: in night sky photography, one is
almost always beyond ETTR because even at short exposures some stars
are getting clipped, losing their color.
However, there are uses for working at higher ISOs and losing a little
dynamic range. For example, you may be following some action and you
want to verify that your images are sharp and not blurred by slow shutter
speed. Then you need to have the image bright enough to evaluate them
on the camera. In such a situation, I would do at least some images at
the higher ISO to confirm I had the right settings, then if I needed
more dynamic range back off on the ISO (again with manual settings so
I keep the shutter speed constant).
There are also situations where detecting a very weak light source is
more important than clipping some highlights. Even in the so-called
ISOless zone, there may be small improvements in low level noise that
you may want to exploit to improve that detection. For example, on a
Canon 7D Mark II the noise floor at ISO 1600 is 2.4 electrons and at
ISO 3200 it is 1.9 electrons. If about a 20% improvement to your image
in the lowest level noise is more important than a half-stop loss in dynamic
range then by all means use the higher ISO.
Read noise at high ISOs is not always the noise floor. In night sky
photography, the noise floor is noise from light pollution, airglow,
and sensor dark current. In such cases, light pollution, airglow,
and sensor dark current limit dynamic range, not what we read as the
dynamic range on web review sites. In any long exposure (few tens of seconds),
noise from dark current is often the noise floor in any image, not just night sky photos,
unless it is very cold (e.g. night city photography, or indoors long exposures, or
daytime long exposures with neutral density filters).
For example, the image in Figure 4 was made at ISO 3200, one stop above
the ISO 1600 I usually use for the "ISOless" region of the camera.
I normally do 60 second exposures at ISO 1600 for astrophotography.
It was a windy night and I was concerned about camera shake so I elected
to use ISO 3200 and 30 second exposures in case I had to throw out some
exposures and double the number of exposures I made. By halving the
exposure, I increased the chances of getting an image without wind shake
with minimal impact to the noise in the final image and did not clip any
more star colors than I would have at ISO 1600 and 60-second exposures.
Noise from dark current, light pollution, airglow, or anything in
the scene will be the same when the total exposure time is the same,
regardless of ISO settings and individual exposure length. The only
disadvantage I had was a lot more data to process with double the images
to add together.
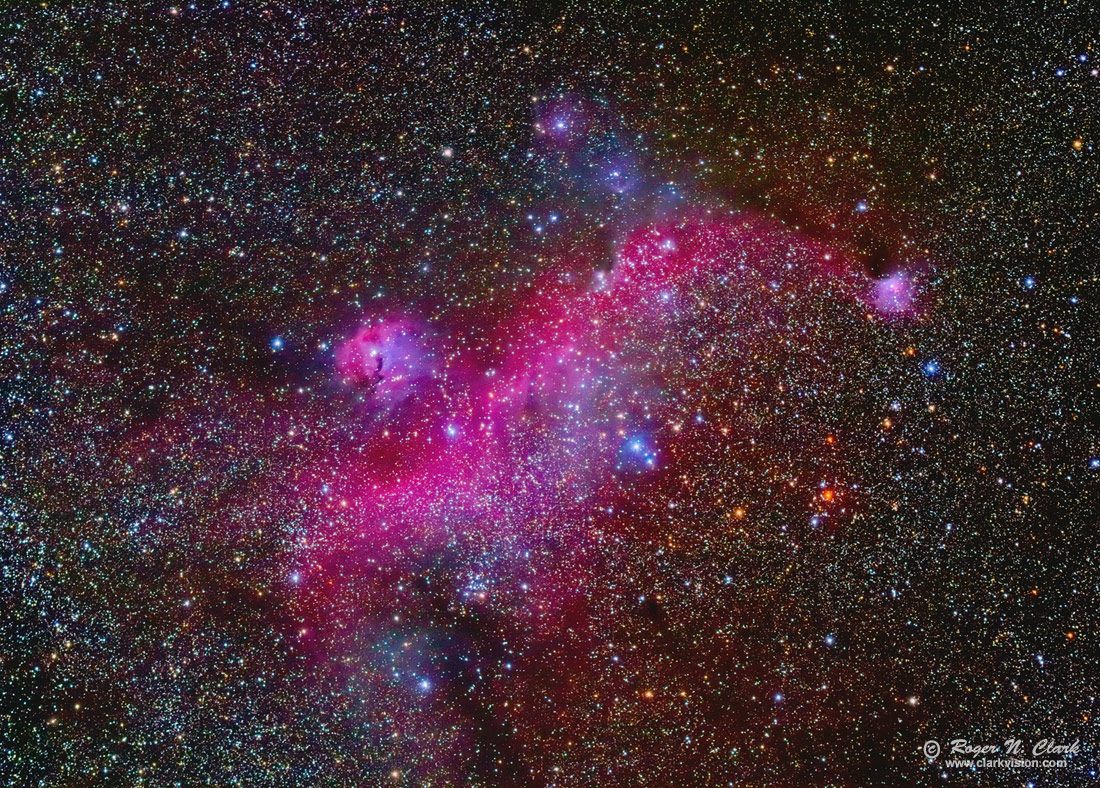
Figure 4. The Seagull nebula. The image was made with a stock Canon 7D Mark II and a 300 mm
f/2.8 lens, ISO 3200, and 124 thirty-second exposures were averaged, for a total exposure time
of 62 minutes.
Note the many and varied star colors.
Larger gallery image with more details is here.
Future Prediction
Future cameras will have 16-bit A/D converters thus reducing the
need for ISO gain. Actually 18-bit A/D converters are needed for the
top cameras, but we are not likely to see that anytime soon.
With 16-bit A/Ds, we'll only need broad categories of ISO,
like low, medium and high, and choose precise gain (ISO)
with raw conversion.
In labs as of 2018 are sensors with read noise less than 1/3 electron. When such sensors
make it into digital cameras, even higher bit depths than 18 will be needed to digitize
the full signal range.
If you find the information on this site useful,
please support Clarkvision and make a donation (link below).
Further Reading
Start with the Exposure and Digital Camera series:
Exposure, Light Meters, and Digital Cameras
Exposure and Digital Camera Series:
http://www.clarkvision.com/articles/iso
First Published July 4, 2012
Last updated January 21, 2020.