
Lighting, Composition and Subject
Learning to See
(and When Not to Take the Picture)
by Roger N. Clark
Recognizing the quality and direction of light, how the light interacts with the subject, the interaction of
the elements in the foreground and background and how these elements in the scene draws the viewer in are all
part of Learning to See. A critical evaluation of the scene in the viewfinder enables one to recognize
distracting elements, move to a better position and make a batter image.
The Lighting, Composition and Subject Series:
Contents
Introduction
Learn Lighting, Composition and Subject, and When Not to Take the Picture
Angle of Light Example.
Great Blue Heron Example.
Landscape Best Light Example.
The When Not to Take the Image Exercise
Discussion and Conclusions
All images, text and data on this site are copyrighted.
They may not be used except by written permission from Roger N. Clark.
All rights reserved.
Introduction
With an understanding of light, composition, and subject, the next step as a photographer
is to put this knowledge to work to make better images. Some people say go out and "shoot! shoot! shoot!"
While it is good to practice, simply going out and and taking thousands of images, returning home
and looking at them on the computer only to realize they are not what you hoped for is,
in my opinion, not the best way to learn.
Practice without understanding and applying light, composition, and subject knowledge
means it will take a long time to learn. In my opinion, it is better the edit in the
viewfinder than edit at home on the computer. Why take thousands of images, only to delete them
when they suck? It is better to
Learn When Not to Take the Picture
using critical examinations of all the elements in the viewfinder to understand
when you have the best composition with the best light on the subject, then you
Know When to Take the Picture. If you are simply too busy snapping the shutter,
you'll likely miss the best image.
Once you learn these principles, you can lift your images to a new level. Then when fast action
happens, you will understand when to take the best image, rather than holding down the shutter
button and spraying and praying.
Learn Lighting, Composition and Subject, and When Not to Take the Picture
When on scene, Study the light, study the subject, and find the
best composition. Learn to edit in the viewfinder before pressing
the shutter button. Examine the image in the viewfinder. Take your
time, especially while learning. Examine the viewfinder for distracting
things in the scene. Is the light right? Would the light be better
if you moved to a different position? Are there distracting elements
in the background or foreground? Is the angle of light good for the
subject? How is the composition? What could you do to make it better?
If all these elements are not great, don't take the picture. Move
to a different position to improve the image. Make every image count.
Learning to critically evaluate what is in the viewfinder before pressing
the shutter button will improve your photography faster than "spraying and
praying" and returning home with thousands of images that you then try to
figure out what was good and bad. The time to decide if the image is good
is before you press the shutter. This is Learning to See.
Let's look at some examples.
NOTE: many of examples below are from out-of-camera jpegs with no contrast
or enhancements made. I did this purposely to show that one does not
necessarily need to post process to make great images. One should be able to
recognize great light BEFORE pressing the shutter button.
Angle of Light Example.
I went to a location for some bird photography. When first arriving, an
anhinga flew by (Figure 1, top). The phase angle (see lighting parts
3 and 4 above) was bad. I took the documentary photo in Figure 1 top.
I would normally Not Take that Picture. I quickly moved to a
position with a better light angle. Within a few minutes, another anhinga
flew in, and I obtained the image in Figure 1, bottom. By understanding
the angle of light and image impact, I knew where I needed to position
myself for the best light on the subject.
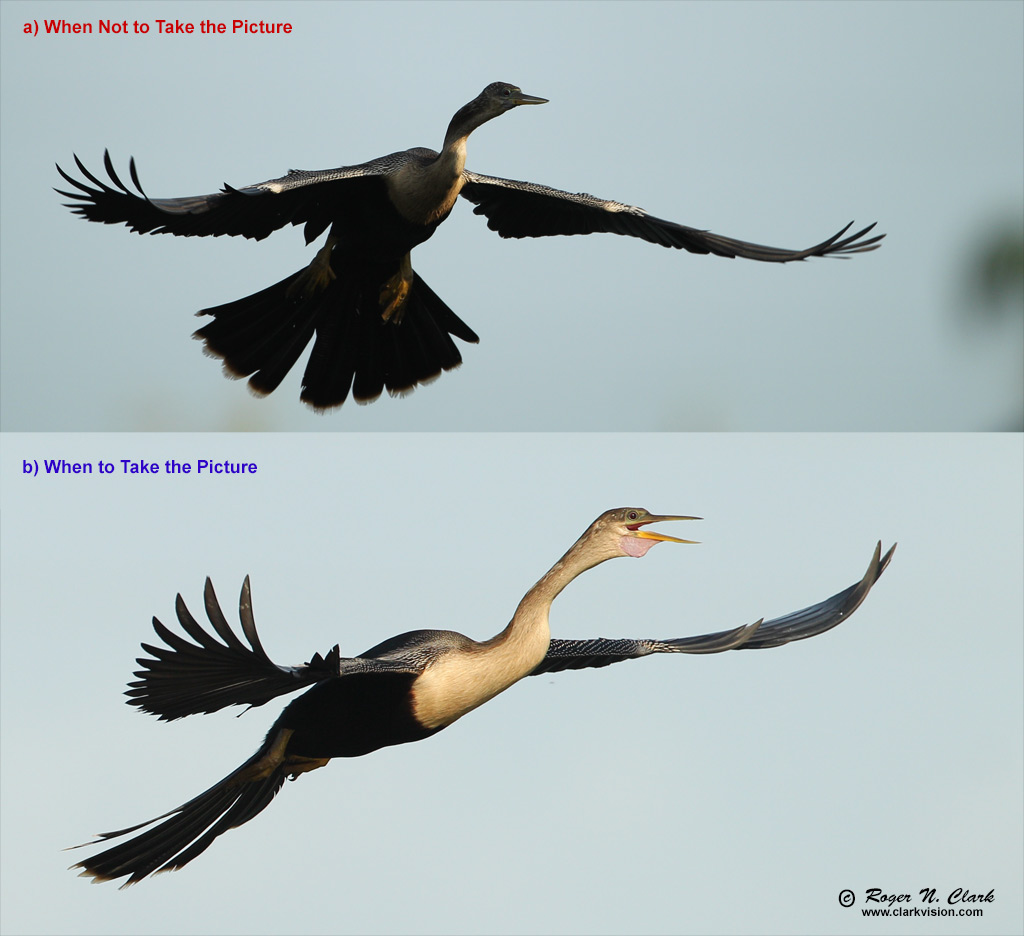
Figure 1. Anhingas in flight. A) Poor light. B) Good light.
These images are from out of camera jpegs
with no post processing except a crop. The raw data shows feather detail
in the black feathers on the bottom image but not the top image
due to the higher contrast from the high phase angle of the top image.
The sun was over my left shoulder in the bottom image, with a phase angle of
about 15 degrees. That phase angle results in shading on the underside of the
neck and body, giving form to the subject.
Made with a 300 mm lens
Great Blue Heron Example.
As a great blue heron flew in, I started
tracking the bird. Figures 2a and 2b show two images made one-half second apart.
I normally would Not Take the Image in Figure 2a (left; but did
for this documentation) because the background is very distracting.
By knowing the scene and the direction the bird was flying, I knew the
bird was headed to a location with a better background.
A half second later, the
bird was closer so the separation between the bird and background was
greater, and the background was a grass field, making for a more uniform
background (Figure 2b, right). That is When to Take the Picture.
Now of course we could get into more subtle aspects with the great
blue heron. The wings are down in Figure 2b. In my opinion it would
make for a stronger image if the wings were up like in Figure 2a.
But the bird is tilted counter-clockwise in Figure 2a, so the underside
of the bird's right wing is in shadow. A better image would be the
background of Figure 2b with the wing position up like 2a, but the
orientation as in 2b. Then the underside of the wings would be illuminated.
So, as I already have many images of great blue herons, I would pass
on this image, waiting for another opportunity. The image in Figure 2b
is simply OK but not that great. of course, if this was my first time
photographing great blue herons, I would certainly take the photo,
but with other opportunities, the image in Figure 2b would not
get displayed or printed as a great image.
So I waited for another bird to fly in with better position and light, as in Figure 2c.
Here, the angle of light is great, the wing position superb,
the body and head angle excellent, and the background beautiful
with no distracting elements. This is When to Take the Picture.
The sun is over my left shoulder at an angle of about 20 degrees.
This angle gives shading and form on the bird's body, and the micro-shading
in the birds feathers give texture. See
Lighting Part 4: The Angle of Light: Phase Angle,
Advanced for more details.
It is very important to realize that the all the images in Figures 1a, 1b, 2a, 2b, and 2c
are out of camera jpegs with no boost in contrast or color balance!
(I usually record raw + jpeg.) The reason why this is important is that
you can see the quality of the light on the scene, in the view finder before pressing the shutter, and
on the camera LCD after taking the picture. You DO NOT NEED POST PROCESSING to see the light and the
quality of the image. Understanding the quality of the light,
the foreground and background at the scene enables you to identify
and make better images and Not Take the Image when the conditions
do not come together. Realizing when things are not right frees you
to look for a better scene in better light without distracting elements.
If you are focused on bad light/composition/subject you will probably
miss the great photo. If you are focused on obtaining many images for
later evaluation, you will probably miss the great photo.
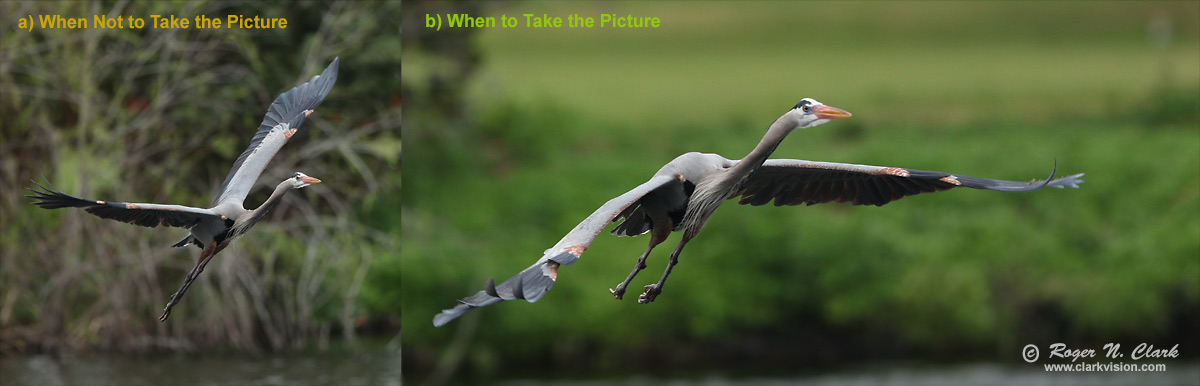
Figure 2a, b. Great blue herons in flight. a) Good wing position but
distracting background. b) Better background, OK light on the bird, so this is the
best image for this bird coming in for a landing. Image b was 1/2 second
after image a. The bird then moved in front of more distracting elements.
From out-of-camera jpegs with no post processing except a crop.
Made with a 300 mm lens
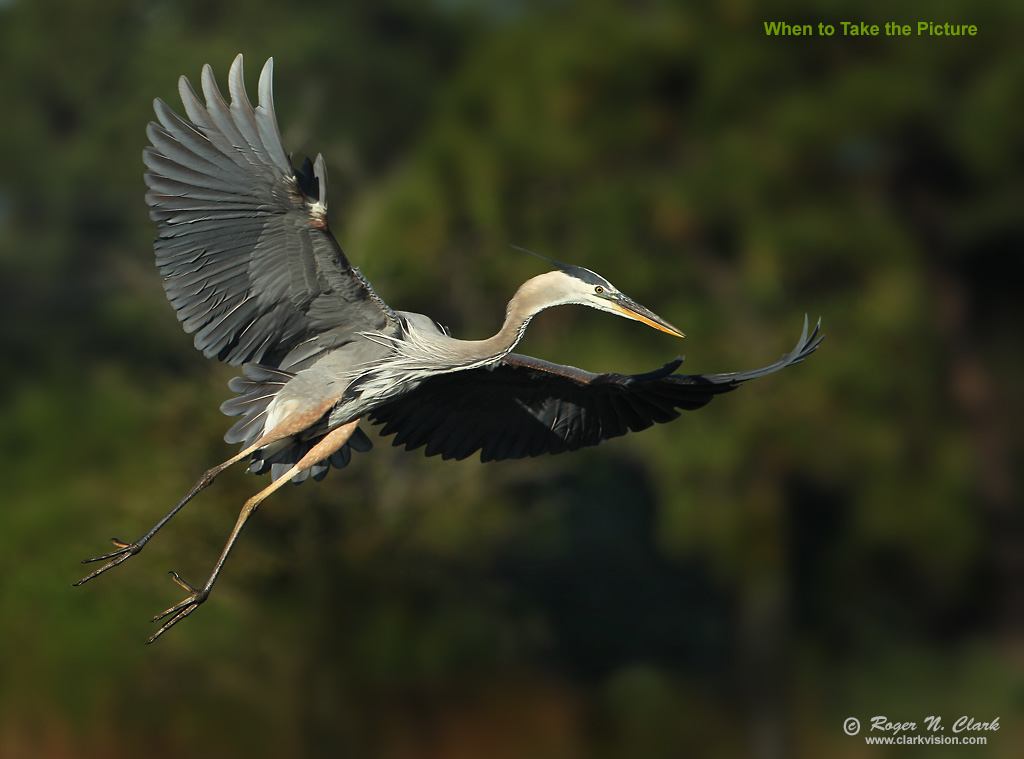
Figure 2c. Great blue heron in flight with great light, great wing position
and good background.
From out-of-camera jpeg with no post processing except a crop.
Made with a 300 mm lens.
Landscape Best Light Example.
The rainbow at sunset image in Figure 3a was made in the 1990s on 35
mm film. It has placed best in show in a national photo contest. I
have returned to this location many times for sunsets and I have never
seen such a scene with a rainbow at sunset. I have many other
spectacular sunsets, but none with a rainbow like this one.
So what do you do when you arrive at a scene like that in Figure 3b.
It is boring with no clouds. If this was my first visit, I would certainly
take a documentary image, but it would never be an image I would use
to show a great sunset, nor would I print it.
But a cloudless clear sky at sunset means there are other spectacular
light opportunities, like that shown in Figure 3c. Simply wait
a couple of hours after sunset at the same location as in Figures 3a, 3b,
and make a nightscape image (Figure 3c). A clear blue sky at sunset
usually turns into amazing stars at night.
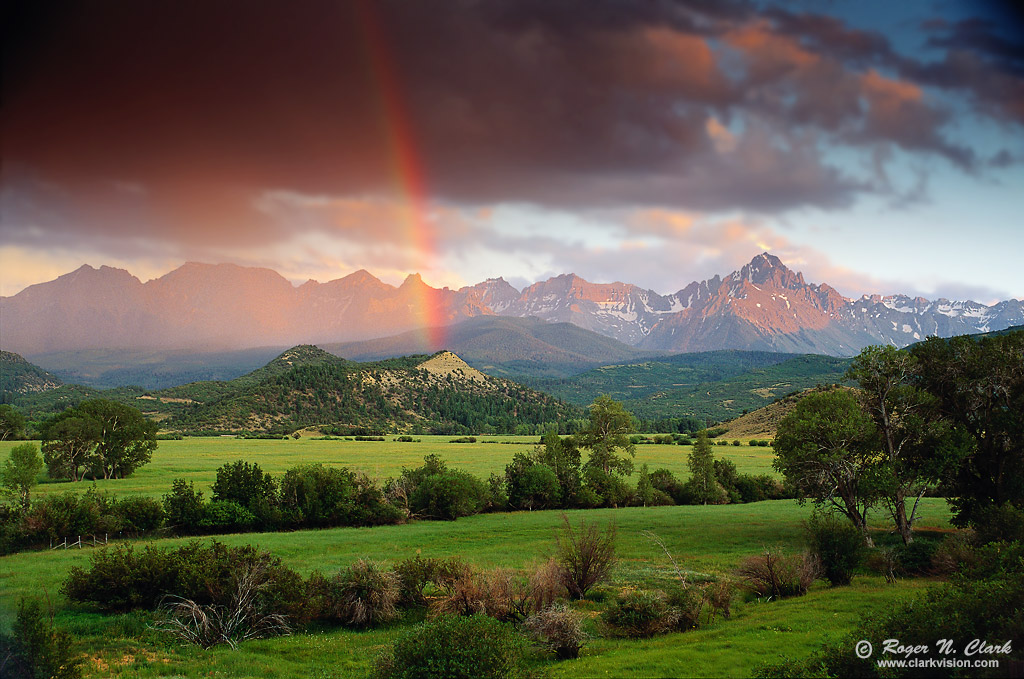
Figure 3a. Spectacular rainbow at sunset landscape.
This is When to Take the Picture.
This is a scan from 35 mm Fujichrome Velvia slide film
(which has about a 5-stop dynamic range) with
no post processing.
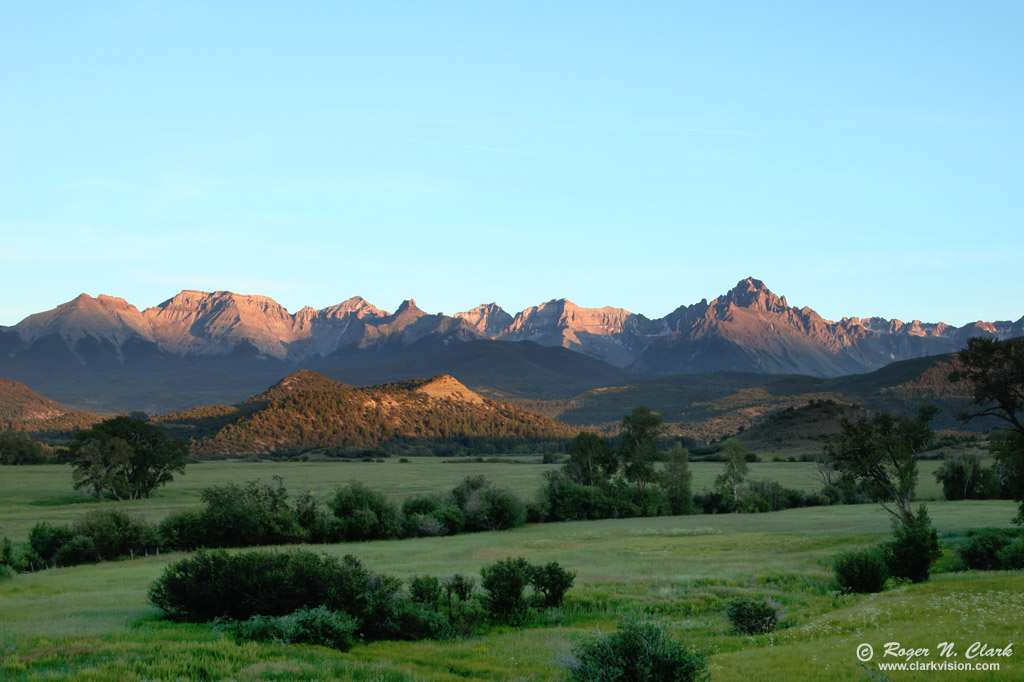
Figure 3b. Boring light sunset.
This is When Not to Take the Picture.
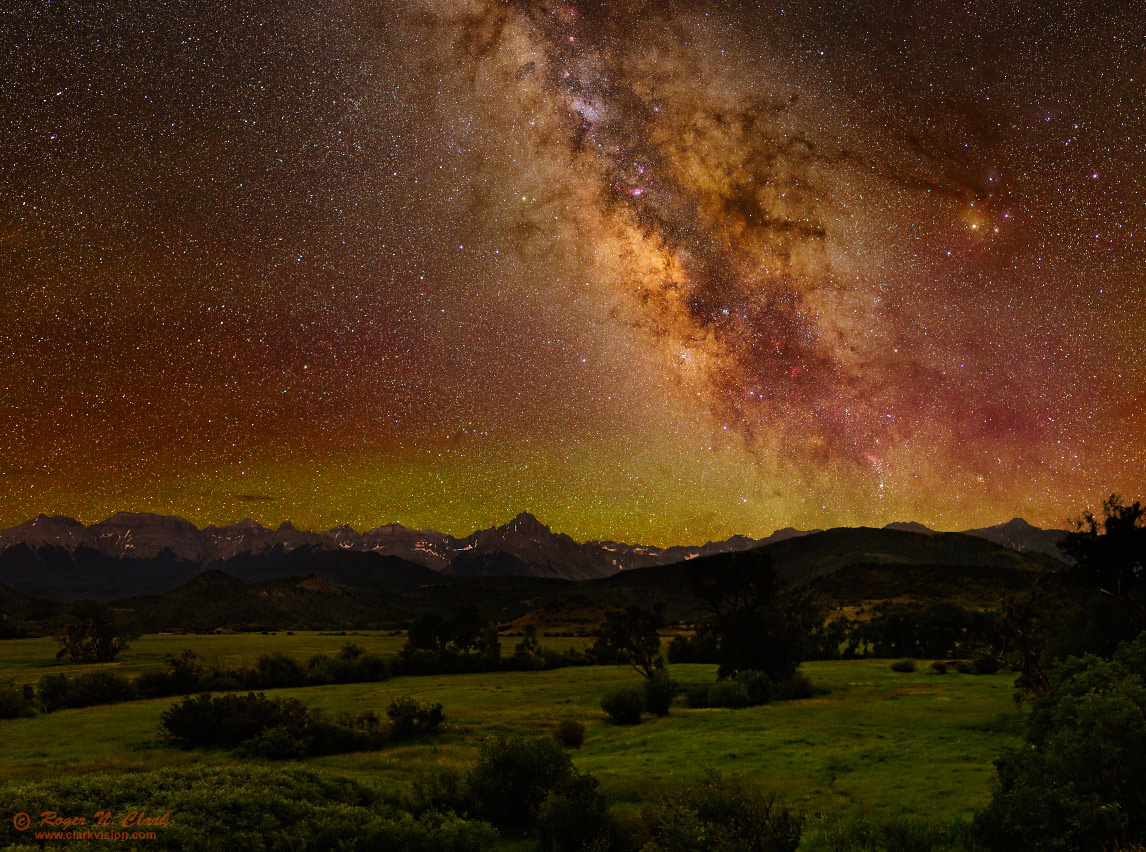
Figure 3c. San Juan mountain nightscape. This image was made from the
same location as the images in Figures 3a, 3b. The light is all natural light
(the Milky Way and the night sky are not blue--the night sky is filled with
amazing colors from airglow and the Milky Way).
More information is on my
gallery page here.
Nightscape and astrophotography is one area of photography where post
processing does matter.
The When Not to Take the Image Exercise
I teach go out and learn when NOT to take the picture. Study the light,
study the subject, and find the best composition.
If you haven't found the best light, composition and subject, keep looking,
and do not take the picture if the elements do not come together.
Keep working to find the best. Spend time studying the scene,
not taking pictures in bad light with distracting elements
that destroy the story.
As an exercise to pull all these concepts together, try the following.
Go out for a photo session and limit your images for that
session to 12 (or pick another small number). Work to make every image
the best you can do. Study the light, perspective, foreground and
background before looking through the camera. Find the best
light/composition/subject. Then use the camera, choose the focal length
and frame the camera to best show what you see visually without the camera.
The camera has a narrower field of view (unless you are using a fish-eye lens),
so use that smaller field of view to lead the viewer to the subject.
Then make the best image. Strive to return home with 12 great images.
Look for and avoid distracting elements, like a branch coming out
of someones (or an animal's) head. Does the background have bright
distracting highlights, or is there distracting branches in front of the
subject? Is the angle of light the best, or if you move to the left or
right would it be better, and avoid the distracting elements? If so, then
this is a time to recognize that in the viewfinder and NOT take the image
before pressing the shutter. Move to a different position where the light,
composition and subject is better. The more one practices this critical
assessment at the viewfinder, images will improve. If you don't do this
in-viewfinder assessment, you'll likely return home, download the images,
and realize you blew it and then try things like remove tree branches
sticking out of someone's head in post processing, taking a lot of time
that could have been corrected on scene in just a few seconds.
- If the light is not right, don't take the picture.
- Would the light be better if you moved to a different position?
- If there are distracting elements, don't take the picture.
- Does the background have bright distracting highlights?
- Are there distracting branches in front of the subject?
- Is the composition ideal for the story you are trying to tell?
- What is the story you are trying to tell?
This exercise teaches critical assessment and understanding of what
makes a great photo. You should not have to take a picture to know if
it will be a great image. Conversely, if you know the light is not good,
not what you are looking for, why take an image that you will just delete
later because it is a bad image? If you knew that the image was not good in the viewfinder, you
might have seen something better once you understood light, composition
and subject. Maybe go to a different location, or return at a different
time when the light is better. Again it teaches critical assessment
and thinking.
Learning to edit in the viewfinder and critically evaluating the image
before pressing the shutter will teach far more than spray and pray
shoot shoot shoot, only later to find those thousands of images are poor.
Try this exercise more than once.
It is OK to return home with fewer than 12 images in this exercise.
Don't force 12 images. Only take the picture when the scene is great.
Once you take the time to critically examine the image in the viewfinder
before pressing the shutter, you will get faster and see more things. This
will teach you to SEE, not spray and pray.
Yes, I have done this exercise, many times for many years. I used to do
a lot of 4x5 view camera landscape photography. I would head out for
a day with 6 film holders and one film holder has two sheets of film.
So I had 12 frames for the day, including any bracketing I wanted to do.
Sometimes I would do 2-frame mosaics, so I only had 6 images for the day
(example: Figure 4). Every image needed to count.
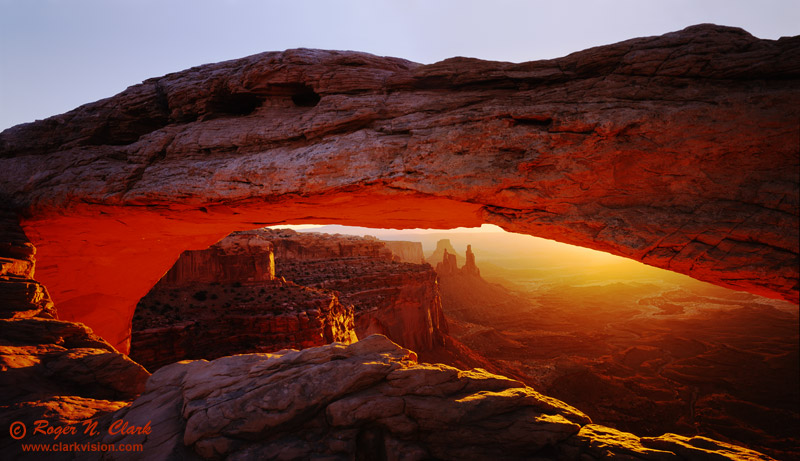
Figure 4. Mesa Arch Sunrise, Canyonlands National Park, Utah.
This is a 2-frame large format film (4x5) mosaic. With 12 sheets of film per
day, doing 2-frame mosaics meant that I could make only 6 images per day.
This is a scan from two 4x5 sheets of Fujichrome Velvia slide film
(which has about a 5-stop dynamic range) with
no post processing except for scanning the film and mosaicking the two scenes
together.
Discussion and Conclusions
Key to photography and producing great images is finding and recognizing
great light, coupled with interesting subjects and strong compositions.
The angle and quality of the light is the most important. A boring
subject can make an astounding image in great light. An amazing subject
can result in a boring picture in poor light. It is important to be
able to see this before taking the picture. You do not need to see
this only after you take the picture or only after post processing.
Learn to see this in the field before pressing the shutter, not after
"spray and pray" and evaluation later on a computer screen.
Note that internet discussions in photography forums commonly focus on
gear, pixels, noise, dynamic range, and post processing. The discussion
is often something like if you don't have 14-stops of dynamic range your
camera is not good and you need to switch brands or get a different model
if you want to take good pictures. Or, to get to the next level and
grow as a photographer, you need to learn post processing. Or, your post
processing is weak, improve your post processing to improve your images.
Well, how did anyone ever take a good, let alone a great images with slide film
which has low dynamic range, grain and when there was no post processing? Wow!
Note, I have said little about gear. Sometimes gear matters, sometimes not.
But mostly not in the way many internet discussion go.
For more information on when gear matters, see:
Does Gear Matter in Photography?
Otherwise, start over in this series and read it again:
Lighting Part 1.
If I had a choice to go on another African safari with a point and shoot
camera with a guarantee of great light every day versus $30,000 in the
top gear but a guarantee of awful light every day (something I can't
imaging as I can always find good light), I would choose the point and
shoot with great light.
Light is most important. Learn light, the angle of light,
the quality of light on the subject to learn the key to photography.
Above all, Focus on the light, composition and subject, not on the pixels (pun intended).
Focus on quality NOT quantity.
Related Reading
Here is a funny spray and pray story:
A Whale Tail.
It is a story about a person who did not understand
when not to take the picture.
Does Gear Matter in Photography?
The Lighting, Composition and Subject Series:
This page URK: http://clarkvision.com/articles/learning-to-see
First Published November 1, 2015.
Last updated December 28, 2015.