ClarkVision.com
| Home | Galleries | Articles | Reviews | Best Gear | Science | New | About | Contact |
Polarized Light and Evaluating Polarizing Filters
by Roger N. Clark
| Home | Galleries | Articles | Reviews | Best Gear | Science | New | About | Contact |
by Roger N. Clark
Introduction
Polarizing filters are used to block reflected and/or scattered light. Reflection from any surface is partly polarized, even metallic surfaces (induced polarization from metals, like a mirror is very small). Light from a clear blue sky is highly polarized when viewing the sky about 90 degrees from the sun (this is due to the nature of Rayleigh scattering from molecules and dust that is smaller than the wavelength of visible light). Rainbows are polarized. Reflections from water is polarized. Reflections from diffuse materials (e.g. soil) is polarized too but usually at such a small amount as to not significantly affect photography. A polarizer used with your camera when you take a picture can be used to block polarized light, changing how the picture is recorded. For example, a polarizer is often used to darken blue sky, or to cut the effects of haze in the distance, or to block reflections from water so you can record details in the water. Choosing a good polarizer is important for getting good performance.
Polarized Light
In today's electronic cameras, the metering systems are usually sensitive to polarized light, so the type of polarizer used is important. There are two types: linear and circular.
When light goes through a linear polarizer, the light (e.g. the electric vector of the electromagnetic wave) vibrates in a single plane. Light vibrating 90 degrees from that are blocked from passing through the polarizer. Think of carrying your tripod with the legs extended, and you walk through some vertical bars. If you have the tripod vertical, you can go through, if horizontal, you get blocked. Now think if the tripod legs as the direction of vibration of light waves.
In a circular polarizer, you have a linear polarizer in front and a "quarter-wave plate" in back. The light that passes through the linear polarizer then passes through the plate, which has indices of refraction different along two orthogonal axes. The thickness of the plate is such that along one axis, light of a specific wavelength is slowed 1/4 the wavelength (usually green light in photographic polarizers). Then when the polarized light passes through the quarter-wave plate, oriented so the axes are 45 degrees to the linear polarizer, the electromagnetic wave vectors end up rotating. Back to the tripod analogy: after passing through the vertical bars, with the tripod vertical, you then pass through the quarter wave plate and come out the other side twirling the tripod as you continue to walk. (you are twirling the tripod orthogonal to the direction you are walking). A subsequent encounter with a polarizer (linear or circular) acts as if the incident light is unpolarized. The camera's metering system will not be affected by circularly polarized light but will be by linearly polarized light. The circular polarizer prevents highly polarized light from being detected by the cameras metering and autofocus systems.
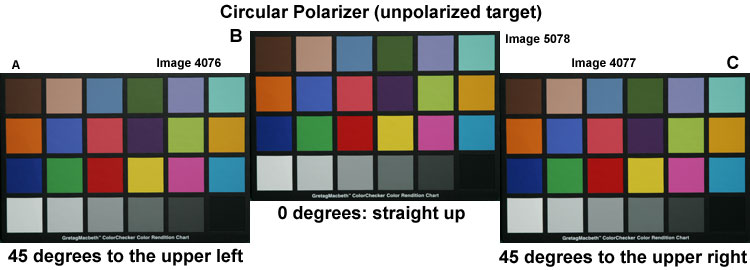
The visible spectrum, violet to blue, to green, yellow, orange, and red, covers about a factor of 2 in wavelength. That means that the circular polarizer will not make perfectly circularly polarized light for all colors. At wavelengths away from that designed for the quarter-wave plate, the light will be elliptically polarized. What this means is that as you rotate the circular polarizer when viewing a polarized source through your camera, there will be a slight color change. For example, on polarizers I have used, a scene with a lot of polarized light becomes slightly "warmer" when a circular polarizer is used (this means a color shift to the red). Such small color shifts can be easily corrected, if desired, by a change in white balance in digital camera images. For mountain scenes, or scenes with a lot of blue sky illuminating the scene, in addition to the sun, the warming color can help make a more pleasant image.
This color effect can also be used to evaluate polarizer quality, as we will see below.
Evaluating Polarizer Filters
I recently faced a dilemma when I needed to buy a filter. I had lost a polarizer, and was about to leave on a photo trip, so I went by a camera store and asked for a quality circular polarizer. They guy pulled out one (forget the brand) that was over $200. I asked for a good consumer model. I then compared the two (using two of each filter):
1) For each side of the filter, reflect sunlight onto a distant wall (preferably outside). The projected reflection should look like a perfect ellipse with no distortion.
2) Look through the filter held at arm's length, and tilt and rotate it. Look for any distortions. If you can get a second person to hold it well way from you look through the filter that way. Any deviations from plane parallel with show stronger the further you away you look.
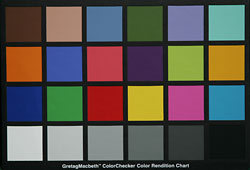
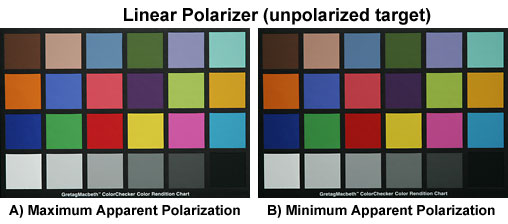
3) Find a good unpolarized light source. Reflection from a sheet of white paper illuminated by the sun or a light bulb usually works well. Figure 1 shows a color test chart and Figures 2 and 3 show the response of the test chart by a camera (a Canon 1D Mark II DSLR) to various orientations of the polarizers. Note, the linear polarizer introduces small metering and exposure errors on this unpolarized test target.
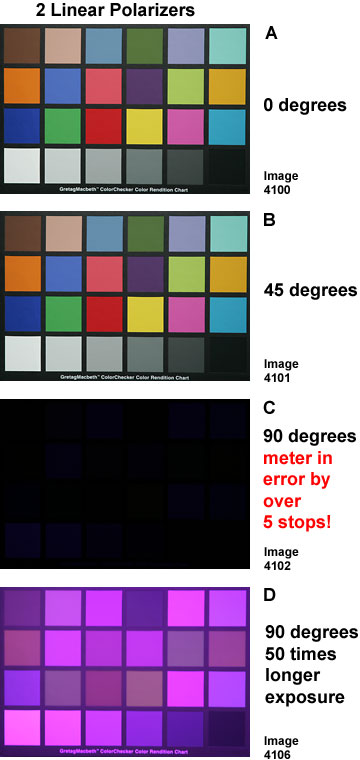
4) Take two polarizers and stack them, as you would put them on a camera (back of one screws into the front of the other) then rotate them while looking at a light source (e.g. light bulb or a diffuse reflection, like from white paper). You can do this with both linear and circular polarizers. Good circular polarizers will show NO extinction (dimming of light) as you rotate them with respect to each other, but linear polarizers will show huge changes in intensity. You will likely see some small color variations with the circular polarizer, and while similar color changes can occur in linear polarizers, the intensity change may be so great as to mask color changes. If the changes are not uniform at different locations on the filter, avoid using that filter. Figures 4 and 5 illustrate effects of two polarizers on images.
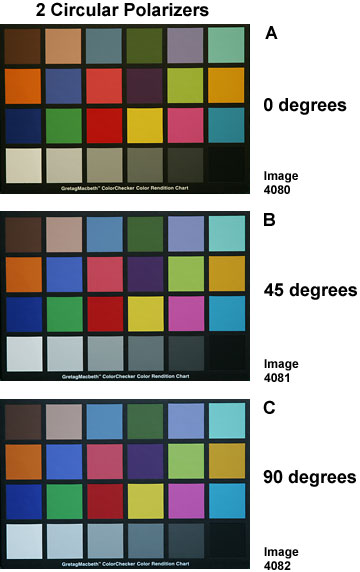
5) Examine the color shift of two circular polarizers. If the color variation is too much for you, choose another set and try the experiment again, to see if you can find a model with acceptable response. If you test other orientations (e.g. like stacked filters and front to front/rear to rear) you will see other effects. Front to front will act like two linear polarizers with huge intensity ranges. The greater the dimming when the polarizers are crossed, the better the linear polarizers are (but look for color shifts by viewing a bright light). Look for maximum extinction without color shifts with the circular polarizers front to front.
6) Place the circular polarizers front to front and rotate them to look at the point near and at maximum extinction. If the transition is smooth with no variations in transmission at different locations on the filter, it is good quality. If the maximum extinction is not uniform or the angle of maximum extinction changes at various locations on the polarizer, the polarizer is not very good and should be avoided.
7) Placing the circular polarizers back to back produces results similar to front to back: no intensity variation and little to no color shift. Color shifts should be smaller then or similar to that in Figure 5.
8) If you can look at the daytime clear blue sky, try the polarizer out on the sky (without a camera). Hold the filter up and look through it while looking at a patch of sky 90 degrees from the sun. The filter transmission should be smooth at all locations on the filter as you rotate the filter.
I use Hoya filters and find them very good and reasonably priced. The data in Figures 3 and 5 are Hoya circular polarized filters.
I did find a filter that failed to pass the above tests one time many years ago. It showed a blurry image when looking through the filter with the filter at about 10 feet.
| Home | Galleries | Articles | Reviews | Best Gear | Science | New | About | Contact |
http://clarkvision.com/articles/evaluating_polarizing_filters
First Published 2005
Last updated January 13, 2007