
Lighting, Composition and Subject
Lighting Part 4: The Angle of Light: Phase Angle, Advanced
by Roger N. Clark
The direction and quality of the light on the subject are the
most important keys to image impact. The subtleties of phase
angle can make the difference in image impact. Apparent sharpness
(accutance) is also impacted by phase angle, as are color and shading.
This article describes positive versus negative phase angles and
the impact on imaging quality.
The Lighting, Composition and Subject Series:
All images, text and data on this site are copyrighted.
They may not be used except by written permission from Roger N. Clark.
All rights reserved.
If you find the information on this site useful,
please support Clarkvision and make a donation (link below).
Introduction
Understanding phase angle and its effects is key to understanding light,
the angle of light and image impact. See part 3 (above) for basics of
phase angle. This page describes more advanced aspects of phase angle.
Remember, phase angle is the angle between the light source (e.g. the sun)
and the viewer from the position of the subject. The photographer can
control the phase angle by choosing where to stand, in conjunction with
the time of day and/or day of year. I will show that low phase angles
(the sun directly behind you) produce lower impact images, and present
evidence for the best phase angles to produce images with form, texture,
and impact.
Direction of Light: low Phase Angles and the Loss of Shadows
Shadows are important in many aspects of photography. Without shadows,
an image only changes intensity by the reflectance/transmittance intensity and color.
Images will usually
appear flat, without form. With shadows, 3-dimensional objects show form.
But more importantly, shadows on the fine scale show texture in an image,
whether the shadows cast by grains of sand on a beach, shadows cast by
hair or fur, or shadows cast by bird's feathers.
Examine the images of the great blue heron in Figure 1a. The image on
the left in Figure 1a was made at a phase angle of about 10 degrees.
The sun was directly behind my back and the sun just over my head.
This is the "point your shadow at the subject" position popular with
some bird photographers. But there is no shading on the bird
and it looks flat. I moved to the left in the field for the image in
Figure 1a, right panel so that the phase angle increased to 30 degrees.
The sun was then over my right shoulder and the two images were obtained
within a few minutes of each other.
Examine the differences in the two images in Figure 1a. The 10-degree
phase angle image shows the bird as a flat two-dimensional object.
The leaves in the background are yellower with less color saturation than
the leaves in the 30-degrees phase angle image. The 30-degrees phase
angle image shows shading on the right side of the bird, giving it form.
But that is not all, look at the feathers on the bird's back.
The 30-degree phase angle image shows that the feathers cast small
shadows. That adds texture and the impression of sharpness.
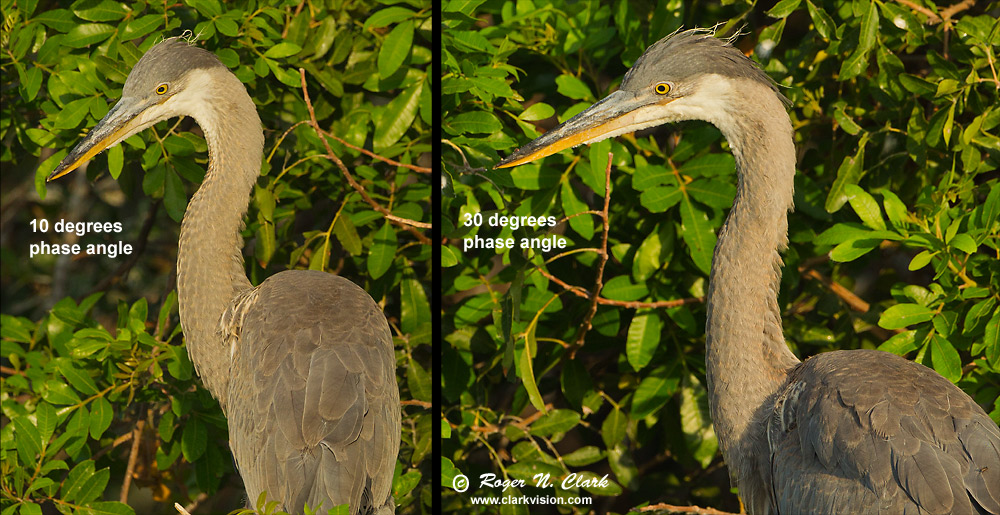
Figure 1a. Image of the same bird made at 2 different phase
angles and within 3.5 minutes of each other. The 10-degree phase angle
image lacks shading, both at the macro as well as the micro level.
Macro shading gives form (the shading on the bird's neck and body
in the 30-degree phase angle image). Micro shading gives texture (the
small shadows cast by feathers in the 30-degree phase angle image).
See Figures 1b, 1c, and 1d for closer examples of micro shading.
An interesting effect is seen in images made at low phase angles.
As shadows disappear because the light source (e.g. the sun) is behind the
viewer, one sees little to no shadows. Besides macro shadows giving form,
the micro shadows disappear too. The micro shadows around fine detail
casts tiny shadows. It is those small shadows that are often responsible
for texture in an image. But more than texture, the shadows increase
contrast and contrast is in part a factor in the apparent sharpness of
an image. Indeed, it is the edge contrast that the popular "sharpening"
tool, unsharp mask, boosts. Unsharp mask boosts edge contrast, otherwise
known as accutance. Unsharp mask does not actually sharpen (see my
series on sharpening for more details).
The images in Figures 1b, 1c, and 1d illustrate the micro shading changes
with phase angle. At phase angles of about 10 degrees and less, there is
little micro shading (as well as little in macro shading). Examine the
images in Figure 1b (the neck region of the bird in Figure 1a) and in
Figure 1b (the back of the bird in Figure 1a). The 10-degree phase
angle images lack fine shadows and appear less sharp. At 20 degrees
phase angle, the shading is large enough to give higher edge contrast
(accutance) and appears sharper. At 30 degrees phase the effect is
quite pronounced. All the images are in great focus.
There is an additional factor of low phase angles. As the shadows
disappear, and the fine edge contrast decreases, the contrast for
autofocus systems in your camera decreases and autofocus accuracy drops.
This can be a problem in fast action photography as the camera
has less time to achieve focus as contrast decreases as a subject moves
toward low phase angles.
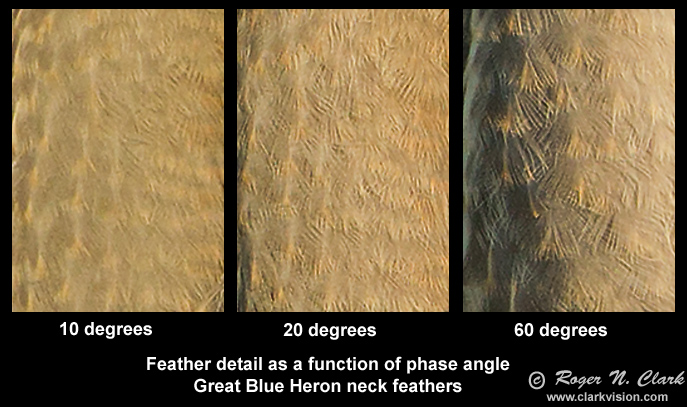
Figure 1b. Enlargement of the neck region of
the bird in Figure 1a. At low phase angles ( less than about
10 degrees) insufficient shadows are cast by the feathers on a tiny
scale, so the image loses texture, accutance and apparent sharpness.

Figure 1c. Enlargement of the back area of
the bird in Figure 1a. At low phase angles ( less than about
10 degrees) insufficient shadows are cast by the feathers on a tiny
scale, so the image loses texture, accutance and apparent sharpness.
Note too the changes in color versus phase angle.
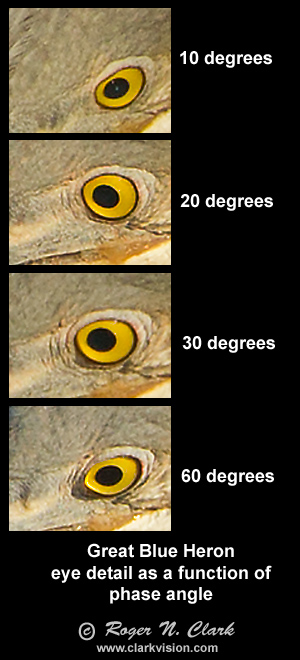
Figure 1d. Enlargement of the eye area of
the bird in Figure 1a. At low phase angles ( less than about
10 degrees) insufficient shadows are cast by the feathers on a tiny
scale, so the image loses texture, accutance and apparent sharpness.
Note too the changes in color versus phase angle.
The edge of the pupil of the eye appears equally sharp in
all images because there is high edge contrast, and that shows the images
are all focused well.
Positive versus Negative Phase Angle
Some may have already noticed that the micro shading on the bird in Figure 1
is not the same across the bird. This is because the bird is 3-dimensional,
and the angles of incident light and the viewer with respect to
the local area on the bird varied. For example, in Figure 1b, on the left side
of the bird's neck, the micro shadows are quite apparent while on the right side
of the neck, there are no shadows. This is because some of the phase
angles are negative, and some are positive. Figure 2 defines when the
angles are positive and when they are negative.
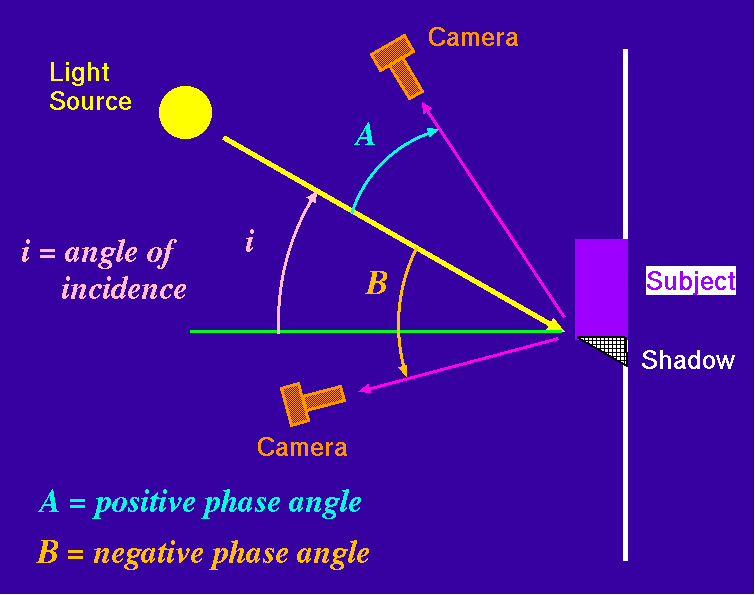
Figure 2. Phase angle can be positive or negative. Negative phase
angles are in the direction that emphasizes the shadows, positive
phase angles emphasize the lit side of the subject.
The Lunar phase angle sequence, presented in Part 3 of this series, and in Figure 3, below, illustrates
positive and negative phase angles. Look at the 90-degree phase angle
in Figure 3. If high phase angles show micro shadows, why do we only see
craters near the lunar terminator (the vertical boundary between lit
and unlit sides of the Moon)? The reason is that near the terminator we
are seeing negative phase angles because the angle of incidence to
the incoming sunlight is high (near 90 degrees at the terminator) and we are viewing
the shadow side of the mountains and crater rims.
Further from the terminator, the sun is high in the lunar sky (for an astronaut
on the lunar surface) and all sides of mountains and craters are lit by the
sun from our viewpoint, thus positive phase angles. Diagrams presented below will further explain
the geometry. At low phase angles (e.g. the 4 degree image of the full Moon in Figure 3),
even though the incident sunlight varies from grazing to overhead, no shadows
are seen anywhere.

Figure 3. Lunar phase angles. Phase angles of the Moon as viewed from Earth range from near zero (<2
degrees and the Moon is in the shadow of the Earth during a lunar eclipse) to near 180 degrees when a thin crescent
(exactly 180 degrees has the moon between the Earth and the Sun during a total solar eclipse). Low phase angles
have the light source (e.g. sun) behind your back as you photograph your subject. Phase angles approaching 180
degrees means you are photographing into the light source. Note the changing shadows revealing craters as you
move away from near zero phase angle. This same effect occurs with everything we observe and photograph.
Now consider positive and negative phase angles on an animal subject,
like the finch in Figure 4. Both images were made from the same location
looking at the same spot at a phase angle of about 20 degrees. These are
two different birds, so ignore the change in color. Why are the effects
of micro shading so different? On the left, we are seeing predominantly
negative phase angles, and on the right we are seeing predominantly
positive phase angles. The sun was over my right shoulder.
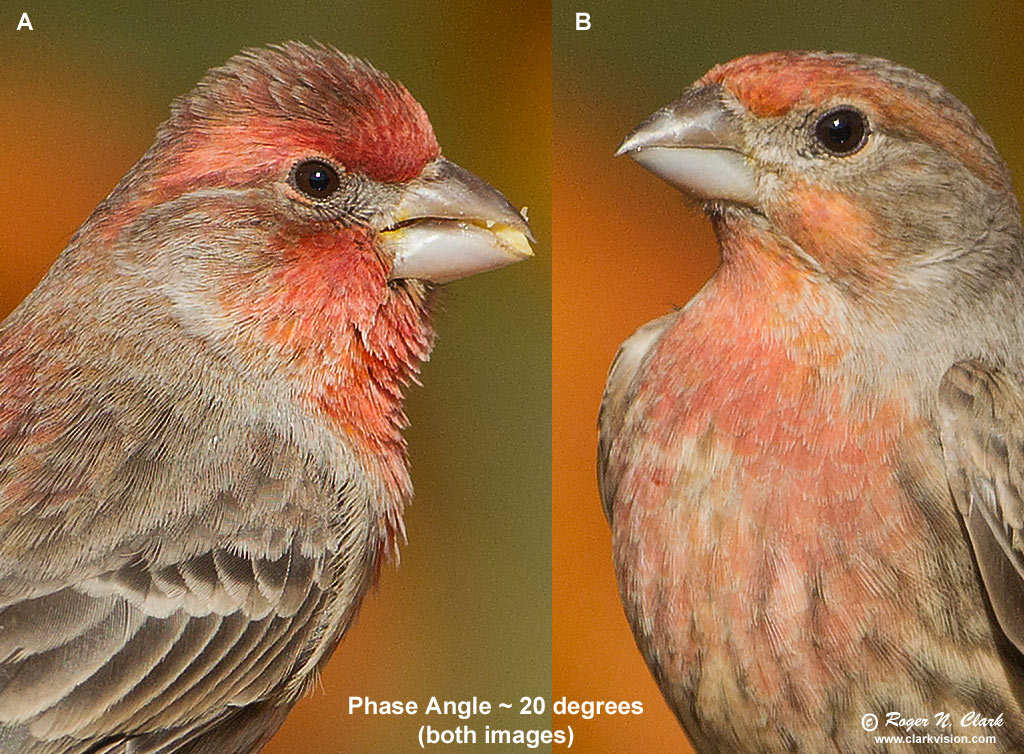
Figure 4. Images of two finches, both made from the same location and
viewing the same perch where the birds landed. The sun is over my right shoulder
to give a phase angle of 20 degrees. Image A is predominantly negative phase angles
and image B is predominantly positive phase angles.
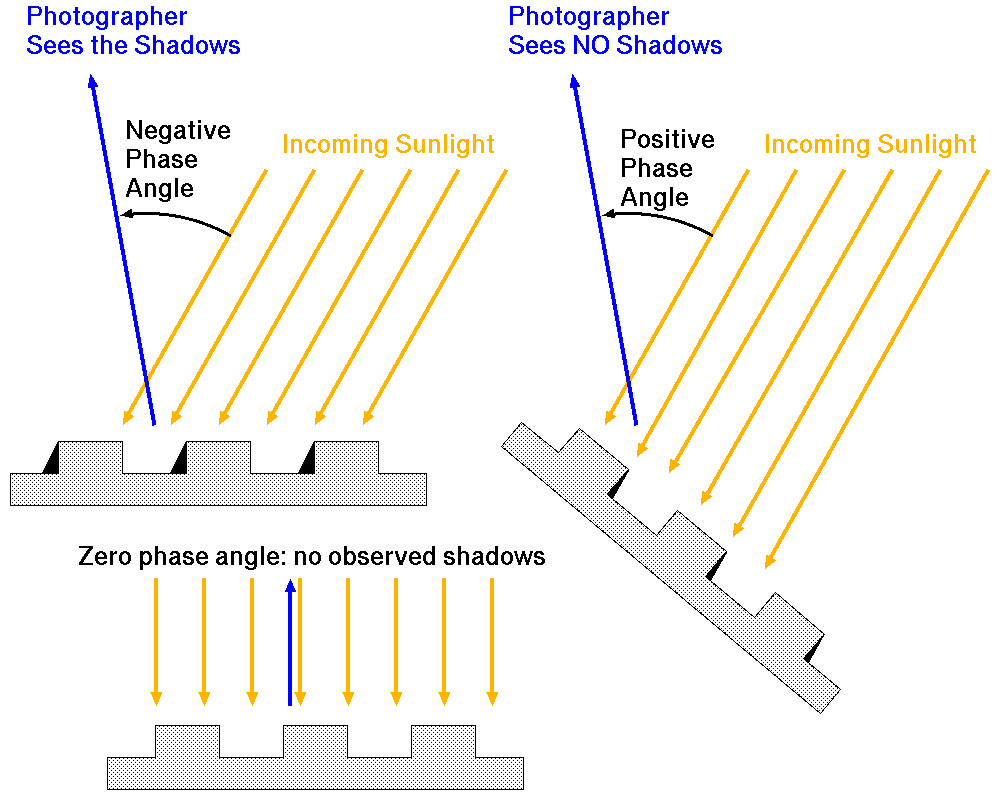
Figure 5. Illustration of positive and negative phase angles and
whether or not the viewer sees shadows. When phase angle approaches zero,
no shadows are seen by the viewer.
The diagrams in Figure 5 illustrate the geometric effects of positive and
negative phase angles. The orientation of the subject illustrated in Figure 5
is the same as the bird in Figure 4. In Figure 4a, the side of the bird has the sun
to the right casting small shadows for the camera to record, with similar orientation
as shown in Figure 5 in the negative phase angle panel. In Figure 4B the normal to the bird's
chest is pointing to the left. The sun is illuminating the same sides of the feathers
as seen by the camera and no shadows are seen. That is positive phase angle.
For a situation like that shown by the finches in Figure 4, I positioned myself
to have a pleasing phase angle (along with a good background). Then I waited
for the birds in their feeding activity to have the right position, like that in
Figure 4a to show the maximum texture in the feathers of the bird.
When phase angle is very low, no shadows are seen, regardless of the orientation
of the local surface. This is illustrated in Figure 6 and seen in practice with
the full Moon (Figure 3, left most image).
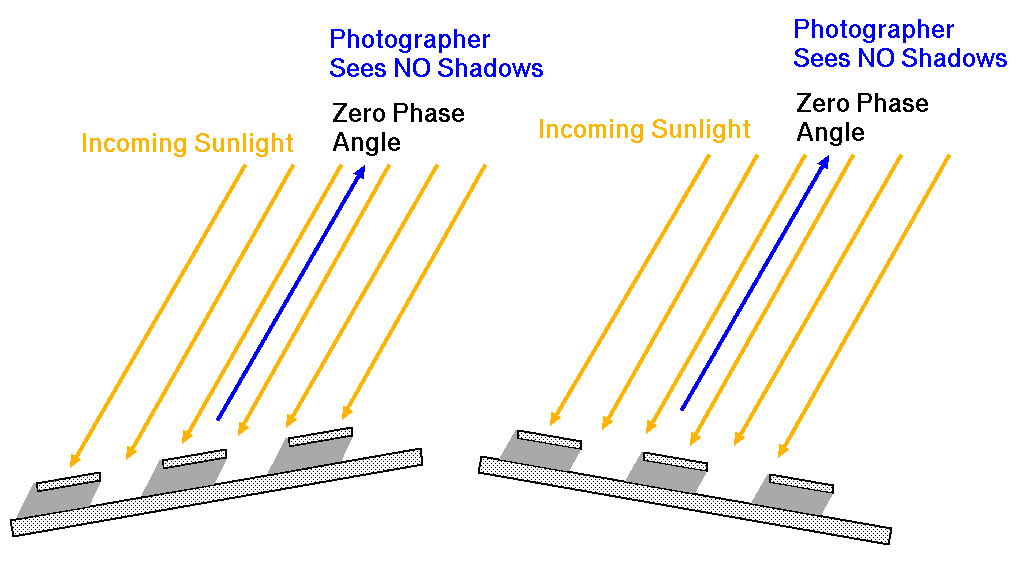
Figure 6. Illustration of low phase angle showing that regardless of the
orientation of the local surface, no shading is apparent to the viewer. The
image will appear flat with little to no fine texture.
Phase angle affects more than just the Moon and birds. Most surfaces show similar effects.
Look at the series of images of the Grand Tetons in Wyoming in Figures 7a, 7b, and 7c.
Wide angle scenic images can show large variations in brightness and shading as illustrated
in Figure 7a. The zero phase point at the lower right (bright area) in Figure 7a
seems out of place considering the rest of the scene. The mountains above center are
at a phase angle of about 30 degrees. Rugged mountains are often better represented
by higher phase angles, like those shown in Figures 7b and 7c.

Figure 7a. Mountain scene with a 28 mm lens on a 1.3x crop DSLR.
The zero phase point is at the lower edge, right of center where the bright
area is located (at the shadow sticking up below the bright area). The
tall mountain, the Grand Teton, is at a phase angle of about 30 degrees.
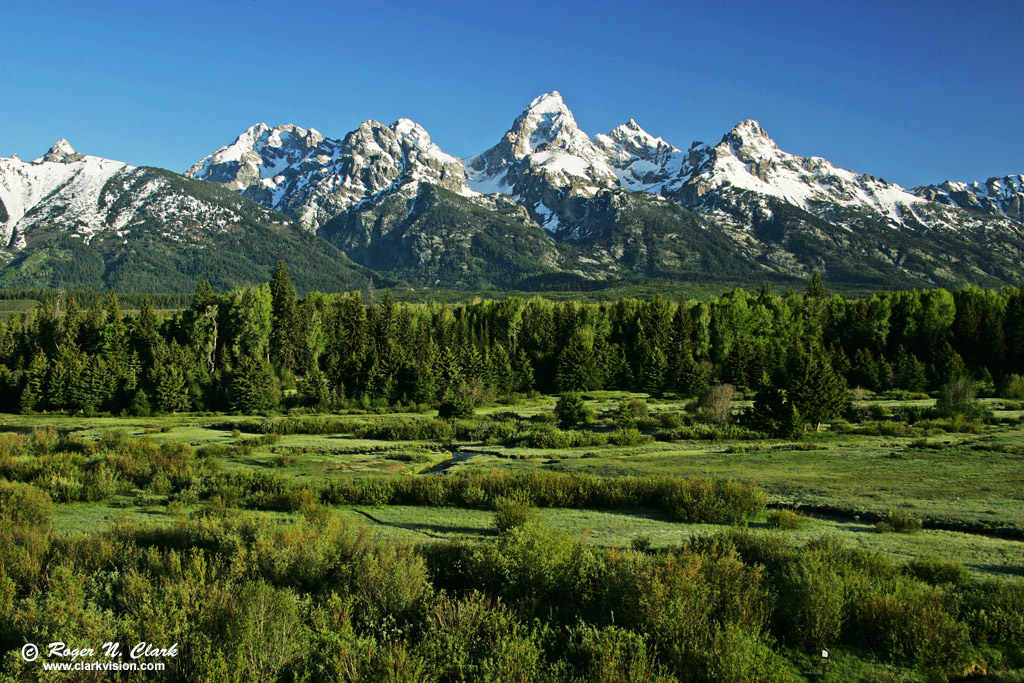
Figure 7b. Beautiful early morning light at a phase angle of about
70 degrees nicely shows the ruggedness of the mountains.
Note that the scene brightness is increasing toward the left, as phase
angles are decreasing from right to left. The zero phase point is to the left out of
the scene.
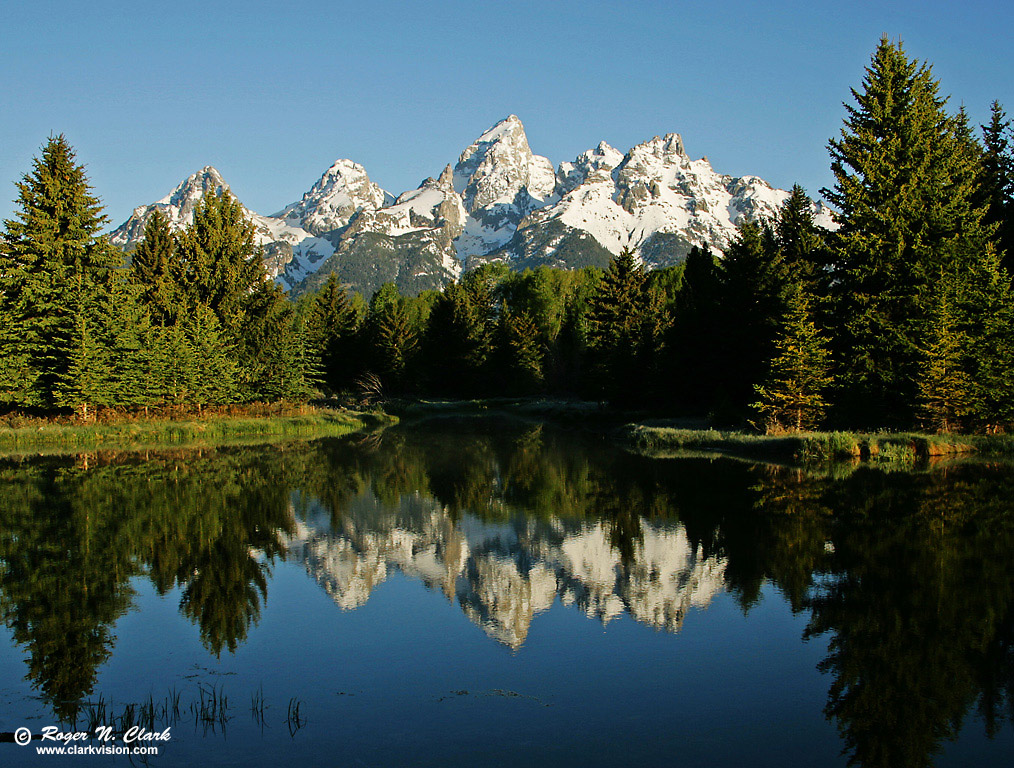
Figure 7c. Another beautiful early morning light at a phase angle of about
70 degrees nicely shows the ruggedness of the mountains. However, the
high phase angle has deep shadows in the center of the frame, losing
detail. One way to mitigate such deep shadows is if there were a few
clouds above the top edge of the frame reflecting light into the shadows.
As in Figure 7b, the scene brightness is increasing toward the left,
as phase angles are decreasing from right to left. The zero phase point
is to the left out of the scene.
Conclusions
Understanding phase angles along with the effects of micro and macro shading allows one
to position oneself in the field to record a subject in the best light. If you want
macro shading to show form and micro shading to show texture, then phase angles
greater than about 10 to 20 degrees are required. In other words, do not have the sun
directly behind you. Instead, put the sun over one shoulder, either to the right
or left.
If you want more contrast, then increase the phase angle to be side light. However,
contrast and dynamic range may increase too much for the camera to record in a
single exposure. Exposures must be more precise to keep the dynamic range
within the intensity range that the camera is capable of recording.
As the sun moves higher in the sky in the morning, the light becomes harsh (harsh light
will be explored in the following parts of this series). To minimize the harshness, then
one can point one's shadow at the subject. If the sun is 30 degrees high, for example,
then pointing your shadow at the subject means the sun is directly above your head and behind you,
and the phase angle is 30 degrees. The next chapter, Part 5, shows how to
determine the phase angle in the field.
If you find the information on this site useful,
please support Clarkvision and make a donation (link below).
The Lighting, Composition and Subject Series:
http://clarkvision.com/articles/lighting.part4
First Published May 5, 2009
Last updated November 1, 2014.