
Fast Simple on Site Microadjustment Methods
Requiring no Computers or Charts
(calibrate the focus on your DSLR)
by Roger N. Clark
All images, text and data on this site are copyrighted.
They may not be used except by written permission from Roger N. Clark.
All rights reserved.
Introduction
Lenses and DSLR cameras vary in their ability to accurately autofocus (AF).
Phase detect AF sensors in a DSLR are fast but use a different optical path
than that to the sensor, and a path that includes a mirror.
In a DSLR, when the mirror is up, the light from the lens goes straight
through to the sensor. When the mirror is down, some light from the lens is
reflected to the viewfinder, and some is transmitted through the mirror
to a second mirror which reflects the light to the bottom of the camera
where the AF sensors are located.
As the temperature of the lens + camera changes,
the distances change due to expanding/contracting components in the camera. Thus, the
calibration of the DSLR AF system can be off in certain conditions. Accurate
AF is important if you image with fast lenses wide open, as is common in
wildlife and astrophotography. AF calibration is less important in landscape
and other photography where you stop down to f/8 and slower.
If you are doing focus stacking (e.g. landscapes or macro photography),
AF calibration is probably not necessary. and certainly becomes unnecessary
as f/ratios become slower than f/8.
There are really simple ways to check AF accuracy using microadjustment
that is available on newer higher end cameras. On the net you can find
exotic test targets and complex instructions requiring a laptop computer.
Such setups are impractical for real world in the field situation situations, where one
must calibrate for the conditions on site. Calibrating with exotic
tools back home under different temperature conditions may not result
in a good calibration that works on site.
The methods described here require no software, or any setup. You can do it
anywhere, anytime. I have done it from safari vehicles using a beanbag,
on a tripod, and even checked calibration hand held. The only requirements
are a DSLR with microadjustment capability and that has a live view mode,
or with a second method without live view.
Picking a Target in the Field for Calibrating
Keys to picking a target for doing your microadjustment calibration:
1) A target large enough and isolated enough so that a single AF sensor can
clearly lock onto the target. Use a single AF point and turn off any AF
expansion.
2) A target where you can see detail both at, in front of and behind the
target.
3) The target should be a bright subject with no distracting bright spots
nearby. This improves the accuracy of the AF system is locking onto
your intended target and not something nearby. The AF system will lock
onto the brightest high contrast spot near the AF sensor.
4) It can help if the surrounding (in front of and behind) your target is
slightly darker than your target.
Figure 1 shows the full frame of a good test target and the AF point shows
the intended target. Grass blades in front of and behind the rock are used
to find where best focus is located. Figure 2 shows a close-up of a
good calibration, while Figure 3 shows front focus, and Figure 4 shows
rear focus.
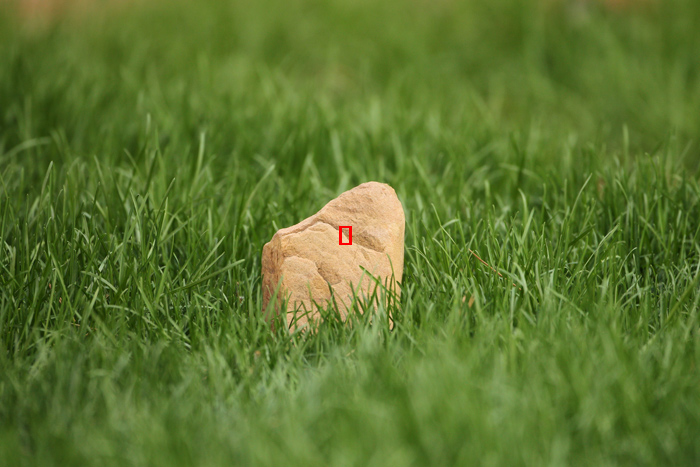
Figure 1. A rock in a grass field works as a nice test target for determining
AF calibration accuracy. The is the full image from a 500 mm lens on a
1D Mark IV camera, at f/4.
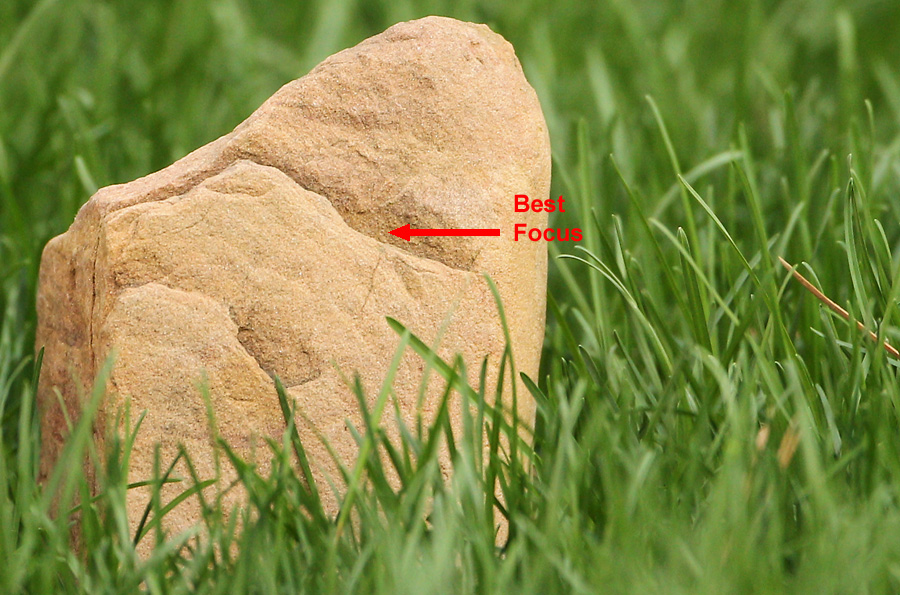
Figure 2. Close up showing a good calibration.

Figure 3. Close-up showing the AF system is front focusing.
A positive microadjustment should be added.
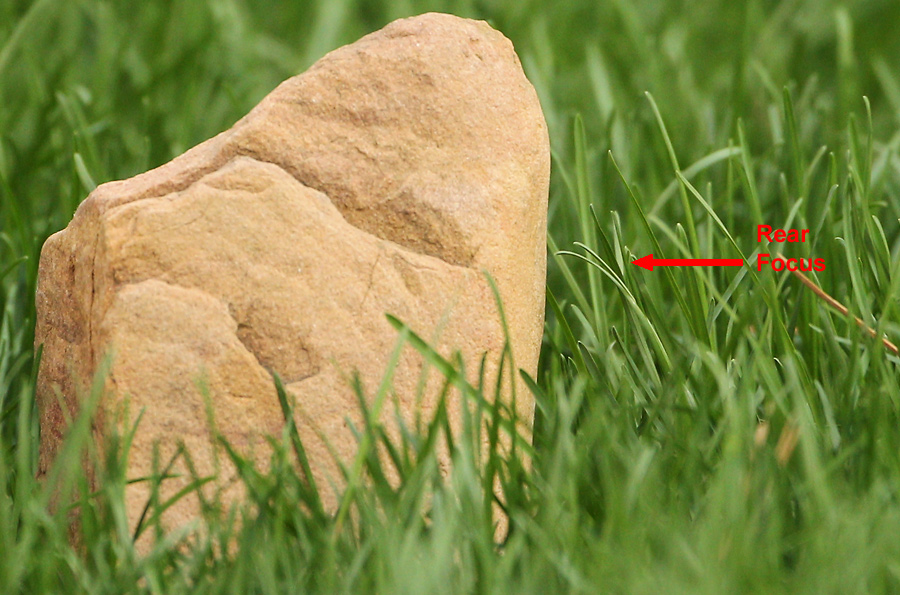
Figure 4. Close-up showing the AF system is rear focusing.
Microadjustment needs to be decreased.
Method 1
This method works because
there is a difference in the way the AF works in a DSLR in normal
(mirror down) versus live view modes. In the case of phase detect AF in a
DSLR (the mirror down mode), there are separate sensors in the bottom of
the camera and a mirror that deflects the light from the lens onto the AF
sensors. The distance must be calibrated to on the order of 10 microns or
better. The live view focus is on the sensor itself and works by contrast
detection. So when you normally AF with the phase detect circuitry there
can be an error in the calibration. The calibration can vary from lens
to lens because of small differences in the bokeh as the phase detection
is on a slightly out of focus image from the lens. The contrast detection using
the sensor in live view (which I call delayed view but that's another
story) is optimized using contrast in the focused image on the sensor,
making it a slower iterative process but for static subjects is very accurate.
Phase detect AF is fast because, once accurately calibrated, a single
reading tells the direction and by how much the lens needs to be moved
to achieve focus. Contrast detect AF requires sensor readout, move the
lens, sensor readout, analyze: did the contrast improve? Move the lens,
read out sensor, etc, etc. so is quite slow.
The following is a method that can be done in the field without purchasing
any setups, no use of a laptop computer. and is quite fast. I can usually
check my AF accuracy and tune the microadjustment for best focus in 2
to 3 minutes.
The goal of the method is to minimize the change in focus between the two
AF systems (live view and phase detect AF), using microadjustment to make
the phase detect AF match the live view contrast AF.
Part I: Setup and Evaluation If You Need Microadjustment
Put your camera+lens on a tripod and aim at a flat static subject. The
subject should be perpendicular to the sensor plane. Brick walls, very
distant tree/house/building, or even the moon will work (even though the
moon is slowly moving through your camera's field of view). You can even
do this from a safari vehicle (e.g. it works well with the camera+lens
on a beanbag). The camera need not be level, and any AF target will work
as long as it is clean enough from distracting subjects for the AF system to clearly
lock onto your intended target (see Figures 1-4 for an example).
You can test
at any distance, but choose a flat subject with fine detail that the
lens+camera will not confuse with a foreground or background subject.
For example, a sloping roof is not a good test target. The side of
a brick wall is excellent if the wall is perpendicular to your view.
I have used the moon, distant trees, distant lights at night, and even
a very still animal at close range.
1) Set the camera to single frame mode (not predictive autofocus:
e.g. not AI servo on Canon). On canon, this is called single shot.
2) Set the lens to widest aperture (e.g. f/2.8 on a 300 mm f/2.8 lens).
3) Select a single AF point (usually center AF) and turn off any AF expansion.
4) Focus as normal with the AF point on the subject.
5) Enable microadjustment modes on the camera. (This varies from camera
to camera. On a Canon 1D Mark IV, it is custom function III-7).
6) Configure live view to start with a simple button push.
7) Aim at your target and half press the shutter to engage AF on the
subject (this step is NOT with the camera in live view).
8) Turn on live view and zoom in all the way on the LCD to the area of
the AF point. You are now looking at the live view image of the focus achieved
by the AF sensor. Note how sharp the image appears.
9) Half press shutter button and see if the focus changes. (It is best
to do the focus half press of the shutter button with a cable release.)
The focus will jump around--ignore that jumping and wait for it to settle.
You are now looking at the live view focused image. It should appear
the same (same sharpness) and before you half-pressed the shutter button
at the beginning of this step.
The live view must adjust the focus to determine its best position,
and it can only do that by moving the focus off and then searching
for the best location. Thus, the focus jumps around for a brief moment.
Try and ignore that and concentrate on what the image looked like before
you started this step versus after the live view focus is complete.
So the live view focus in step 9 can be different than that with AF
focus in step 7 because the two methods are different in the camera.
10) If you observe the focus improving with the live view focus compared to the
DSLR AF sensors, your setup needs microadjustment.
If the focus gets worse, it is not a good target and the focus
failed or there were confusing foreground or background
objects that it may have focused on. Another possibility is there
might be something wrong with the camera and it may need to be sent
in for repair. Try several different test targets before concluding
camera repairs are needed.
Part II for method 1: Finding the Best Microadjustment
If focus changes in step 10 above, you will next need to dial in some
microadjustment and test again.
I generally start with +10 and -10 to see direction. First dial in -10
and AF with the mirror down (half press the shutter), then turn on live
view and half press again and watch the change. Do this again with +10.
Which one (-10 or +10) results in the least change and thus better focus
before the live view test? If neither, try other positive/negative
combinations, e.g. -20 and +20, or -5 and +5. Once you determine
direction (+ or -), we'll then work on how much in that direction.
Lets say +10 is better. I next try +5 and +15. and reduce range from
there. If +5 results in a better focus than +15, then reduce the amount
of the one furthest off. For example, if +15 was furthest off, try +10
and +5. if +5 is still better, try +0. Try and bound the problem by
changes of 5.
Once you find the nearest 5, try reducing the range more, like 2 or three.
Say +5 is best so far. Next try +8 (5+3) and +2 (5-3). If you can tell a difference,
choose the best and try a smaller interval. For example, if +8 is best, try changing
by 2, for example, +10 and +6 (8+2, 8-2).
If you can tell which way the best focus is, then you know which
way to adjust the microadjustment. For example, if you can tell from
your testing that the best focus is in front of what you were actually
focusing on, that is called front focus, and dial in positive microadjustment.
If the best focus is further away than your focus spot, dial in negative
microadjustment.
It is unlikely that you can tell a difference below about 5 with soft lenses, or
sharp lenses with 2x TC on them. You might see a difference at the +2 or +3
level with the very sharpest lenses.
Method 2
The live view method can be frustrating because you must get out a cable release
for the best results, and you must remember if the live view focus, after its focus
adjustment is better or worse, and with the jumping around that live view does it can
be distracting. In some cases, I've needed to check my focus accuracy while
photographing a complex scene with distracting foreground and background elements
that gave live view problems. This method (method 2) does not use live view.
1) Obtain an image with single AF point focus (e.g. as in Figure 1).
2) Zoom in on the image from #1 as much as you can
and examine the foreground and background elements as
well as the subject you were focusing on. If the focus is not on the subject
as you envisioned, you need some microadjustment. Note: you must be certain
the camera is focusing on the spot you desire and not some brighter high contrast
object nearby. The camera's AF sensor is sensitive to the area around the AF point
(best to use one AF point and turn off any AF expansion).
3) Determine if the focus is front focus or rear focus.
3a) If front focusing, dial in
positive microadjustment. I think of it like this: I need to push the
focus out further, adding to the distance, so add + microadjustment.
3b) If back focusing, dial in negative microadjustment.
4) After making a microadjustment (I usually move it by 10 steps) take another image
and examine the image again. If the focus is still in the same direction as
before add another 10 (now at 20, the max). If focus has moved past you focus
point, move back half the distance, e.g. to 15). If you can tell a difference
at this point, try moving by 2 or 3 steps until you find the best AF accuracy.
Method 2 Example
Photographing an owl with a 500 mm + 2x TC, I noticed
the image was front focused (Figure 5, 6) by zooming in on the image on
the camera's LCD screen.
I dialed in +10 microadjustment (Figure 7). Another image
showed it was still front focused, so I moved microadjustment to +20 (Figure 8)
and made another image.
That image showed the focus was now beyond my subject, so I
backed up to +15 and found it right on (Figure 9). My depth of field was
large enough to cover my subject and I did not need to refine
the microadjustment further. This only took a two and a half minutes.
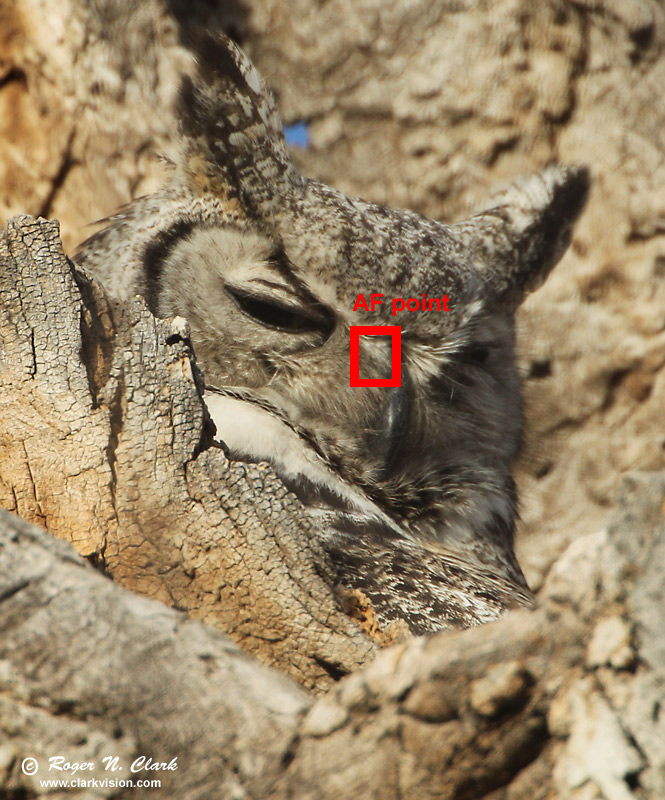
Figure 5. Cropped image of an owl made with a Canon 1D Mark IV
camera and 500 mm f/4 lens + 2x TC. This is an out-of-camera jpeg.
The AF rectangle is shown approximately as the red rectangle.
Focus should have been on the white feathers by the bird's beak,
but focus appears to be in front of the bird (see Figure 6).

Figure 6. Full resolution out-of-camera jpeg. This is the same
image as in figure 5. Microadjustment = 0. The white feathers
by the beak are not in the best focus. Better focus is on feathers
to the lower left or the tree bark on the left (red arrow).
No sharpening has been applied to this image.

Figure 7. Full resolution out-of-camera jpeg with
Microadjustment = +10. The focus has moved closer to the
desired point (red arrow) but is not far enough.
No sharpening has been applied to this image.

Figure 8. Full resolution out-of-camera jpeg with
Microadjustment = +20. The focus has moved beyond the
eye (note feathers behind the eye on the left, red arrow).
No sharpening has been applied to this image.
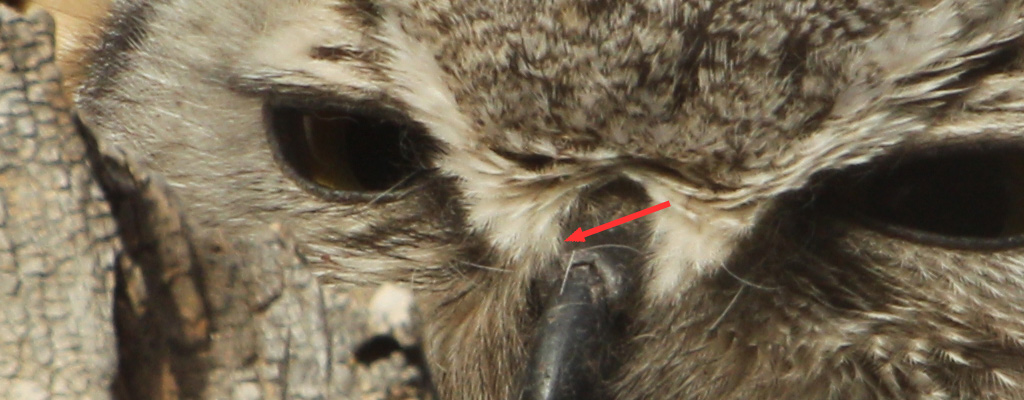
Figure 9. Full resolution out-of-camera jpeg with
Microadjustment = +15. Focus is now nicely on the feathers
by the beak (red arrow). No sharpening has been applied to this image.
Compare to Figure 6.
Discussion
I have found the amount of microadjustment varies with the environmental
temperature. An example is shown in Figure 10.
Thus, it is best to test on site once your camera is
equilibrated to local conditions. For example, if you get to a location
around sunrise on a cold morning, check calibration after a few minutes
then, as the day warms up, check periodically. I have found that the
microadjustment varies by about 6 to 7 over a 20 degree (C) temperature change
with my 1D Mark IV with a 500 mm f/4 lens with a 2x TC.
Figure 10. The microadjustment value determined in the field on the subject
under varying temperature conditions. The temperature is the camera internal
value recorded in the exif data stored with each image. The internal
camera temperature was higher than ambient air temperature. For the cold end,
the camera internal temperature was 5 to 7 degrees (C) warmer, while at the warm
end, the camera was only about 2 degrees (C) warmer than the air temperature.
Of course, you need separate calibrations for bare lens, lens+1.4x TC, and
lens + 2x TC (or whatever magnification TC you have).
If you keep a log of microadjustments and temperature, you might find a trend.
If you do, you may be able to check temperature, and directly set the best
microadjustment. Then a quick check using one of the methods above will confirm
the setting is working correctly.
Future Possibilities: Automatic microadjustment Calibration
It should be possible for the camera to automatically determine the
microadjustment calibration. For example, select a single AF point.
Click on an auto-calibrate mode, and press the shutter. The camera
then focuses on the target, raises the mirror and does a contrast
detect focus using the same area on the sensor. The difference between
the phase detect AF sensor and the contrast detect focus gives the
microadjustment value. It should only take a few seconds.
If you want to see alternative methods using test targets and computers,
check this out:
http://www.northlight-images.co.uk/article_pages/cameras/1ds3_af_micoadjustment.html
http://clarkvision.com/articles/microadjustment
First Published November 26, 2011
Last updated February 16, 2014.