ClarkVision.com
| Home | Galleries | Articles | Reviews | Best Gear | Science | New | About | Contact |
Exposure and Digital Cameras, Part 2
Understanding Exposure
by Roger N. Clark
| Home | Galleries | Articles | Reviews | Best Gear | Science | New | About | Contact |
by Roger N. Clark
There is a significant distinction between the total light recorded (true exposure) from a subject and the camera exposure on that subject. Image quality is directly related to the amount of light collected by a camera and its lens. Exposure is about relative density of signal (density on film or relative signal level in a digital camera pixel). Understanding these concepts is critical for obtaining the best image, especially in low light situations.
Exposure and Digital Camera Series:
Prerequisite Before reading this article, please read the other articles in this sequence (links above).
Exposure, Light Meters, and Digital Cameras
Discussions I have observed and participated in on the internet shows that many photographers do not actually understand exposure, including amateur, advanced amateur, and even pro photographers. Along with exposure confusion, there also seems to be confusion about light meters. With this article, I'll try and clarify exposure, and make a very important distinction between actual light collected during an exposure, versus camera exposure. Metered light, and camera exposure versus actual light (true exposure) recorded are usually quite different. It is different between camera formats (sensor size), pixel size, and even different focal length lenses of the same f/ratio.
Why is this important? In making choices between lenses and cameras understanding these concepts may allow one to make better choices, especially when pushing photographic limits, as in fast action+low light photography, including baby's first steps in a dimly lit room, to wildlife action near sunrise/sunset, to things like nightscape photography.
Definitions
Camera exposure: The relative exposure recorded by a camera. In a digital camera, this is how full a pixel is to a given reference level. Smaller pixels fill with fewer photoelectrons than do larger pixels. As ISO is raised, the reference level is reduced. For example, at ISO 200, the reference level is half the photoelectrons as at ISO 100. Thus, a "properly" exposed digital camera image records half the light at ISO 200 as at ISO 100.
True exposure: the actual amount of light recorded, e.g. expressed in photons (or photoelectrons) on the subject. Remember, the subject is what we are concerned about in our images, not pixels.
There is a significant distinction between the total light recorded (true exposure) from an object and the camera exposure on an object. Image quality is directly related to the amount of light collected by a camera and its lens. Exposure is about relative density of signal (density on film or relative signal level in a digital camera pixel). With film, the relative density is controlled by the film speed and the amount of development. On a digital camera, the exposure is a relative level determined by a post sensor gain level. Actual light recorded is dependent on aperture diameter and the angular size of SUBJECT on the sensor (film or digital).
There are digital cameras of many sizes, with different sized sensors and different sized pixels, and each can be set to a large range of ISO. Camera exposure may appear to be the same, but true exposure is different in these cameras with differing sensor and pixel sizes and even at the same ISO.
Buckets of Water Analogy
Four people are carrying buckets of water. Each one says the buckets are full. How much water are they carrying? There is not enough information to say. This is exactly what one faces with cameras and exposures. The camera says the exposure is "correct," but one really doesn't know how much light from the subject one actually collected.
Let's give a little more information. Let's call the people A, B, C, and D. Person C's bucket is actually only half full, but is saying it is full. Person D's bucket is actually 1/4 full but is saying the bucket is full. Who is carrying the most water? There is still not enough information. The less than actually full buckets that are called "full" is similar to the way cameras tell us exposure when we select higher ISOs. Higher ISOs use a smaller light level but call it the same exposure as lower ISOs from the perspective of digital numbers in the image file (for example, 8 bit numbers ranging from 0 to 255). Can you say how much water is now in the buckets? No, there is still not enough information.
Only by knowing the actual capacity of the buckets would we
know the true amount of water in the buckets. Here are the
buckets maximum capacity:
A: 1 gallon.
B: 4 gallons.
C: 4 gallons.
D: 20 gallons.
Now we can figure out how much water each person is carrying.
A and B had full buckets, so A is carrying 1 gallon, and B
is carrying 4 gallons. C's bucket is really only half full,
so the bucket contains 2 gallons. D's bucket is 1/4 full,
so contains 5 gallons. D is carrying the most water.
Cameras and exposures are similar, and digital cameras enable
us to quantify these effects precisely. This exposes simplifications
in the exposure model used by cameras and therefore photographers.
But how did the buckets of water get filled? A faucet. How much they got filled depends on the water pressure, how far open the faucet was turned on, and how long the bucket was filled. The bucket is only a carrying device; it is the faucet and time that determines how much water was delivered to the buckets. Same with photography: the pixel is a carrying device and it is the lens that gathers the light that fills the pixels for a given time (the exposure time).
Light Meters
Light meters in digital and film cameras measure LIGHT DENSITY, not total amount of light. For example, a light meter may measure photons per square micron. The advantage of this kind of metering is that for an extended object, all lenses of the same f/ratio will deliver the same LIGHT DENSITY in the focal plane.
But by the very definition of light density, different sized pixels will collect different amounts of light. For example, if an f/4 lens is focusing 10 photons per square micron per second onto the sensor, it is simple math to count all the photons in the pixels in a one second exposure. The answers are:
4-micron pixels: 10 photons/sq micron *4 *4 microns = 160 photons per pixel,
8-micron pixels: 10 photons/sq micron *8 *8 microns = 640 photons per pixel.
Thus, it should be plainly evident that while the light meter measures the same LIGHT DENSITY, the true total light delivered by the lens in the two different sized pixels is different with the different cameras. This means that while camera exposure may be the same in the two cameras, the true exposure is different. This capacity difference between different sized pixels is shown graphically in Figure 1.
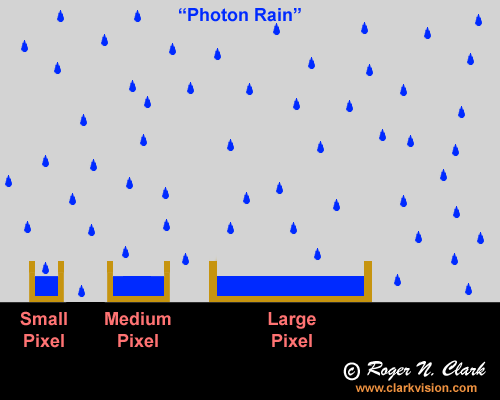
Figure 1a. Photon rain: the analogy of photons falling into
buckets which collect the rain drops. A larger bucket (pixel) collects more
drops (photons). Given two sensors with equal numbers of pixels, and each
with lenses of the same f/ratio, the larger sensor collects more
photons yet has the same spatial resolution. The lens for the
larger sensor would have a longer focal length in order to cover the
same field of view as the system with the smaller sensor and the lens
will also have a larger aperture diameter, thus collecting more light.
It is the larger aperture diameter of the lens that delivers the light to the pixel and the
larger pixel simply enables collection of the increased light delivered
by the lens.
The example pixels in Figure 1 illustrate a significant property of digital camera metering: smaller pixels collect less light than larger pixels even though the camera meter may show the same settings (e.g. 1/100 second at f/16, ISO 100). But the pixels fill at the same rate in proportion to their total capacity because of the capacity difference. The smaller pixel fills at a slower absolute rate (photons per second) but reaches the same fractional fill level (e.g. half full) at the same rate as a larger pixel. This is the same as different sized buckets in a rain storm (assuming the same height of the different sized buckets). For example, the smaller pixel fills at a lower total capacity than the larger pixel, so it can fill at a slower rate yet reach the same relative level (e.g. 1/8 full, 1/4 full. 1/2 full) at the same time as the large pixel. Thus metering LIGHT DENSITY provides the same metered exposure between the two cameras yet different total light collected.
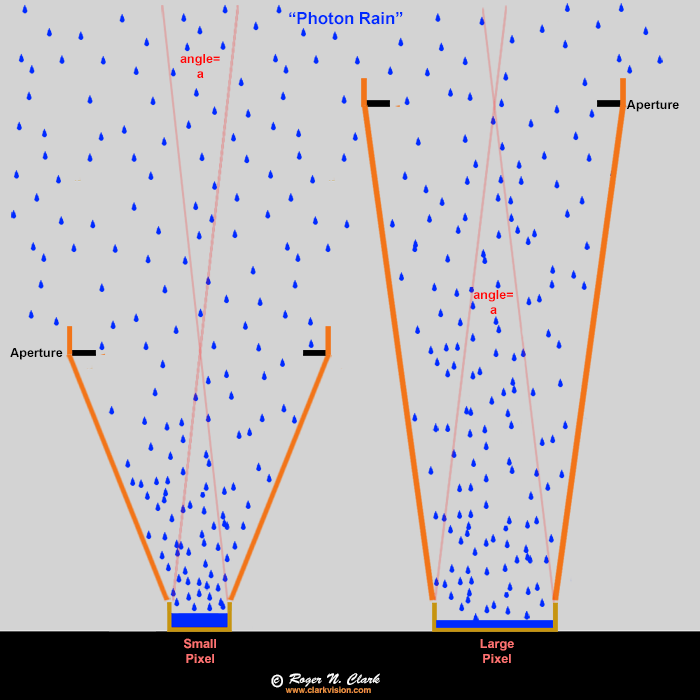
But the rain analogy in Figure 1a misses the key factor in real world imaging: the lens. A lot of internet discussions are irrelevant regarding actual camera performance. It is generally assumed on the internet that larger pixels collect more light and that cameras with larger pixels have greater low light sensitivity. The derived parameters like maximum signal per pixel (also called full well capacity) when compared between cameras do show that larger pixels hold more light (electrons). But that is like saying my bucket has more water in it because it is a 5-gallon bucket and you only have a one gallon bucket. But did I actually put any water in the bucket? In one recent argument, an internet poster said put out a thimble next to a swimming pool and see which one collects more rain drops. Well, that is obvious but the analogy to light and cameras is lacking one thing: a lens, or in the case of rain drops, a funnel. The rain drop analogy (Figure 1a) is good because like raindrops, light is composed of photons (particles of light) that randomly arrive at our eyes and camera lens. To illustrate this concept, consider the graphic in Figure 1b. The photon rain analogy can be considered raindrops on a rainy day, or photons coming to our camera. The orange lines represent funnels in the rain, or a lens focusing light onto a pixel in a camera. Two different cameras are illustrated, one having large pixels and one having pixels half the size. The lens collects the light and as long as the lens diameters are the same, the same amount of light is collected in the same exposure time. This results in equal performance as long as the pixel does not overflow (see Figure 1b caption). The amount of rain (photons) in each bucket (pixel) is the same.
Putting the above concepts to real world photography, the fundamental physics tells us:
(Technical notes: by lens aperture diameter, it really means the lens entrance pupil diameter. The technical term for equalizing the systems is equalizing the Etendue. Etendue is the lens aperture area times the subject or pixel angular size. Etendue is defined in more detail below. Output presentation assumes correct math to build photon statistics when resampling -- pixels need to be averaged, not skipped.)
The images and data in Figure 1c illustrate these concepts.

Constant f/ratio, changing sensor size. Another common situation is using cameras with different sensor sizes. For example, consider two lenses: 100 mm f/4 and 200 mm f/4. Regardless of sensor size, both f/4 lenses deliver the same light density to the sensor. Light meters read the same exposure time at the same ISO. The 100 mm f/4 lens has a lens diameter (technically the entrance pupil) of 25 mm. The 200 mm f/4 lens has an entrance pupil of 50 mm, so twice the diameter and 4 times the area of the 100 mm f/4 lens. Therefore, the 200 mm f/4 lens collect 4 times the light from a subject as the 100 mm f/4 lens.
While the 200 mm f/4 lens collect 4 times the light from a subject as the 100 mm f/4 lens, its greater magnification spreads the light over 4 times the area, so the LIGHT DENSITY remains the same as that from the 100 mm f/4 lens. But now consider that if the 200 mm lens were put on a 2x larger sensor, then it collects all the light in that 4x larger area. Thus, the camera with the 200 mm f/4 lens and the larger sensor collects and records 4 times the light as the 100 mm f/4 lens on the camera with the smaller sensor.
Constant f/ratio, same sensor. But the same concept holds for the same sensor when the subject is small in the frame. For example, say a bird is 300 pixels tall in an image made with a 100 mm f/4 lens. If the 200 mm f/4 lens is put on the same camera, using the same exposure time, the 200 mm f/4 lens collects 4 times the light as the 100 mm f/4 lens. That light is spread out over 4 times the area so the light per pixel remains the same. But there are 4 times more pixels on the bird (the bird now appears 600 pixels high). LIGHT DENSITY remains the same between the two bird images, but TOTAL LIGHT from the bird is 4x higher with the 200 mm f/4 lens.
A real-world example is shown in Figure 2 where a night sky image from two lenses are compared: 15 mm f/2.8 and 35 mm f/2.8, using the same exposure time, ISO and sensor. The 15 mm lens has a 5.36 mm aperture at f/2.8, while the 35 mm lens has an aperture of 12.5 mm. Thus the 35 mm lens collects (12.5/5.36)2 = 5.4 times the light from the SUBJECT in the same exposure. Here, the subject can be a star, a star cloud, or even the sky background. This will be explored further in part 2 (and the unprocessed image can be viewed).

Figure 2. Comparison of best effort presentation of two images,
both made with f/2.8 lenses, ISO 1600, 30 second exposures with the
same sensor. The 35 mm f/2.8 lens collects 5.4 times the light from
the SUBJECT as the 15 mm f/2.8 lens. The higher noise in the 15 mm image
is due to the lower light, combined with light levels so low that
fixed pattern noise from the sensor also contributes.
Both images are crops from the full frame and downsized
for presentation. The proportion of noise on a subject is the same
in the original images. Sky conditions were slightly worse for the
35 mm image with more haze which also added to the light pollution,
yet the larger lens produced a better image despite worse conditions.
(The bright stars are somewhat enlarged due to haze in the atmosphere.)
Now consider changing ISO. Changing ISO simply changes the level at which the camera says the pixel is "full" (Figure 3). If the pixel is truly full at ISO 100, then at ISO 200, the camera declares the pixel at half full to be "full" and increases the gain to give the digital values the same level in the recorded file as we would see in the ISO 100 data. So while we may have properly exposed the scene at both ISO 100 and ISO 200, the actual light recorded is different, despite correct exposure in both images. (If this is confusing, ISO does not change sensitivity; see http://clarkvision.com/articles/iso/ for more information.
![]()
Figure 3. The blue represents the maximum signal in a pixel. Higher ISOs
record proportionally less signal. There is no change in sensitivity
with changing ISO. The camera digitally fakes increased sensitivity
by saying the pixel is full (image value 255 on an 8-bit scale) at proportionally
lower levels as ISO is increased. This is a conceptual diagram, in real
pixels the electrons in the physical pixel are stored in a relatively
thin layer, more like a pancake relative to the area of the pixel.
Most photographers know that increasing ISO results in more perceived noise in both digital camera and film images. Noise in digital camera images is mainly due to photon noise. Photon noise is proportional to the square root of the number of photons collected. So with higher ISOs, the camera meter reduces exposure time or uses a slower f/ratio, thus collecting less light (true exposure). It is the same with film: higher ISOs result in less true exposure. Collecting less light (fewer photons) means the noise is actually less! But the signal is even less. The photon noise increases with the square root of the light collected (and thus, the changing meter values as ISO is increased). But light level is decreasing proportionally with ISO as the exposure time (or lens aperture) is decreased. The result is that signal decreases faster than noise, so the signal-to-noise ratio decreases as the ISO is increased and exposure time and/or lens aperture decreases. This signal-to-noise ratio decrease is what we perceive as increased noise in our high ISO digital images.
True Exposure
Today's digital photographers seem focused on the pixel: pixel level sharpness, and pixel level noise. But I argue we should all be focused on the subject, not the pixel. With this change in focus (puns intended), I hope you will see the proverbial light.
As an example, as we discussed above, lenses deliver the same light density on an extended object (pretty much everything but stars) at the same f/ratio regardless of focal length.
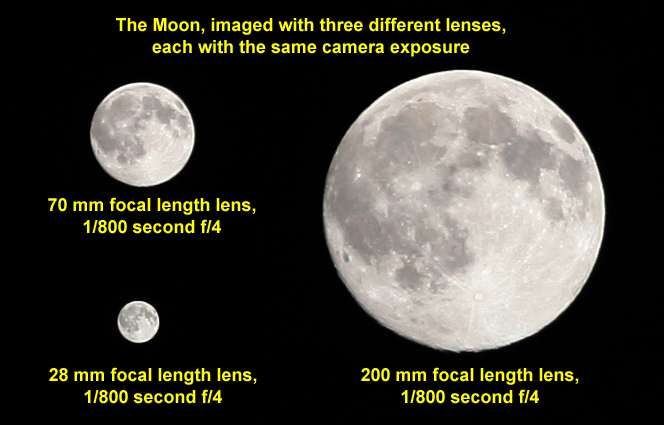
Which of the three Moon images in Figure 4 LOOKS brighter? The largest image. Each image of the Moon has the same LIGHT DENSITY, e.g. recorded the same average photons per square mm on the sensor, but because the largest Moon image covers more square mm, more light was recorded. The three lenses recorded the same LIGHT DENSITY (with the same exposure time and f/ratio) but DIFFERENT TOTAL LIGHT from the subject. Corollary: in the three Moon images f/4 ≠ f/4 ≠ f/4 regarding actual light recorded FROM THE SUBJECT. This is true in ALL photography.
From what has been discussed so far, it should be apparent that camera exposure and actual light recorded on a SUBJECT are different, even when exposure time and f/ratio are the same.
On the net, one can find long discussions like: "When is f/2 = f/2 = f/2" or other f/ratios. The answer is argued it is always equal with exceptions of stars. Physics rarely has exceptions like this. The real answer is they are never equal unless Etendue is equal (Etendue is discussed below), and there are no exceptions for stars.
The basic reason for the misconceptions of exposure and f/2 = f/2 is again confusing LIGHT DENSITY with actual light from the subject.
Etendue, the A * Omega Product
Both True Exposure and Camera Exposure can be explained by Etendue, the A * Ω product (Ω is the Greek letter Omega).
The actual light from the subject, delivered by a lens to the sensor is:
True Subject Exposure = EtST ∝ A * Ω(subject) * T * SE (equation 1)
Where
A = lens aperture area (more precisely, the lens entrance pupil area),
A = pi * D2 /4. where D = Lens diameter (entrance pupil diameter),
D = Lens diameter = focal length / f/ratio,
pi = 3.14159,
Ω is the solid angle of the SUBJECT,
T is the exposure time, and
SE= system efficiency = optics transmission * fill factor * quantum efficiency.
Note, the ∝ means proportional to.
Note, this equation is independent of f/ratio, ISO, and even focal length.
Assuming similar generation cameras, SE will be similar among various cameras, so
True Subject Exposure, EtST ∝ A * Ω(subject) * T (equation 2)
The nomenclature introduced here for EtST means Etendue (Et = A * Ω), Subject (S), and T (Time).
Going back to the Moon images in Figure 4, the aperture diameter of the 28 mm focal length f/4 lens is D = 28/4 = 7 mm, that of the 70 mm focal length f/4 lens is D = 70/4 = 17.5 mm, and that of the 200 mm f/4 lens is D = 200/4 = 50 mm. The subject is the Moon, which is 1/2 degree in our sky, and that angle does not change with lens focal length. Thus, with both Ω and T the same between the three images, the only difference is lens diameter. The 200 mm lens has 50/17.5 squared = 2.9 times more area, thus the 200 mm f/4 lens collected 2.9 times more light from the moon than does the 70 mm f/4 lens. The difference is even greater for the 28 mm versus 200 mm lenses: the 200 mm f/4 lens collects 200/28 squared = 51 times more light from the Moon. If the 200 mm f/4 lens didn't collect more light from the Moon, the image would have much lower signal-to-noise ratio and image quality would be much lower.
The subject need not be the whole object (like the whole Moon). The same holds true for each crater on the Moon, or a bird's eye, or a person's eyelash. Every portion of an image can be the "subject" and the same principles apply: the larger diameter lens collects more light, assuming the images were obtained from the same distance from the subject. If you change distance to the subject, then the inverse square law comes into effect (yes even for extended subjects as well as point sources). The inverse square law in photography will be the subject of another article.
The Etendue equation also explains light density and exposure per pixel (camera exposure). By making Ω the angular area of the pixel instead of the subject the equation tells us light density. The angular size of a pixel is pixel size/focal length (result in radians). For a canon 5D Mark II, each pixel is 6.4 microns square, or 0.0064 mm. Thus, the etendue, EtPT (Etendue, Pixel, Time) of a lens and pixel is:
Camera Exposure = EtPT ∝ A * Ω(pixel) *T (equation 3),
which can be reduced to EtP when all exposure times are the same:
Camera Exposure ∝ EtP ∝ A * Ω(pixel) (equation 4, for constant exposure),
The angular size of a pixel, Ω = (pixel size /lens focal length)2.
This result is in radians (57.29 degrees), which results in very small numbers,
so I use milliradians:
Ω = (1000 * pixel size in mm / lens focal length in mm)2.
In Figure 4, the lens was 200 mm f/4 with a 5 Mark II
camera with 6.4 micron (0.0064 mm) pixels.
D = 200 mm /4 = 50 mm. A = pi * 50 * 50 /4 = 1963 sq mm.
Ω = (1000 * 0.0064 / 200)2 = 0.001024 sq milliradians (mr)
EtP = A*Ω = 1963 * 0.001024 = 2.01.
The 70 mm f/4 lens gave:
D = 70 mm /4 = 17.5 mm. A = pi * 17.5 * 17.5 /4 = 240.5 sq mm.
Ω = (1000 * 0.0064 / 70)2 = 0.008359 sq milliradians (mr)
EtP = A*Ω = 240.5 * 0.008359 = 2.01.
The 28 mm f/4 lens gave:
D = 28 mm /4 = 7 mm. A = pi * 7 * 7 /4 = 38.5 sq mm.
Ω = (1000 * 0.0064 / 28)2 = 0.0522 sq milliradians (mr)
EtP = A*Ω = 38.5 * 0.0522 = 2.01.
Note that the EtP is identical for the 28, 70, and 200 mm f/4 lenses, explaining pixel-level constant exposure with f/ratio.
Conclusions
Thus, Etendue, the A*Ω product, explains both LIGHT DENSITY and TOTAL LIGHT from the subject in the sensor plane in the camera. Light density is used for exposure calculations but one should be more concerned about recording as much light as possible, thus TOTAL LIGHT (without blurring the subject if one wants a sharp image).
Understanding Etendue is key to understanding recording of light and getting the best performance from your camera system in different situations. The implications, for example, include:
Exposure and Digital Camera Series:
| Home | Galleries | Articles | Reviews | Best Gear | Science | New | About | Contact |
http://clarkvision.com/articles/exposure
First Published August 10, 2013
Last updated June 10, 2020.