
Wildlife Action Photography: Autofocus Tracking with Digital Cameras
by Roger N. Clark
I am often asked how I set up my camera to do action photography.
Here is my strategy. The key to fast autofocus and focus tracking is the use of phase detection
focus.
The Action Photography Series:
All images, text and data on this site are copyrighted.
They may not be used except by written permission from Roger N. Clark.
All rights reserved.
If you find the information on this site useful,
please support Clarkvision and make a donation (link below).
I am often asked how I set up my camera to do action photography.
Here is my strategy (I use a Canon camera so I'll cite the specific modes
on Canon cameras); other cameras have similar settings and many can also
take excellent action photos, so please do not take these descriptions as
endorsing Canon, nor that only Canon cameras can do this type of photography).
The key to fast autofocus and focus tracking is the use of phase detection
focus. This is a method where two or more small apertures are used to
mask the light from the lens at an out of focus position. The sensing system
can detect the direction and amount the image is out of focus, and command
the lens to move to the proper position. No second check is necessary in
most cases. Such phase detection systems are generally available on
single lens reflex (SLR) film and digital cameras. Few point and shoot
cameras have phase detection autofocus. The time to raise the mirror
in an SLR is small compared to alternative methods (e.g. contrast detection
autofocus) so SLR cameras currently have the fastest autofocus.
More on autofocus can be found at:
Combining the rapid measurement of focus error and magnitude with its
rate of change, allows modern SLR cameras to use predictive autofocus.
Predictive autofocus tracks the change in focus position, usually assuming
a linear velocity, and from the known time it takes to raise the mirror
and open the shutter, predicts where the focus should be when you press
the shutter button and the camera actually takes the picture. It is this
property that makes the modern SLR and DSLR ideal for action photography.
Point and shoot cameras with contrast detection iterative focus checking
are very slow in comparison to SLRs and DSLRs, although the former are
usually more expensive. The faster the camera, the faster the electronics
and mechanical movements must be, driving up costs.
With that introduction, here is how I do action photography.
Use Manual Exposure mode for subjects in constant light
You set aperture to control depth of field and also set the shutter speed.
If the subject is in constant light and moving with changing background
(e.g. sky to trees) or against a very different intensity background (e.g
dark bird against cloudy-bright sky), manual mode gives the most consistent
results. Check exposure by monitoring the histogram.
For maximum speed, open the aperture
all the way (smallest f/number). If you have a short enough exposure time
to stop the action the way you want,
you can close the aperture a bit to increase depth of field
or lower the ISO.
Use Aperture Priority mode only if the light on the subject is changing
(Av on Canon cameras).
For example, if the subject is moving in and out of shade.
You set aperture and
control depth of field and speed. For maximum speed, open the aperture
all the way (smallest f/number). If you have a short enough exposure time
to stop the action the way you want,
you can close the aperture a bit to increase depth of field.
Use Predictive Autofocus (AI servo on Canon cameras). Predictive
autofocus tracks moving subjects and sets the focus point predicting
where the subject will be after the delays in raising the mirror and
actually opening the shutter.
Use one focus point: A common mistake in action shots is to use
multiple Auto Focus (AF) points, then the camera confuses the subject and
often locks on to something you don't want. Use one focus
point and keep that AF point on the moving subject so the
AI servo can track it. The AF system has trouble with contrasty
back lit subjects, so try and choose well lit subjects and/or
backgrounds that are smooth (like birds with blue sky background).
Set ISO to stop action if that is what you want. Depending on
the speed of the action, you may need 1/500, 1/1,000, or even
1/2,000 second exposure time. 1/200 sec. only works for pretty
slow movement, unless the subject is very small in the frame.
Example: Eagle in Flight
A pair of eagles were moving down the beach, fishing, on the Kenai
peninsula in Alaska. I moved ahead of the direction of travel and got
onto the beach with my gear. An eagle landed not far from me. I moved
diagonally toward the eagle, acting like I was walking along the beach
not paying attention to the eagle. The eagle was aware of me but never
made any moves to indicate it was stressed. I positioned myself where
I thought the eagle would take off and fly generally in my direction.
I got in position several minutes before the eagle took off.
This image was made a 500 mm f/4 L IS lens with the now discontinued Canon 1D Mark II, but now for images like
this usei a
Canon EOS 7D Mark II DSLR Camera with a
Canon EF 300mm f/2.8L IS II USM Lens.
and have better tracking and more detail on the subject.
This example uses a bald eagle starting from a sitting position, then
taking off and flying past me.
The camera used was a Canon 1D Mark II
with a 500 mm f/4 L IS lens plus a 1.4x teleconverter, giving 700 mm at f/5.6.
The 1D Mark II is a 1.3x crop sensor, so at 700 mm the field of view is
2.23 x 1.56 degrees. The ISO was 400 and exposure times varied from
1/1250 second to 1/1600 second except the last frame (Figure 24 below)
was 1/500 second. The camera and lens was mounted on a carbon fiber
tripod (which is very good at reducing vibrations), using a Wimberly (gimbal) head.
The camera and lens were well balanced to that they would easily
move in both directions and would stay point in the same direction if I
let go. It is the superb balance that allows ease of tracking a moving
subject with a long telephoto lens. Image stabilization was on. I only turn
off image stabilization if I lock the axes so the lens only points
at a static subject.
My goal was to get the eagle in close to full frame flying with its
wings outstretched. Critical to a successful wildlife photo is to have
the eyes in focus. So, with the eyes in focus, and the wings in a nice
V shape, I thought the body of the bird would be below center for this
image, so I set
the camera for one autofocus point below center. This meant I needed
to keep the one autofocus square on the eagle's eye. But at the long
telephoto length, one autofocus square is only 4.5 x 6.4 arc-minutes on
the eagle. That is about the size of a U.S. quarter (2.4 cm diameter)
at a distance of 20 yards (18.3 meters). When the subject is close
so it fills the frame and is moving fast, the angular turn rate is high,
making pointing with such fine accuracy difficult. That will make it
hard to keep the autofocus rectangle positioned perfectly. Below shows
how I did. Keep in mind, this was the first try of the day.
The images below show the full frame of the 1D Mark II camera
and the 45 focus points. The focus point in use is colored
in red. These images are screen grabs from zoombrowser and
do not have a color managed work flow done.
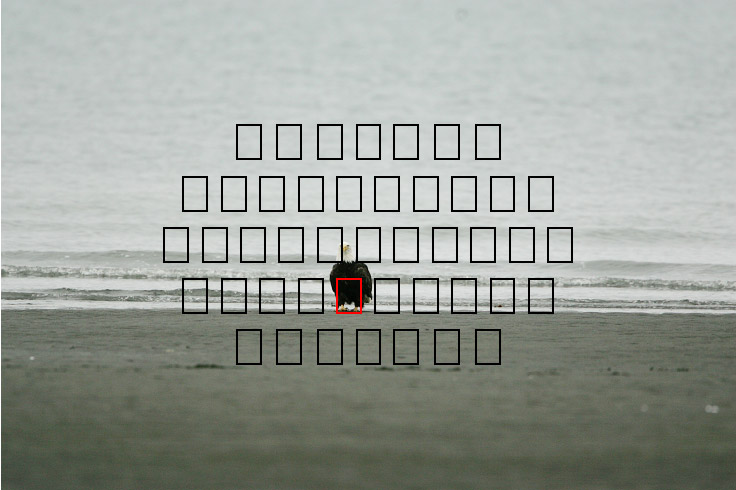
Image eagle.09.15.2008.jz3f3010.af-b.jpg
Figure 1. Time from takeoff ~ -14 seconds.
The eagle is showing some interest and may be getting ready to
take off.
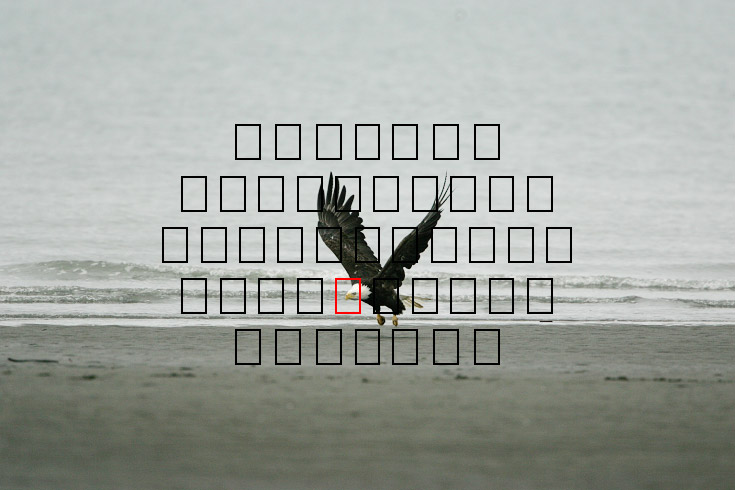
Image eagle.09.15.2008.jz3f3011.af-b.jpg
Figure 2. Time from takeoff ~ 1 second. The is the first frame
in reaction to the eagle taking off. I have the eagle's eye
nicely within the autofocus rectangle (note the active autofocus area
is actually a bit larger than the red rectangle on this camera).
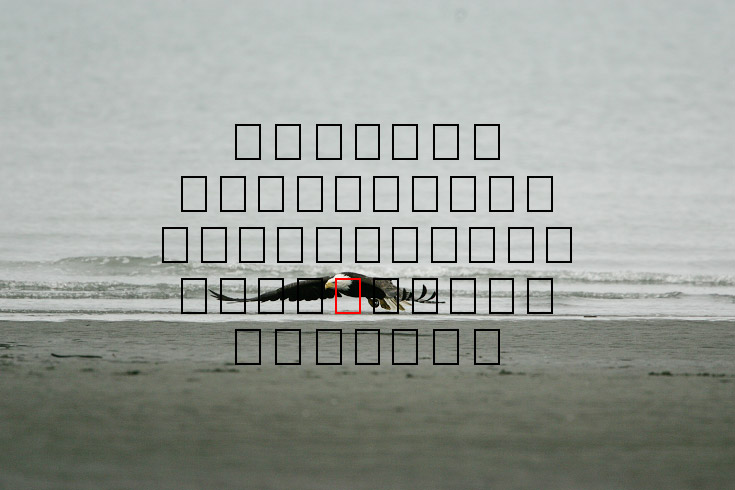
Image eagle.09.15.2008.jz3f3012.af-b.jpg
Figure 3. My tracking is still good but not perfect. With the
distance to the bird, the entire bird is in focus.
Time from takeoff ~ 1+ seconds.
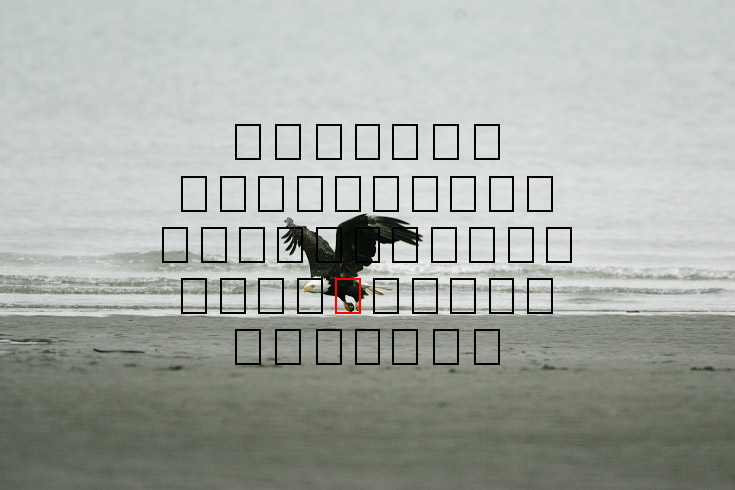
Image eagle.09.15.2008.jz3f3013.af-b.jpg
Figure 4. My tracking is now a bit off, but at this distance, the
depth of field is still large enough to keep the bird in focus.
Time from takeoff ~ 1+ seconds.
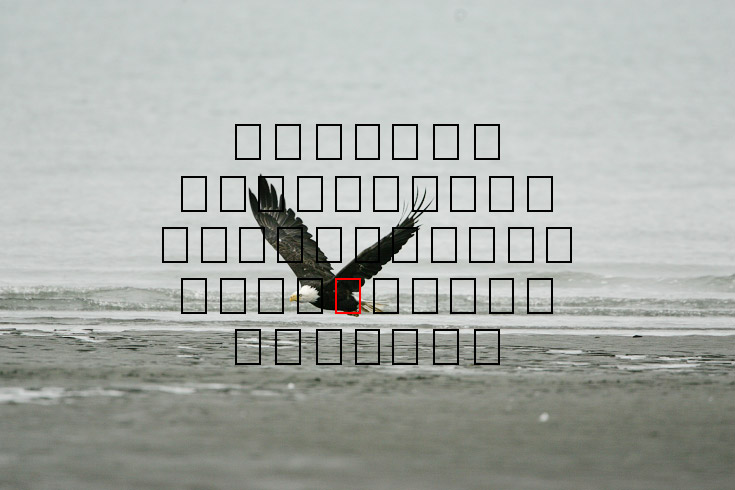
Image eagle.09.15.2008.jz3f3014.af-b.jpg
Figure 5. My tracking is still a bit off, but at this distance, the
depth of field is still large enough to keep the bird in focus.
Time from takeoff ~ 2 seconds.
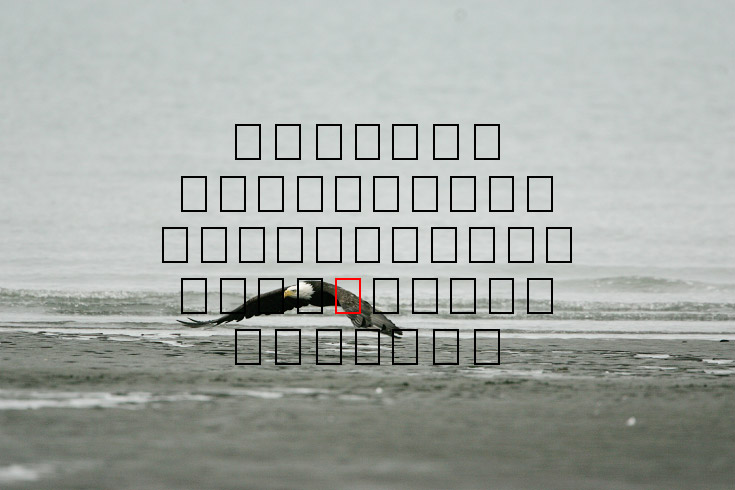
Image eagle.09.15.2008.jz3f3015.af-b.jpg
Figure 6. My tracking is still a bit off, but catches the wing
at about the same distance as the eagle's eye.
The bird is moving at a rate of about 35 arc-minutes /second
(almost 0.6 degree/second), and my position error is about 6 arc-minutes
Time from takeoff ~ 2+ seconds.
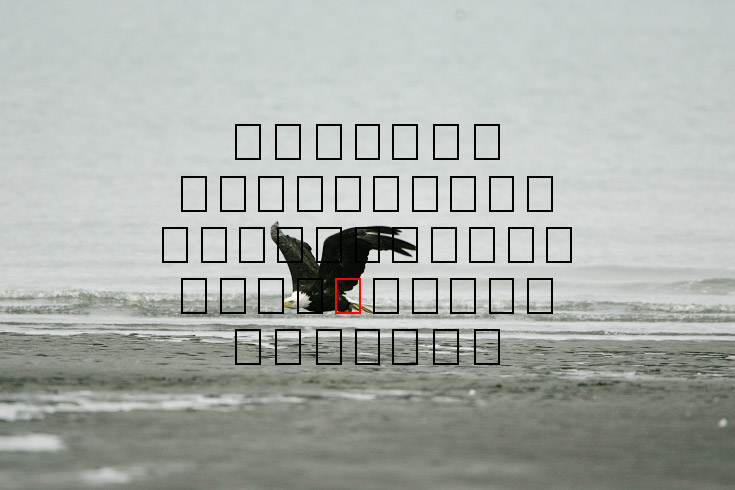
Image eagle.09.15.2008.jz3f3016.af-b.jpg
Figure 7. I'm still slightly lagging on the tracking, but
I'm no longer continuing to fall behind. From the timing,
I'm shooting short bursts of images as the bird moves closer.
Time from takeoff ~ 2+ seconds.
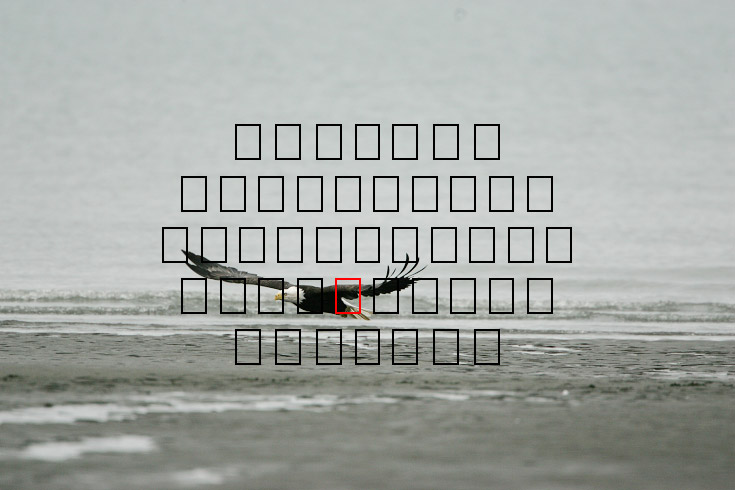
Image eagle.09.15.2008.jz3f3017.af-b.jpg
Figure 8. The eagle is accelerating and as it approaches, the angular rate
increases. I am still lagging, but still not falling more behind.
At this range, depth of field still has the entire bird in good focus.
Time from takeoff ~ 3 seconds.
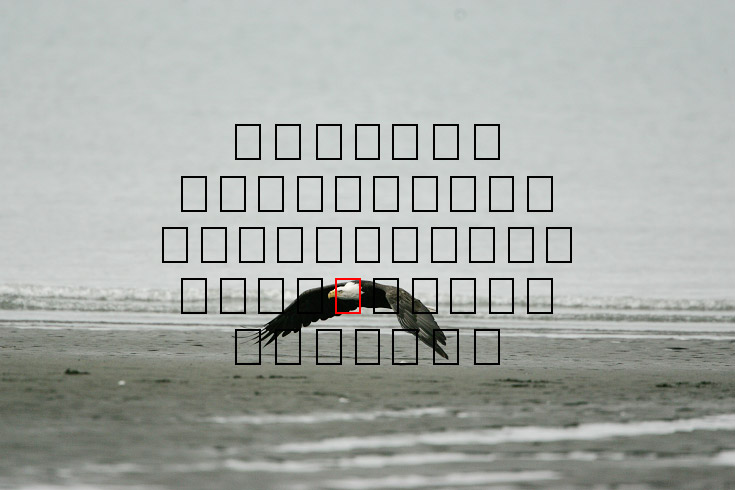
Image eagle.09.15.2008.jz3f3018.af-b.jpg
Figure 9. The angular rate of the bird is now 3.2 degrees/second,
(about 190 arc-minutes/second). My tracking is now back on the
eagle's eye.
Time from takeoff ~ 3+ seconds.
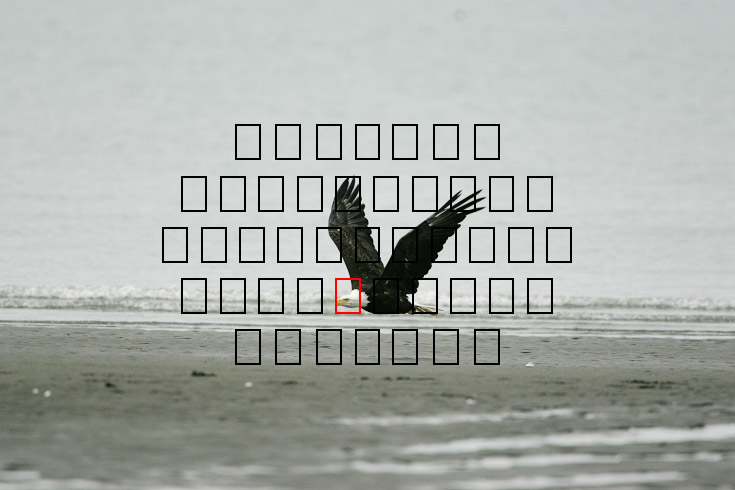
Image eagle.09.15.2008.jz3f3019.af-b.jpg
Figure 10. My tracking is now right on.
Time from takeoff ~ 3+ seconds.
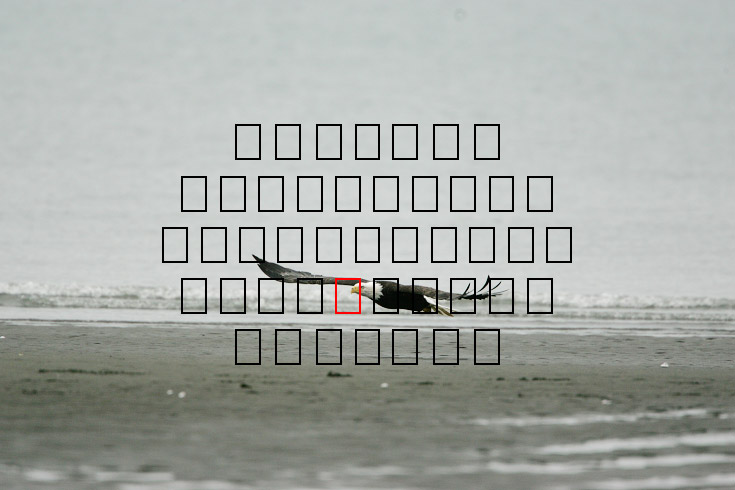
Image eagle.09.15.2008.jz3f3020.af-b.jpg
Figure 11. My tracking is still excellent but is getting
slightly ahead.
Time from takeoff ~ 3+ seconds.
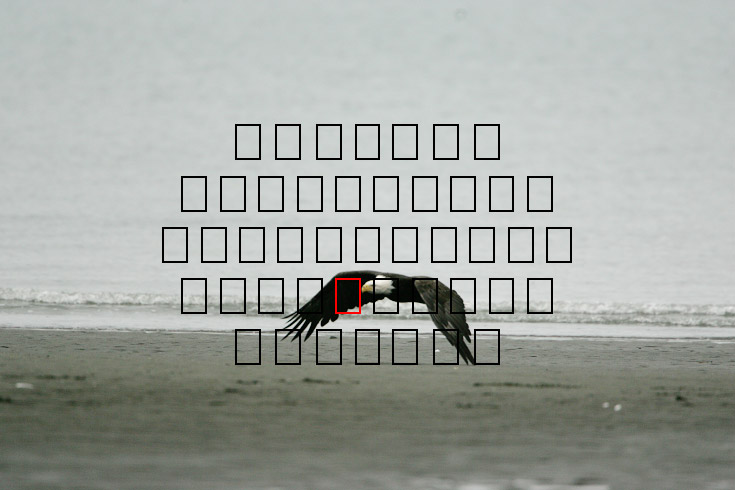
Image eagle.09.15.2008.jz3f3021.af-b.jpg
Figure 12. My tracking is still excellent but is getting
still moving slightly ahead.
Time from takeoff ~ 4 seconds.
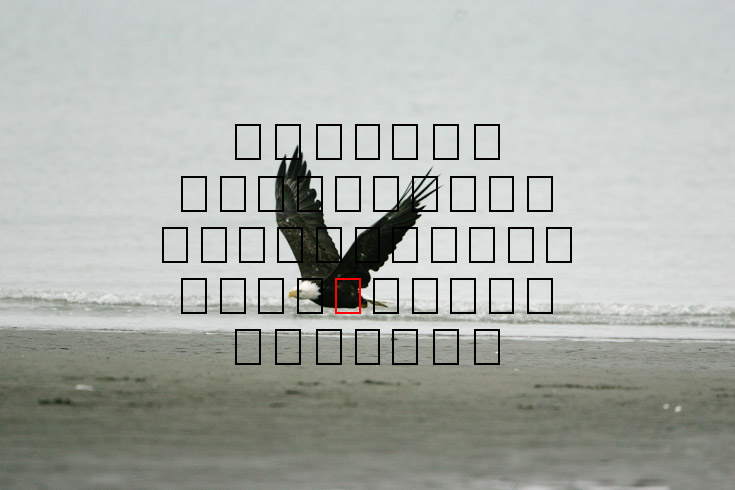
Image eagle.09.15.2008.jz3f3022.af-b.jpg
Figure 13. I reduce my turn rate and fall slightly behind.
The entire bird is still in good focus.
Time from takeoff ~ 4 seconds.
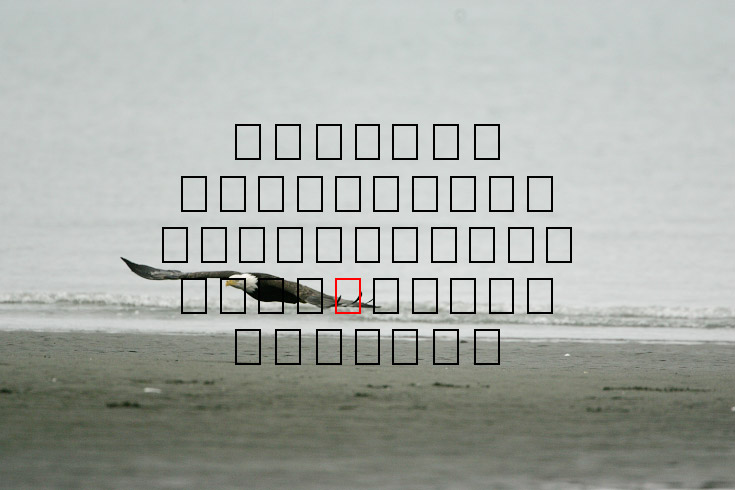
Image eagle.09.15.2008.jz3f3023.af-b.jpg
Figure 14. I continue to fall behind as the angular rate accelerates.
Now the eagle's wing tip is in best focus.
Time from takeoff ~ 4+ seconds.

Image eagle.09.15.2008.jz3f3024.af-b.jpg
Figure 15. I compensate and get the focus point closer to
the eagle's eye. The entire bird is in good focus again.
Time from takeoff ~ 5 seconds.
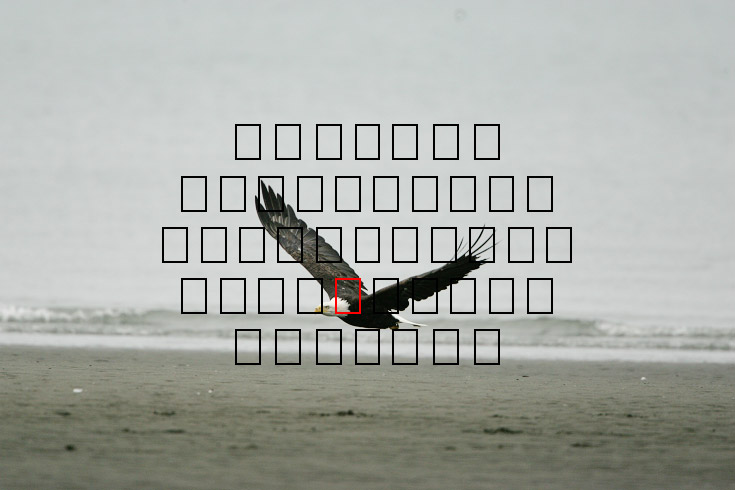
Image eagle.09.15.2008.jz3f3025.af-b.jpg
Figure 16. The angular rate is now 300 arc-minutes/second (5 degrees/second),
and my position error is about 4 arc-minutes.
Time from takeoff ~ 5+ seconds.
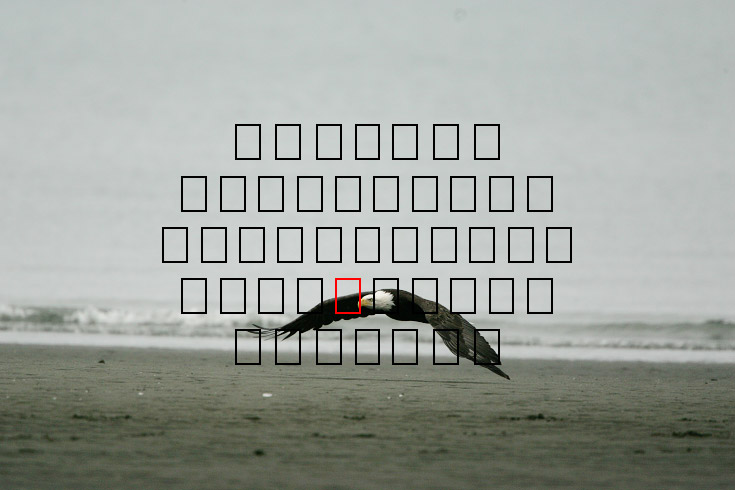
Image eagle.09.15.2008.jz3f3026.af-b.jpg
Figure 17. At the high angular rate, it is becoming harder to
track the bird, but I remain close to my desired position.
Time from takeoff ~ 5+ seconds.
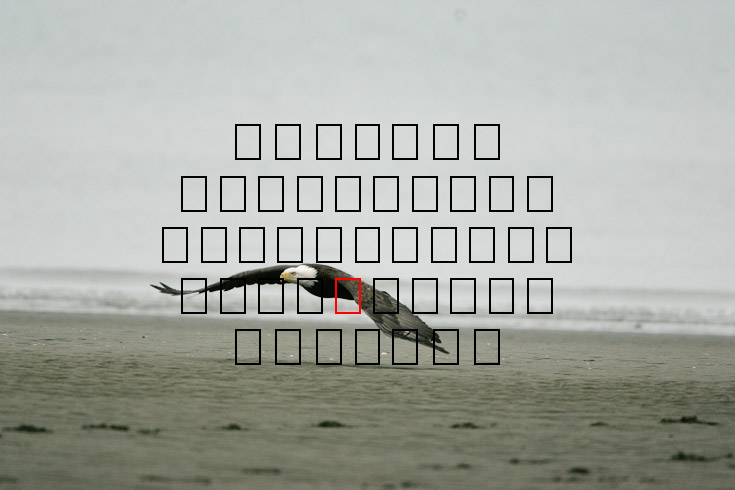
Image eagle.09.15.2008.jz3f3027.af-b.jpg
Figure 18. I'm beginning to fall behind again, but not too far off.
After this frame, I fall off the bird and lose focus.
Time from takeoff ~ 6 seconds.
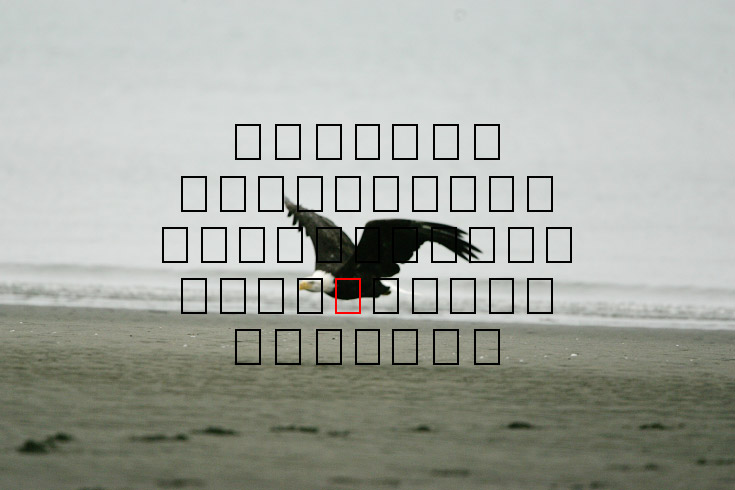
Image eagle.09.15.2008.jz3f3028.af-b.jpg
Figure 19. A fraction of a second from the last frame, I re-acquire
the bird with the autofocus point, but the camera has not yet caught up,
so this frame is out of focus due to operator error.
Time from takeoff ~ 6+ seconds.
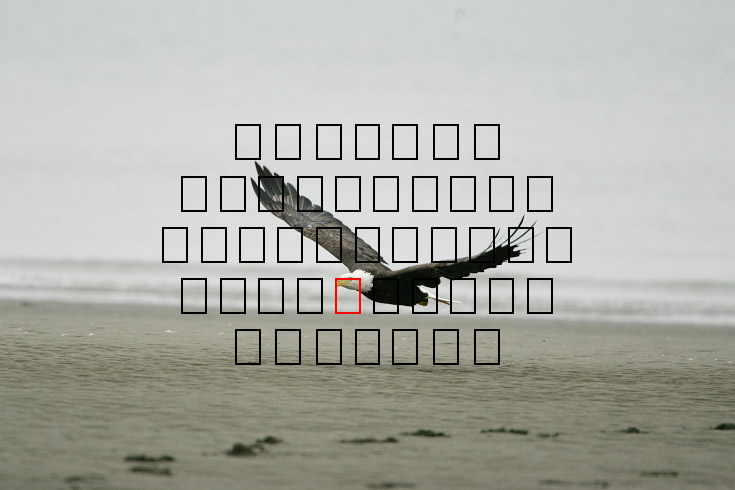
Image eagle.09.15.2008.jz3f3029.af-b.jpg
Figure 20. I've gotten the autofocus back close to the eagle's eye and
the camera has caught up, recovering from my error.
Time from takeoff ~ 6+ seconds.
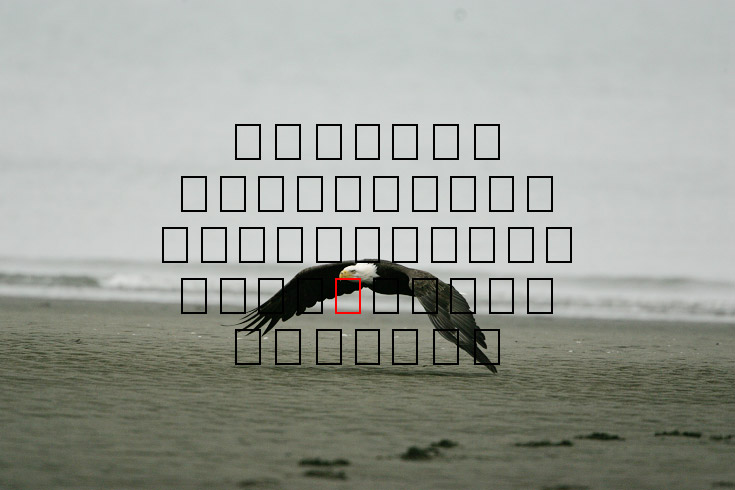
Image eagle.09.15.2008.jz3f3030.af-b.jpg
Figure 21. My tracking is still pretty good. The bird is increasing in
altitude (the beach being further away makes this fact not as obvious),
so I must increase my vertical rate as well as my azimuthal rate.
The beach is extending diagonally up toward the left, it is not an
error in tilt of the camera.
Time from takeoff ~ 6+ seconds.

Image eagle.09.15.2008.jz3f3031.af-b.jpg
Figure 22. My tracking continues to be very good
and the bird remains in focus.
Time from takeoff ~ 7 seconds.
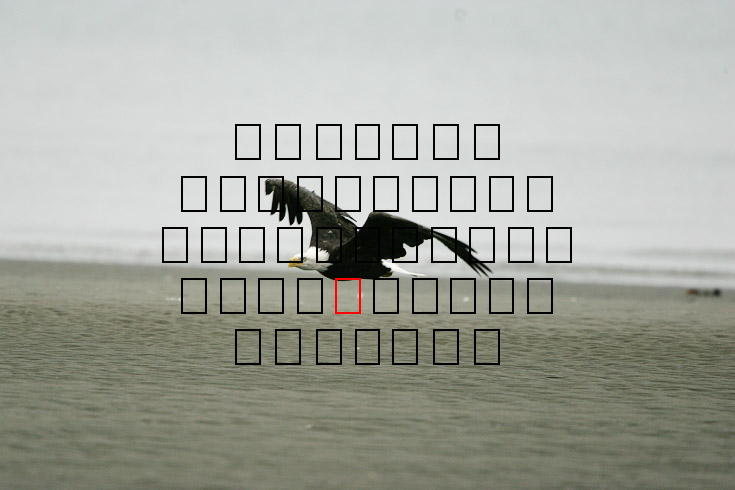
Image eagle.09.15.2008.jz3f3032.af-b.jpg
Figure 23. The angular rate is now about 20 degrees per second
(1200 arc-minutes/second)! My position error is about 10 arc-minutes,
but I think this is pretty good for the angular rate.
Note that if there was a contrasty background, I probably would have
lost focus on the bird.
Time from takeoff ~ 7+ seconds.
I know at this time that the bird is about to pass very close to me.
Not wanting to risk getting the wrong wing position or filling my
buffer and missing the close shot, I keep my finger on the shutter,
pressed half way so the autofocus system continues to track the bird.
I wait for the bird to move into position and frame one shot (Figure 24,
below) when its wings are in the raised V position.
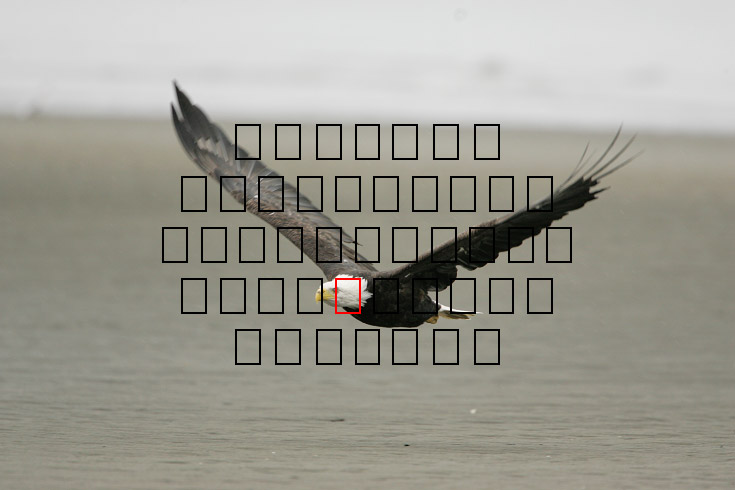
Image eagle.09.15.2008.jz3f3033.af-b.jpg
Figure 24. The eagle in the final frame before passing by me.
The eagle's eye is on the edge of the autofocus sensor but within
the sensor's active area. The bird is so close that the depth
of field is small enough that the wings are slightly out of focus.
The 1/500 second shutter speed is not fast enough to freeze the
wing tip motion, but that imparts the perception of the rapid movement
of the wings. Time from takeoff ~ 10 seconds.
Conclusions
The predictive autofocus tracks the changing distance to the camera
quite well. With long focal length telephoto lenses, the
corresponding narrow field of view makes it difficult to track
a fast moving subject. Even so, with the lens and camera balanced
on the gimbal head, out of 24 frames shot, 22 had the bird's head and
eyes in focus, for a 92% success rate on the first tracking attempt of the
day (with the error mine and not the camera's). And more
important, the closest images, with the distance and
angular rates at their maxima, have excellent focus and sharpness
on the head and eyes. Acquiring the bird at a great distance and following
it allowed me to adjust rates, and if desired, I could have moved
the focus point for desired composition (which I often do with birds in
flight, or animals running, playing, and fighting).
If you wander around the subject while tracking,
the autofocus systems must compensate and move the focus to that which comes
within the focus sensor, and if you fall off the subject, the focus
will be thrown off and will likely lock onto something in the background.
Some cameras can not recover from such drastic loss of focus very quickly,
with the loss of the best images. The higher end cameras, with their
faster response, can recover from such errors quickly.
If you use multiple autofocus points, you risk the possibility that
one autofocus point will lock onto the background, losing your subject.
Normally, I would not use this strategy of near continuous framing
in photographing action such as
the eagle. I was taking images to illustrate the longer term tracking
of action. I would normally not take so many images early in the
sequence when the bird is far away. I would track it as shown here,
with my finger half pressed on the shutter button.
However, once I saw its flight path, I would wait and frame more images when
it was close or had a better background, or was doing something
more interesting, as in some of the eagle images, linked below in my Eagle Gallery.
Another lesson, was not shown here. A friend was also photographing close by,
perhaps 6 yards away (~6 meters). The bird was flying low enough that
from his view, the bird passed on the other side of me, and my momentary
appearance in his field of view caused his autofocus tracking to lose
lock on the bird, losing some close images. So keep a good distance
between you and other photographers in case of low flying subjects.
More birds in flight images can be viewed in my
Birds in Flight Gallery.
Additional Examples
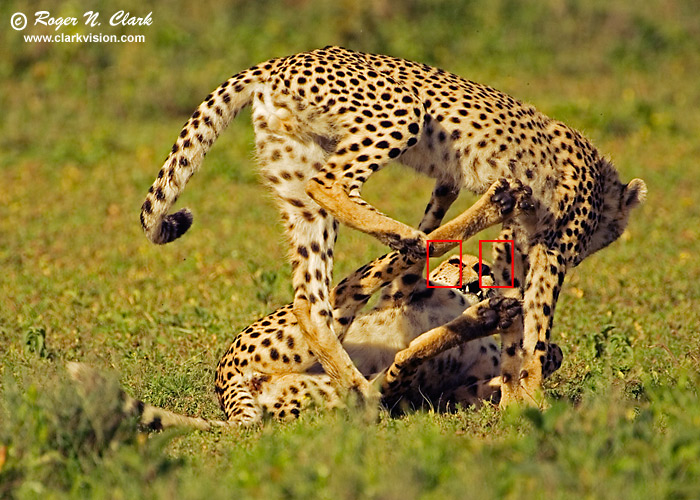
Image cheetah.c01.26.2007.JZ3F2435c-700-af.jpg
Figure 25. This mother and cub cheetah were playing on the Serengeti. As I followed
them, I moved the focus point to keep the composition desired and the focus points on
their eyes. In this case, two off-center focus points were used (2nd row from top,
2nd and 3rd AF-points from right edge).
The gallery image is
HERE.
If you find the information on this site useful,
please support Clarkvision and make a donation (link below).
Additional Reading
Using multiple AF points in the EOS-1D X and 5D Mark III
"http://www.learn.usa.canon.com/resources/articles/2012/5d3_multiple_af_points.shtml
This article has good information for other Canon cameras too.
The Action Photography Series:
http://clarkvision.com/articles/tracking.action.with.autofocus
First Published September 27, 2008
Last updated March 8, 2016.