ClarkVision.com

| Home | Galleries | Articles | Reviews | Best Gear | Science | New | About | Contact |
(How much detail can you capture and scan?)
(And other information on digital camera detail and print resolution.)
by Roger N. Clark
| Home | Galleries | Articles | Reviews | Best Gear | Science | New | About | Contact |
by Roger N. Clark

Mt Sneffels reflection
Image quality and sharpness are critical if a photograph is going come close to the perception of "being there." The examples here illustrates what can be obtained at different scanning resolution and the difference in ultimate sharpness with film sizes. The results show the significant advantage of film size (larger = better) and show that lens resolution is not the ultimate limitation with color film, even with fine grained film or the smallest digital image camera pixels.
What kind of detail can you record on film and then digitize? Two popular film formats were tested: 35mm (image size approximately 24mm x 36mm, or 0.94 x 1.41 inches) and 4x5 (image size approximately 97 x 122 mm, or 3.8 x 4.8 inches). All tests used tripod mounted cameras and the field of view set to put approximately the same image area onto the film (as in the above image). The film in both cameras was Fujichrome Velvia, one of the finest grained color slide films available today. Multiple exposures were obtained alternating between the 35mm and 4x5 cameras. Lens aperture was f/11 on the 35mm and about f/45 for the 4x5 camera (thus diffraction limits the angular detail in the focal plane on the 4x5 to approximately the same as the 35mm lens). All film (35mm and 4x5) were processed by a professional lab in one two hour period on the same day.
The sharpest 35mm and 4x5 transparencies were selected and digitized on a drum scanner. The 4x5 was scanned at about 3300 DPI ("dots" or pixels per inch), and the 35mm was scanned at various resolutions, thus resolution differences within the 35mm are solely due to DPI and not differences between scanners. Because of the commonality of film, lens aperture and scanner, the main difference between image detail between 35mm and 4x5 is film grain (and film resolution). 4x5 shows a huge advantage when making enlargements.
Resolution Test Area 1: Grass Field
The images below show enlargements in the distant grass field (in the white box in the above image). Each resolution was enlarged to match the 4x5 scan so image detail differences can be readily seen. Imagine the image at the top of this page spread out before you in a 15 x 19 foot enlargement. Move back from your monitor about 6 feet and imagine the entire image before you, then focus in on the patch of grass in the image below.
After the drum scans are scans of the 35mm slide on an HP Photosmart (the original SCSI model), a Nikon LS2000, and a Polaroid Sprintscan 4000. Note the detail differences from the drum scans.

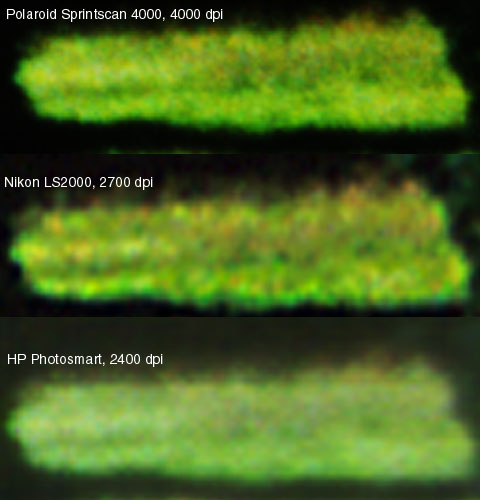
Only the 4x5 resolves the grass blades. The 35mm resolves clumps of grass blades. In the 35mm scans, it is hard to tell what is grain and what is real image detail. There is some of both. Below, other images will be compared between the actual scene (above) with images of a print from the 4x5 image. That comparison will help show what is real versus what is grain in 35mm. In any case, the images here illustrate the advantage of film size.
The lens systems in this test were essentially diffraction limited (meaning essentially the best that can be done for the lens and apertures chosen). Because the 4x5 image was done at f/45 and the 35mm at f/11, the diffraction limits say the image detail should be the same in both imaging systems (35mm and 4x5). But it clearly is not! The conclusion is that the 35mm image is film grain limited (for color film), not diffraction limited. This will be discussed in more below. (Black and white films are finer grained and some, like Kodak 2415 may change the situation--I have yet to evaluate such fine-grained film.)
Resolution Test Area 2: trees and Mountains
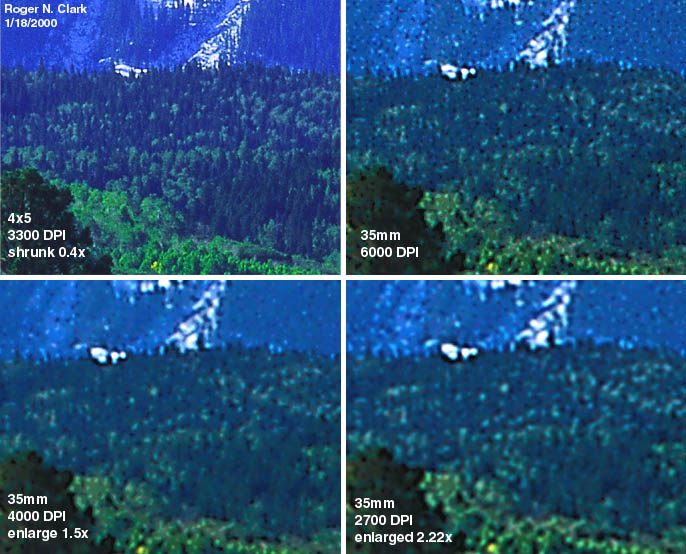
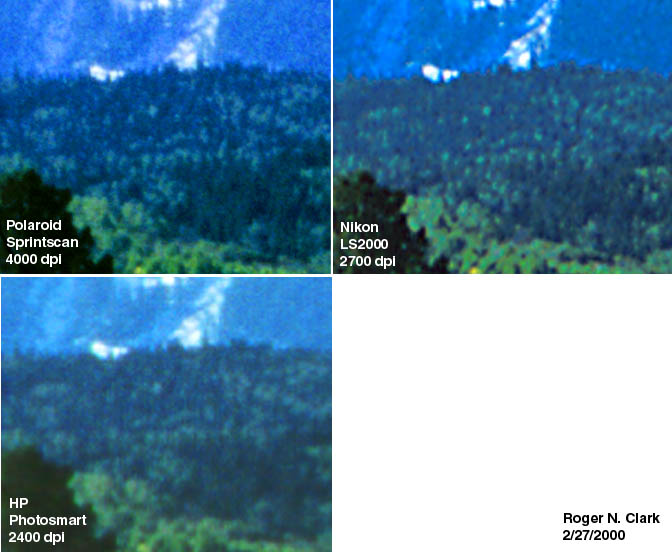
A second area is shown where the 35mm 6000 DPI scan is shown at 100% and other scans are shown relative to the 6000 dpi scan. The 4x5 image is still best. There is a significant increase in detail from 2700 DPI to 6000 DPI 35mm, and proportionally in between. The is only a slight increase in detail from 4000 to 6000 DPI because grain is resolved better, but that increase is important for big enlargements (more than about 11x14). On a 72 DPI monitor, these images are equivalent to a 72x91 inch enlargement. After the drum scans are scans of the 35mm slide on an HP Photosmart (the original SCSI model), a Nikon LS2000, and a Polaroid Sprintscan 4000. Again, note the detail differences from the drum scans, and the detail differences at higher dpi.
Resolution Test Area 3: Close Grass Blades
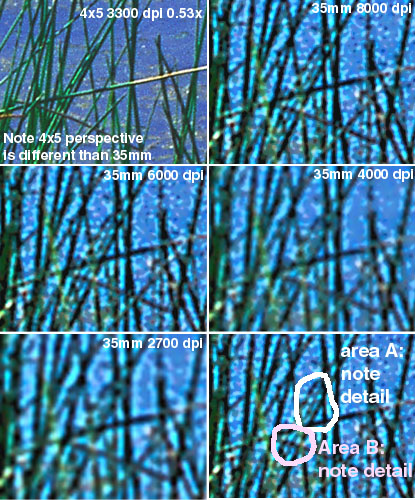
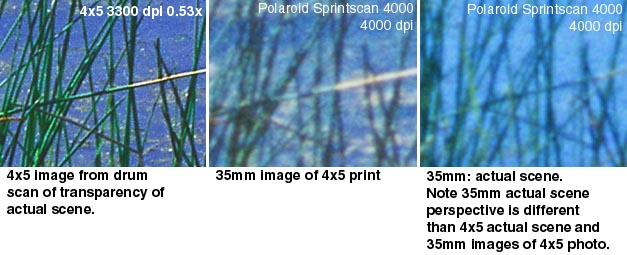
To some, the above images do not show significant detail above about 4000 dpi in the 35mm scans (I think they do). One could question whether or not it is just grain being resolved or real image detail. So below is another set of comparisons where there are larger structures (resolved grass blades in the foreground). There are two areas to note (shown in the lower right corner): area A and B. Compare area A: at 8000 dpi (35mm) 3 parallel grass blades are resolved. Same at 6000 dpi (maybe slightly less distinct). At 4000 dpi the blades are not fully resolved, just a hint that one might think is grain. At 2700 dpi, area A, the blades are not resolved. Now compare area B, which has the same 3 blades of grass, but slightly wider spacing. The 2700 dpi scan does not resolve them, but the 4000 dpi scan does. The 6000 dpi scan shows it a little better, but one might conclude not by much.
After the images of the drum scans are scans of the 35mm slide on an HP Photosmart (the original SCSI model), a Nikon LS2000, and a Polaroid Sprintscan 4000. As before, note the detail differences from the drum scans. A surprising result is that the Polaroid Sprintscan resolves the grass blades in area A similar to the 6000 dpi drum scan. The Nikon resolves the blades a little better than the corresponding 2700 dpi drum scan. It appears the drum scan had too much overshoot (appears similar to too harsh of unsharp mask), and a change in the drum scan parameters might optimize it a little better. Note that some of the bright spots in the water in the above scans, which may look like grain, are bright areas such as the bottom showing through the shallow water.

Conclusion: the image has a lot of detail, but how it looks and is resolved depends on the the specifics of the detail. One can choose a portion of an image to make a particular point or scan look good.
From the above scans, it shows that 35mm shows increasing detail at least to 6000 dpi in the drum scans (5650 x 8500 pixel image = 144 MBytes), and similar to the best consumer film scanners available today (4000 dpi). The more common film scanners (2400 to 2800 dpi) do not record all the detail on images such as this one (they probably will record all detail on grainier film, or hand-held snapshots). Note, 6000 DPI on 35mm is 48 megapixels (RGB pixels) (compared to the couple of megapixel digital cameras available today in the consumer market--and only mono-color pixels--more on digital cameras below).
Extending the Testing: Actual Scene and Imaging a Print
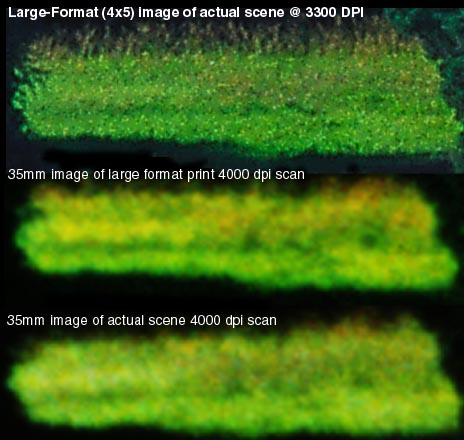
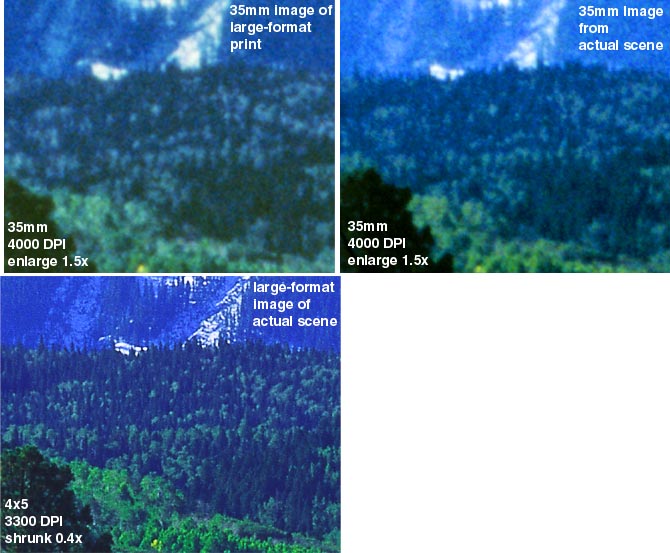
To extend the above tests to other cameras, I would have had to have all cameras on site and completed all the imaging at one time. As new cameras become available, it is desirable to test them. To do this, I used the 4x5 image to make a digital, lightjet 5000 print 30 x 39 inches in size on Ilfochrome Classic (Cibachrome) paper. This print was then used as a test target for additional testing. In this section I'll compare 35mm images of the actual scene to 35mm images of the print, for the 3 test areas. The purpose of this test is to show that imaging on the print produces very similar results to imaging the scene.
The results, below, show that the detail is close to the same between actual scene and print imaging. There is a slight increase in contrast when imaging the print. There are some slight changes in color balance, but they will be ignored for the most part, and only image detail will be discussed.
For all tests below, comparison is made only to the test print and not to the actual scene. Above established the differences between 4x5 and 35mm film formats, whereas below will compare 35mm film to digital cameras. Each is an internally consistent comparison, and because 35mm is common to both actual scene and test print, the extension can be made from digital camera to 4x5, if one wishes. If there is any bias in going from actual scene to test print, the image detail in the test print is slightly higher, partly due to the increased contrast. This makes any lower-end result slightly better than reality, but this is very minor considering the huge variation in image detail that is observed from 1 megapixel digital cameras to 4x5 fine-grained film.
Digital Camera Resolution: How many Pixels and How Much Image detail? Initial Testing
An often asked question is how many pixels does film have versus digital cameras. Tests in this section begin to answer this question.
Shown here are images from digital cameras and 35mm, both imaging the same test target. The digital camera images were done by imaging a 30 x 39 inch print (from the large format). I've done multiple tests. For the initial tests, I used an HP C200 digital camera (872 x 1152 pixels) but closed in so the full image over-filled the field of view. In a more extensive tests, shown after the C200 tests, I used a Nikon 950 2 MPixel camera. At different distances, the full image has varying total pixels (shall we say, virtual image size?). test areas 1 and 2 were done at 2 distances to give equivalent fields of view of about 1900 x 2470 (4.7 megapixel image) and 1000 x 1300 pixels (1.3 megapixel image).
Note the increased color detail as image detail is resolved. Compare image detail between digital cameras and film scans. All systems imaged the same test target, but color and contrast could be slightly different, just as they would be between two different films. However, there is a a consistent increase in color accuracy as image pixels increase. The reason is because the interpolation of color that digital cameras do. They have less color resolution than intensity resolution.
Digital cameras count each red, green and blue pixel as a separate pixel. Thus, 1000 x 1300 = 1.3 megapixel camera includes each red, green and blue pixel--there is only one color per spatial pixel. A film scanner produces 3 colored pixels per spatial pixel, so are true color pixels. A 1130 x 1690 pixel 35mm scan (1200 DPI) = 1.9 true red-green-blue pixels.
A digital camera using monochrome pixels synthesizes a full RGB per pixel image by interpolation. Thus color resolution is lower than intensity resolution. But the interpolation algorithms are pretty good so there is, in general, not a factor of three difference in image detail between monochrome digital camera pixels and 3-color scanned film. The difference is typically less than a factor of two. In tests below, a factor of about 1.6 seems to emerge as the factor in monochrome pixel versus full RGB resolution fo real work images.
Digital cameras have a long way to go to match even the low end of 35 mm film + scanner resolution. (There are certainly applications where digital cameras are better suited, because film developing plus scanning is very time consuming. The HP C200 digital image of Mt. Sneffels is about double the size of the image at the top of this page and shows about the same detail. Such images make great small prints and excellent web pictures.)
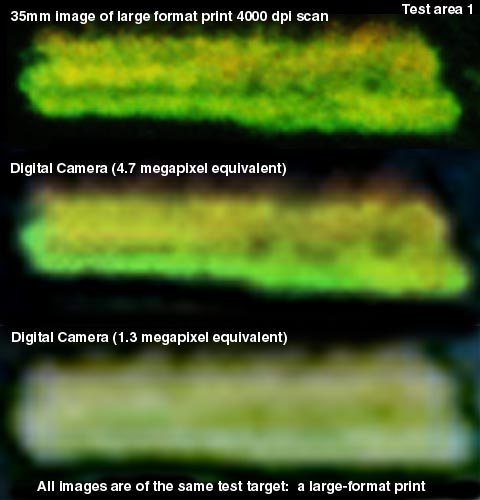

The image below is a consistent comparison of digital and 35mm. The 30x39-inch test print was imaged with 35mm and a digital camera at different distances to simulate what larger pixel digital cameras could achieve in image quality. Film is scanned with each pixel have a red, green and blue value, so the 3260 x 4472 pixel scan of the 35mm film is 14.6 megapixels. But these are not the same as the pixels in a digital camera. In a digital camera, each pixel is ony a red, or a green, or a blue pixel. Digital cameras have 50% green, 25% blue and 25% red pixels (thus called RGBG). So a 1 megapixel digital camera has 1 million red + green + blue pixels. Thus, the 35mm scan has 14.6 * 3 pixels or 43.8 megapixels in digital camera equivalent pixels.
Now compare the images below. Moving from right to left, we see the increased image detail as the image pixels increase. Even at 5.6 megapixels, however, the image does not come close to the detail of 35mm film (and note that the 4000 dpi scan does not get all the detail on the film). from right to left the color improves as the digital camera pixels increase. This is an effect of resolving the grass blades better. Note, also, in the 5.6 megapixel digital camera, the nearly horizontal grass blade near the center of the frame appears double. This is a digital camera error in reconstructing the image from the monochrome pixels.
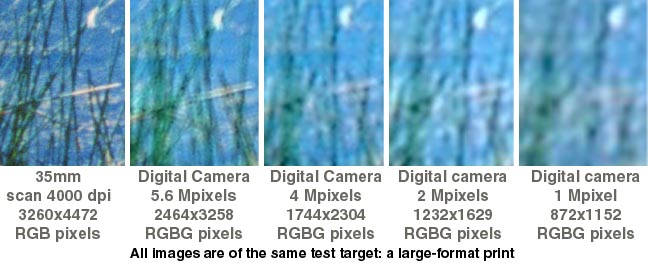
Digital Camera Resolution: How many Pixels and How Much Image detail?
Detailed Testing 2
The above testing did not go far enough in answering the often asked question: Digital versus film: how many digital camera pixels are equivalent to film? This is not a simple question, nor does it have a simple answer. First, what film? Different films have different capabilities. For my photography, I need SHARP images that enlarge as much as possible. I use the finest grain film to achieve this (usually Fujichrome Velvia). So my comparisons are biased to this question. Coarser grained films will generally have a lower megapixel digital equivalent, so this testing represents a likely upper limit.
Important notes before examining the test results. I found the test results surprising. Some notes:
1) Film people (I've even done it) often cite that they scan 35mm film at 4000, 6000, even 8000 dpi getting additional detail out of the film. This is true. But, as I've shown with the testing on this page, film is the limit to the optical system as I use it (in my photography). Digital sensors do not have the resolution limits of film, so we will see that fewer digital camera pixels are needed than film scan pixels. But how much less?
2) PERCEIVED image sharpness of digital camera images is surprisingly good, BUT I found that some of that detail is manufactured and not real! When examining the test results below, before concluding that a digital camera image looks better than the film image, examine the higher resolution digital image to be sure what detail is real and what is not!
3) Digital camera images appear sharper at a lower megapixel level than scanned film, but color resolution is poorer. So when comparing an image, look at both perceived sharpness as well as color detail. Lack of color detail made me choose a slightly higher digital camera megapixel equivalent than I would if I was only comparing intensity sharpness. This makes the resulting answer as to what digital megapixels compare to film somewhat "fuzzy."
4) The film was scanned at 4000 dpi, and as noted elsewhere on this page, a 4000 dpi come close but does not get all the detail on the film. Keep this in mind. But the results are "fuzzy" enough that it does not matter that much.
Discussion of the image set below and what to look for. I produced a series of test images to simulate a higher megapixel image, going from 2 Mpixels to 194 Mpixels and include 35mm, and 6x4.5 cm films. All images were done at the same time using the same lighting, and each were done multiple times to be sure the results were consistent. I'll focus on test area 3. All images are scaled to the same size, and the 35mm 4000 dpi scan was enlarged 3.0x. All images were scaled using bicubic scaling in photoshop.
Digital 2 Mpixels, monochrome: Far from matching film detail.
Digital 5.6 Mpixels, monochrome: Intensity detail getting close to but still not matching 35mm film detail. Color detail far from matching film.
Digital 9.8 Mpixels, monochrome: Intensity detail similar to or slightly better than 35mm film detail. Color detail still lacking film. Note the lack of green in the digital image, especially in the closest grass clump just left of center. Also the brown dry grass tip at the lower left corner shows a lack of color in the 9.8 Mpixel digital compared to the 35mm film. The 9.8 mpxel image shows many fine lines which look like grass blades. Many are real, but some are not! Compare with the higher resolution images to see what is real.
35mm film: 4000 dpi scan is 3760 x 5640 pixels = 21.2 RGB Mpixels (64 MByte tif file).
Digital 17 Mpixels, monochrome: The intensity detail is now clearly better than the 35mm film, but the color detail is just beginning to be comparable. Note the dry grass in the lower left corner still appears washed out compared to the 35mm film and the 48 Mpixel image below.
Digital 48 Mpixels, monochrome: Quality similar to small medium format film. Most of the not real grass blades are gone (but not all). Color detail is very good.
6x4.5 cm film: 4000 dpi scan 7085 x 9600 pixels = 68 RGB Mpixels (204 MByte tif file).
Digital 194 Mpixels, monochrome: Image detail approaching 4x5 film quality.
4x5 film: ~ 3300 dpi scan, ~16000 x 13000 pixels = 200 RGB Mpixels (~600 MByte tif file). This is the original drum scan image. All other images are of the lightjet print on cibachrome paper from this file. Examining the print compared to the other images here, the 4x5 image shown here shows the colors closest to the print.

Results/Conclusions:
From these tests, it is my opinion that digital cameras will match Fujichrome Velvi 35mm film when they reach more than about 10 megapixels. Somewhere in the 12-16 megapixels will produce color image quality comparable to 35 mm film (this is a compromise of more intensity detail and less color detail than film). Somewhat fewer megapixels, approximately 8-10 Mpixels will match 35mm film intensity detail but at below 35mm film color detail.
Medium format film: about 50 digital camera megapixels are need to match Fujichrome Velvia in 6 x 4.5 cm.
Large format: more than 200 digital camera megapixels are need to match 4x5 Fujichrome Velvia film. How much more needs further testing.
Diffraction limits the ultimate detail an imaging system can deliver. This is a fundamental limit due to the wave nature of light.
The trend in digital cameras is to increase the pixel
count, and the easiest way to do this is to decrease pixel size.
However, practical limits have already been reached!
The diffraction spot size in the focal
plane is a function of f/ratio and is
independent of focal length. The diffraction
spot diameter is:
Diffraction spot diameter = 2 * 1.22 w * f / D = 2.44 * w * f_ratio,
where w = wavelength, f = focal length, D = aperture diameter, and f_ratio is the f/ratio of
the optical system. The diffraction spot size is given in the table below for green
light of 0.53 microns (5300 angstroms) in wavelength:
| F/ratio | Diffraction Spot Size (microns) |
| 2 | 2.6 |
| 2.8 | 3.6 |
| 4 | 5.2 |
| 5.6 | 7.2 |
| 8 | 10.3 |
| 11 | 14.2 |
| 16 | 20.7 |
| 19 | 24.6 |
| 22 | 28.5 |
| 32 | 41.4 |
| 45 | 58.2 |
| 64 | 82.8 |
A simple way to remember the diffraction size in the above table is to multiply the f/ratio by 1.3 to get the spot diameter in microns.
Modulation Transfer Function and Image Detail
The Modulation Transfer Function (MTF) is a measure of the response of an optical system to varying intensities of light. It is strictly the response to parallel lines whose brightness varies from minimum to maximum in a sinusoidal function. If the minimum to maximum is set to 1, then the optical system will generally give a response less than 1. At higher spatial frequencies, the response is less, until at some upper limit, there is no response (i.e. the image would be all gray). Optical textbooks or a web search will find many references where you can find more detail.
MTF is expressed in line pairs per mm (lpm), but saying a lens resolves, for example 80 lpm, is incomplete. One should also state the wavelength (color) of light and the MTF response. For example, a complete specification would be 50% MTF at 80 lpm for green light at 500 nanometers (nm). This means that for 80 lpm, the system "compresses" 100 % signal down to only 50%. In other words, the finer the detail, the lower the contrast in the image.
The diffraction spot size discussed above limits image detail, but it is not hard limit. Optical systems can be limited by aberrations, but all systems have a fundamental optical limit even if the were perfect and have no aberrations. This is due to the wave nature of light.
A diffraction limited optical system resolves different lines per mm at different contrasts. There are two commonly used limits:
1) Dawes' Resolution Criterion,
2) Rayleigh's Resolution Criterion,
The Dawes limit is the maximum spatial detail (where contrast =0).
An excellent discussion can be found in Star Testing Astronomical
Telescopes, A Manual for Optical Evaluation and Adjustment by
H. R. Suiter (1994, Willmann-Bell, Inc., Richmond, Virginia).
The Dawes limit is given by:
Dawes limit = 1/(Fw) in line pairs per mm, where
Rayleigh limit = 1/(1.22*Fw) in line pairs per mm, where
50% MTF ~ 0.39 * Dawes limit.
80% MTF ~ 0.16 * Dawes limit.
F = the focal ratio, and w = the wavelength of light in mm.
The Rayleigh limit is at a modulation transfer function (MTF) of about 9%.
| Optical System Resolution Limits | |||||
|---|---|---|---|---|---|
| wavelength = 0.0005 mm (green) | |||||
| F/ratio | Diffraction Spot Size (microns) |
80% MTF |
50% MTF |
Rayleigh Resolution Criterion |
Dawes Resolution Criterion |
| lp/mm | lp/mm | lp/mm | lp/mm | ||
| 2 | 2.2 | 160 | 390 | 820 | 1000 |
| 2.8 | 3.1 | 110 | 280 | 580 | 710 |
| 4 | 4.5 | 80 | 190 | 410 | 500 |
| 5.6 | 6.3 | 58 | 140 | 290 | 360 |
| 8 | 8.9 | 40 | 97 | 200 | 250 |
| 11 | 12 | 29 | 71 | 150 | 180 |
| 16 | 18 | 19 | 48 | 100 | 120 |
| 22 | 25 | 15 | 35 | 75 | 91 |
| 32 | 36 | 10 | 24 | 51 | 63 |
| 45 | 50 | 7 | 17 | 36 | 44 |
| 64 | 70 | 5 | 12 | 26 | 31 |
lp/mm = line pairs/mm
Remember that the above diffraction numbers are for a single wavelength, but the visible spectrum ranges from about 0.38 to 0.7 microns (0.00038 to 0.0007 mm). Diffraction would be 0.7/0.55 = 1.27x worse for the limit of visible red light.
In order to digitize detail in an image (whether it is scanning film, or an electronic image sensor in a camera, there must be enough pixels to capture the detail. The Nyquist criteria says you need at least 2 samples per cycle to get all the information. However, that assumes the phasing of the sampling matches the image detail. It does not. Pixel sampling and image detail are not necessarily in phase, so we must sample at a higher level. At 4 samples per cycle, the detail is well recorded, so we will use that as the standard. Below shows the pixels in pixels per inch (DPI) that a diffraction limited optical system will deliver. The table below explains why 4x5 does so much better than 35mm, and that the 35mm is film limited (for color slide film), not lens limited.
Required Sampling DPI at 4 pixels/cycle
         80%      50%     Rayleigh    Dawes
         MTF      MTF    Limit (9%)   Limit
  2    17272     38608     83279     101600
  2.8  12337     27577     59485      72571
  4     8636     19304     41639      50800
  5.6   6169     13789     29742      36286
  8     4318      9652     20820      25400
 11     3140      7020     15142      18473
 16     2159      4826     10410      12700
 22     1570      3510      7571       9236
 32     1080      2413      5205       6350
 45      768      1716      3701       4516
 64      540      1207      2602       3175
 96      360       804      1735       2117
128      270       603      1301       1588
The tests here were at f/11 with the 35mm, giving over 18,000 dpi at the Dawes limit, or 17000 x 26,000 pixels! This is more than the 4x5 test done here. The 4x5, at f/45 gives a Dawes limit of 4516 DPI, more than the test here, but the 3300 DPI 4x5 scan is close to the Rayleigh limit. This shows that the film in both the 35mm and the 4x5 is the limit, not the lens. If much finer grained film could be made, the lens system could deliver the image detail and 35mm would be comparable to existing 4x5, or over 600 megapixel equivalent!
Example Image Detail and MTF Limits
We have seen a lot of numbers above, and there is often some question what MTF level is important in an image. Below is an enlargement of the grass field in Test Area 1 from the 4x5 image. At the top of the grass field, the fainter streamers are blades of grass sticking up. You can see that this detail is similar to and smaller than the diffraction spot. It appears smaller than the full diffraction spot because we are seeing only the peak response of the grass blades to the diffraction (this is the lower MTF near the Dawes limit), If the film had better response in the dark area, we might see the diffraction halo, but the halos were lost in the scan.
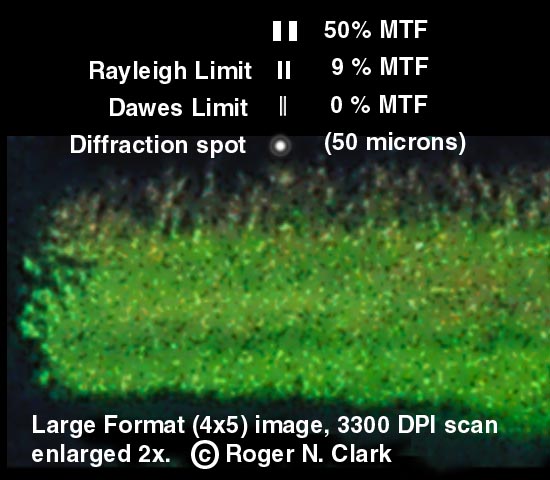
Note in the image above, that the grass blades appear much smaller than the 50% MTF level. Some grass blades are only 1 to 2 pixels wide at 3300 dpi. They are so far away, that they are smaller than the Dawes Limit says should be resolved. Indeed, they would not be resolved if they were close together (as probably some are--those look like wider clumps). What this means is that image detail right up to the Dawes Limit is important. Twigs in a far away tree can be recorded on film even though they are below the Dawes Limit (0% MTF). This is possible whenever that image detail is not close to other image detail. This occurs in many situations, such as hair on a person's face, detail in the bark on a tree, veins in a leaf, etc.
For maximum image detail, scanning to record things at the Dawes Limit is important. The 4x5 image here was scanned at 3300 dpi. The table above indicates scanning at about 4500 dpi. The scan got most of the detail in the image, but examination of the original transparency indicates there is a little more detail than the scan recorded, all consistent with the analysis here.
The 35mm images here (both original field image and the image of the 30x39-inch print) were done on a Canon Elan with a Canon 28-105mm lens at f/11 on Fujichrome Velvia film using the camera's autofocus. Many would say that such a consumer grade zoom lens is not real sharp. While it would be nice to see a better lens along with this test, it does show that a zoom lens can do an excellent job. Note resolution test area 3 is far off-axis yet still produces detail needing 4000 to 6000 dpi scans to resolve! The 6000 dpi 35mm scan produces amazingly sharp 19x28 inch prints even at the edge (print at 300 dpi).
If the sprintscan 4000 dpi is representative of the detail in the
image, it shows the resolving power of the lens + film is on the
order of 80 line pairs per mm off axis
(4000 dpi/2pxl per line pair/25.4mm per inch=78.7 line pairs/mm).
These tests also show that the detail recorded on the very fine grained Fujichrome Velvia film is still limited by film grain, not lens resolution. These tests, the results, and conclusions are consistent with thousands of other images I have obtained with my 35mm and 4x5 systems.
The 4x5 scan at 3300 DPI produces approximately a 635 MByte image file (13,000 x 16,300 pixel image size, or 212 megapixels). This allows for very big enlargements with very sharp detail.
The human eye resolves about 6 to 8 line pairs per mm from a reading distance of about 10 inches. A line pair means light "up and down", not just two adjacent pixels. That is 12 to 16 pixels/mm or 300 to 400 pixels/inch at about 10 inches. These are image pixels, not printer pixels. An ink jet printer needs several times more printer pixels (perhaps only a couple more with ink blending technology).
So to do a fine art 8x10 print, you need approximately 300 (to 400) x 8 x 300 (to 400) x 10 = 2400 x 3000 (to 3200 x 4000) pixels (24 to 48-bit pixels). This is possible with 35mm film and a good scanner. To make larger prints that appear very sharp to the eye, large format film and drum scans are necessary.
The 4x5 images, at 13,000 x 16,300 pixels, allow sharp images of 43 x 54 inches at 300 DPI (sharp when viewed from about 10 inches). But you can't see the whole image that close to it, so you must view from further away. That means the print could be even larger and it will still appear sharp. Thus, for whole image viewing, virtually any size enlargement is possible with large format photography, and the limit to detail is your eyes, not the image.
A large 4x5 print is like viewing "the real thing" out a window.
How many pixels per inch does a SHARP photographic print contain?
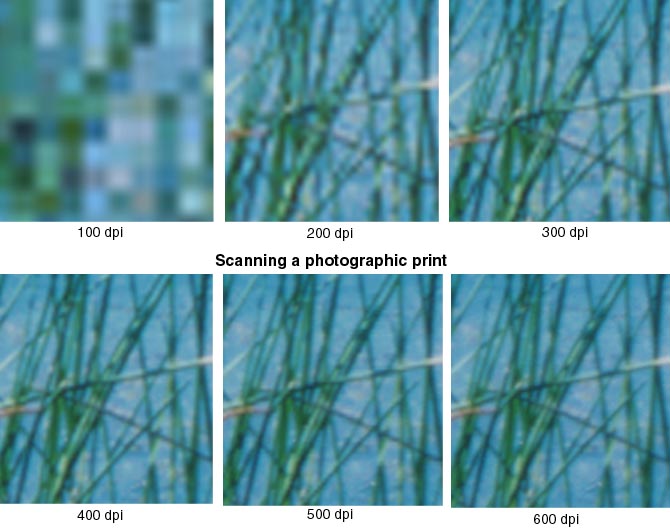
The examples above show that a sharp photographic print has at least 400 pixels per inch. The above test was with a 4x5 transparency enlarged onto an 8x10 print. The scans above were all scaled to the size of the 600 dpi scan and then enlarged 2x so you can see the differences better. Examine the closely spaced grass blades: you need at least 400 dpi to resolve the details. There are improvements in the image all the way up to 600 dpi. Some have stated that 200 dpi is sufficient to get all the detail in a photographic print. That is clearly not the case here. Examination of an 8x10 print on a sharp 35mm image shows similar results.
Comparing the scanned print images with the 4x5 transparency scans, shows that the scanned print contains less detail than the scanned transparency. Thus it is better to scan the original film.
| Home | Galleries | Articles | Reviews | Best Gear | Science | New | About | Contact |
http://clarkvision.com/articles/scandetail
First Published: January, 2000.
Last updated October 22, 2006