
Exposure and Digital Cameras, Part 3:
When f/ratio Does not Tell the Whole Story
by Roger N. Clark
The prevailing view by photographers is that faster f/ratios delivers more light.
This is not always correct.
Two lenses with different focal lengths and the same f/ratio deliver the same
photon density in the focal plane, but NOT the same total light from the subject.
This article explains the real story of f/ratios and how to collect the most light
to deliver the best image quality.
Exposure and Digital Camera Series:
All images, text and data on this site are copyrighted.
They may not be used except by written permission from Roger N. Clark.
All rights reserved.
If you find the information on this site useful,
please support Clarkvision and make a donation (link below).
Contents
Introduction
Exposure
The Answers for the Figure 1a, 1b Questions
Different Sensor Sizes
Night Sky Photography
Computing the A*omega Etendue for a Spot on a Subject, EtS
Conclusions
References and Further Reading
Prerequisite
Before reading this article, please read the other articles in this sequence (links above).
Introduction
Photography requires the collection of small amounts of
light, usually in time limited situations. For example, people or
animals may move preventing longer exposures. At the extreme,
we may be interested in night photography where light levels
are so low that minutes to hours of exposure may be required.
What factors are key in capturing enough light in photography? Many will say
fast f/ratios. We'll explore what f/ratios mean in this article
and a better metric to indicate better light collection from the subject.
There are two images below (Figure 1a and 1b) made with two different
focal length lenses and different f/ratios. The purpose of the two images
is to illustrate true exposure and resulting noise. Noise in digital
camera images is dominated by photon noise and is equal to the square
root of the signal. So with more true exposure, there is higher
signal-to-noise ratio and lower perceived noise.
The prevailing view by photographers is that faster f/ratios
delivers more light. I will show you in this article that
is not necessarily the case. This bucks the prevailing view
in photography, but is not the prevailing view in imaging
science. This article will explain why.
The two images in Figures 1a, and 1b were made with two different
lenses with different f/ratios.
Questions:
1) Which in your opinion is the better low light image?
2) Which image shows less noise?
3) Which image was underexposed two stops?
4) Which image is sharper?
5) Which image was made with a faster f/ratio lens?
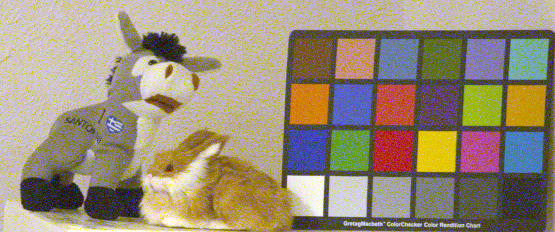
Figure 1a. A low light image. ISO 3200, 1/200 second.

Figure 1b. A low light image. ISO 3200, 1/200 second.
Note there is about a 3 % difference between the sizes of objects in Figures 1a and 1b because
the reported focal lengths by the camera exif data is slightly
different than actual focal lengths; this is a small deviation and of
no practical impact on the results reported here.
Some details. The images were made with the same camera, from the
same distance, using two different lenses. The images were converted
linearly using DCRAW so that any noise differences will not change.
The resulting linear tiff included no white balance. The intensities of
both images were scaled using levels to correct for brightness level and
color balance, as photographers commonly do with images. A levels change
is a multiply, so as intensity is multiplied, so is noise. Thus, the
signal-to-noise ratio does not change. Both images are portions of
a larger frame and presented at 100% pixel level (1 image pixel = 1
display pixel) of the final processed image. No sharpening was applied
to either image. No noise reduction has been applied to the images.
Thus, noise levels are preserved as in the original data.
Answers below.
Exposure
Exposure in a digital camera is a relative measurement. Each digital camera
uses a different level, depending on the pixel size and efficiency of the
pixels. The exposure is relative to a given maximum. It is like having
two buckets that you fill with water. Let's say one bucket holds
1 gallon and the other 5 gallons. You may say fill the buckets to
put 1 gallon in each. One bucket will be full, and the other
will only 1/5 full. camera exposure does not work on an absolute
level like this. It works on a fraction of full. So, if you
tell your camera to work at its lowest ISO (let's say it is 100), it tells the camera to
fill the pixel (bucket) with light from a white subject. Raise the
ISO to 200 and the camera exposes to fill the pixel only half way.
But the camera with small pixels half full is a lot less light than the
the camera with large pixels that are half full. The bottom line
is camera exposure (whether film or digital) is a relative concept,
not an absolute level. Digital cameras, with variable sized pixels,
add more complexity not previously seen with film.
There are three factors that determine the true exposure
in a camera +lens. 1) The lens area, or more accurately, the
lens entrance pupil, which is the effective light collection
area of a complex lens. The area determines how much light the lens
collects to deliver to the sensor. 2) The angular area of the subject.
The product of these two values is called Etendue, or A*Ω (A*Omega)
product. (A= the lens entrance pupil area,
and Ω, omega = the angular area of subject).
The third value is 3) exposure time, the length of
time the sensor is exposed to light. One way to think of this
is the lens area collects the light, the focal
length of the lens spreads out the light and the pixels
collect the light spread out by the lens. While a larger pixel collects
more light than a smaller pixel, which led to the concept that
larger sensors are more sensitive (which is not strictly true),
the subject at the sensor is still the same angular size, thus independent
of pixels. Changing pixel size simply trades spatial resolution (pixels on subject)
for more light per pixel, but does not change the same total light from the
subject. Only changing the lens collection area changes the total light
collected (or moving closer with the same lens so the inverse square law
comes into effect).
The f/ratio, commonly used in photography simplifies the
above by making a relative measure of light. As discussed
in
Part 1: Exposure, Light Meters, and Digital Cameras,
the light from lenses of the same f/ratio has the same
light density in the focal plane (e.g. photons per square micron).
This is a sensor centric viewpoint and works in practice for
many applications for camera exposure. But when one needs to push limits,
as in low light photography f/ratio alone can lead the photographer
in a non optimum direction, or lead to purchase of more expensive
lenses or cameras when they are not actually needed.
The Etendue, or A * Ω (A*omega) product, correctly explains
the situation.
True Subject Exposure, EtST ∝ A * Ω(subject) * T
is the subject-centric viewpoint.
For example, I want at least 100 x 200 pixels on the distant rabbit.
My 50 mm f/2 lens will give me that. The rabbit is moving, so I must
keep exposure times to no longer than 1/200 second. the light
levels are low. Should I use the 50 mm f/2 or my 200 mm f/4 lens?
The 50 mm f/2 just gives the metered exposure at ISO 3200
so meets my requirements. the 200 mm f/4 lens would need
to be underexposed by 2 stops to keep the exposure at 1/200 second.
Which lens would you choose? The two images in Figure 1a and 1b
were made with the 50 mm f/2 and 200 mm f/4 lens.
The Answers for the Figure 1a, 1b Questions
1) Which is the better low light image? Answer: Figure 1a with 200 mm f/4 lens (My opinion; it has lower noise and is sharper).
2) Which image shows less noise, Figure 1a or 1b? Answer: Figure 1a with 200 mm f/4 lens.
3) Which image was underexposed two stops? Answer: Figure 1a with 200 mm f/4 lens.
4) Which image is sharper? Answer: Figure 1a with 200 mm f/4 lens.
5) Which image was made with a faster f/ratio lens? Answer: Figure 1b with 50 mm f/2 lens.
Clearly Figure 1a is the superior image.
The image in Figure 1a shows less noise than the image in Figure 1b.
The image in Figure 1a was made with a 200 mm f/4 lens. Why did the f/4 lens
make a better low light image? The 50 mm f/2 lens has a lens diameter
of 50/2 = 25 mm. The 200 mm f/4 lens has a diameter of 200/4 = 50 mm
diameter. The ratio of the diameters is 2, so the area ratio is 4,
or two stops. The 200 mm lens collected 4 times the light from
the rabbit than did the 50 mm lens.
The 200 mm focal length lens spread the light out 4 times as much
as the 50 mm lens did. So image 1a combined 4x4 pixels to make the
same size subject as in the 50 mm image. But adding 4x4 pixels
increases the signal 16 times, so the 200 mm f/4 lens gives 4 times more signal
than the 50 f/2 lens did, yet gives the same pixels on subject. The higher
signal is due to the large (4x area) of the lens. Adding 4x4 pixels increases the
noise by square root 4*4, or or 4 times. So the signal-to-noise ratio
of the resulting image is 4 times better.
The bottom line: the larger lens collects more light. Combining
pixels makes the angular pixel area the same as that with
the smaller lens. In other words, making the angular area the same
makes the focus on the SUBJECT, not the pixel. In the equation A*omega, we kept omega the
same between the images in Figure 1a and Figure 1b (the angular size
of the combined pixel in 1a is the same as that for the 1b pixels).
Another way to put this, is that the angular size of a spot on the
subject is the same between the two images and that spot size in pixels
has also been made equal (omega is the same in both Figure 1a and 1b).
But the lens
area, A, in the image in Figure 1A (the 200 mm lens) is 4 times larger,
so A*omega gives a true exposure 4 times more.
But wait. A 4x4 pixel adding (or averaging) makes a 16 megapixel
camera only a 1 megapixel camera. Obviously, such a large
reduction does not work for all images. But because we have so much
signal from the 200 mm lens, we actually do not need to combine so
many pixels. And we had to crop the image made with the 50 mm
lens to the same 1 megapixel. It is better to average/sum pixels
than cropping an image from a shorter focal length. Adding/summing
also results in a sharper image at the pixel level (The rabbit in Figure 1a
shows more detail than that in Figure 1b).
Because the 200 mm f/4 lens delivers 4x the light as
the 50 mm f/2 lens, we could double the resolution on the subject
and have the same signal-to-noise ratio per pixel as the image from
the 50 mm f/2 lens. So if we combine 2x2 pixels from the 200 mm
lens, we get the image in Figure 2.
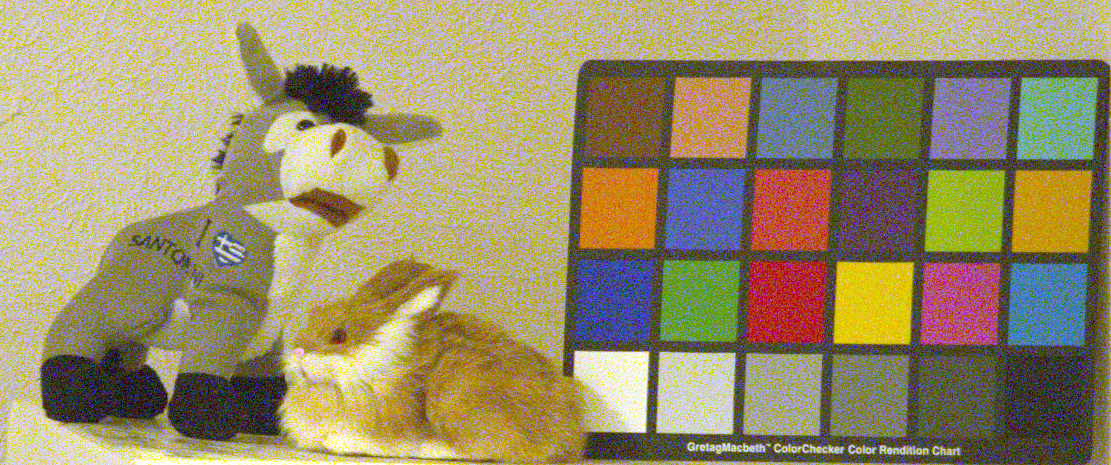
Figure 2. A low light image. ISO 3200, 1/200 second,
the light meter said underexposed 2 stops. Image from
a 200 mm f/4 lens, with 2x2 pixels added together. Compare this image
to the image in figure 1b, made with a 50 mm f/2 lens. The signal-to-noise
per pixel is the same.
Different Sensor Sizes
Small cameras have a reputation for poor low light performance,
and cameras with full frame 35-mm sensors have a reputation
for great low light performance. Figure 3 illustrates
this property of small versus large sensors. If f/ratio
gave the same true exposure, the noise would be the same
in the two images in Figure 3. But clearly, the
noise is higher in the S70 camera that has the smaller sensor.
The example images in Figure 3 were made with different
focal lengths to make the fields of view of the scene close to the same in
both cameras and to match the pixels on the subject (as closely
as can be done with slightly different aspect ratios of the sensors,
and finicky electronic zoom on the S70). In the A*omega product, the
omega of the pixels is close to the the same in the two cameras. But the lens diameters are 1.6 mm
for the S70 and 4.2 mm for the 1DII camera. Thus, the ratio of the lens
areas are: (4.2*4.2)/(1.6*1.6) = 6.9 times greater. Note the S70 image
is slightly larger. If we matched the pixels on subject exactly the
ratio would be 12.7 and the focal length on the S70 would have been 8.4
mm (the motorized zoom feature made precise lens focal length difficult
to achieve). If the pixels on subject were exactly matched, the noise in
the S70 would appear even worse!
The bottom line from this example, it is the lens area that controls the
noise because we closely matched the pixel angular area in the
A*omega equation. The f/ratio clearly did not explain the
noise difference. The lower light level from the smaller S70 lens does.
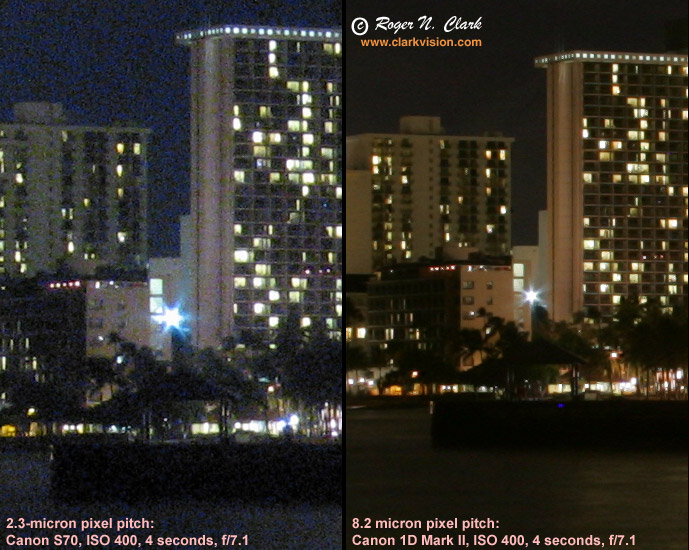
Figure 3.
Full scale crop (1 image pixel = 1 display pixel) comparisons of
a night scene taken with the same exposure, same
f/ratio and same ISO for both cameras. Image from camera defaults with no post
processing modifications. The lens on the S70 was 11.4 mm focal length
and on the 1D Mark II camera was 30 mm focal length. Lens diameters
were then (S70) 1.6 mm, (1DII) 4.2 mm.
Night Sky Photography
One more example will illustrate how f/ratios do not explain
the true exposure. Or, when is f/2.8 not equal to f/2.8? We saw
above how changing sensors size resulted in a change in
focal length, which when used at the same f/ratio results
in different lens diameters and different noise levels.
In this example, we'll keep the sensor constant, and change
lenses.
Figure 4 shows two images obtained with the same camera at the
same exposure time, same ISO, and same f/ratio. Clearly, f/ratio
can not explain why the 50 mm lens does so much better.
In this case we changed both the A and the omega of a pixel in the
A*omega product. The area, A, of the 50 mm lens is much
larger than with the 20 mm lens. But the angular area, omega, of the
20 mm lens is larger. Do the two balance?
(See below of how to do the following calculations. mr= milliradians.)
50 mm f/2.8: A= 250 sq mm, omega(pixel)= 0.013 sq milliradians per pixel,
EtP = A*omega(pixel) = 3.25 sq mm * sq mr.
20 mm f/2.8: A= 40 sq mm, omega(pixel)= 0.0812 sq milliradians per pixel,
EtP = A*omega(pixel) = 3.25 sq mm * sq mr.
The A*omega(pixel) products per pixel are equal giving the same
camera exposure, yet the 50 mm lens produced an image with
more light, and more stars. Why? Some say stars are point sources.
In the sky, yes, not in the camera. Stars in the camera are diffraction
disks plus lens aberrations. But these are largely irrelevant.
The subjects are the stars, NOT the pixels or lens aberrations.
The angular sizes of the stars do not change, thus the omega factor
is the same in both lenses and only A affects the results. From
Part 1: Exposure,
Light Meters, and Digital Cameras, we saw
True Subject Exposure = EtST ∝ A * Ω(subject).
With Ω(subject) of the stars the same for all lenses,
the equation reduces to EtST ∝ A, the lens area.
Thus, the lens area explains the result. Thus, larger
lenses are best for night sky images where you want to
record the most stars.
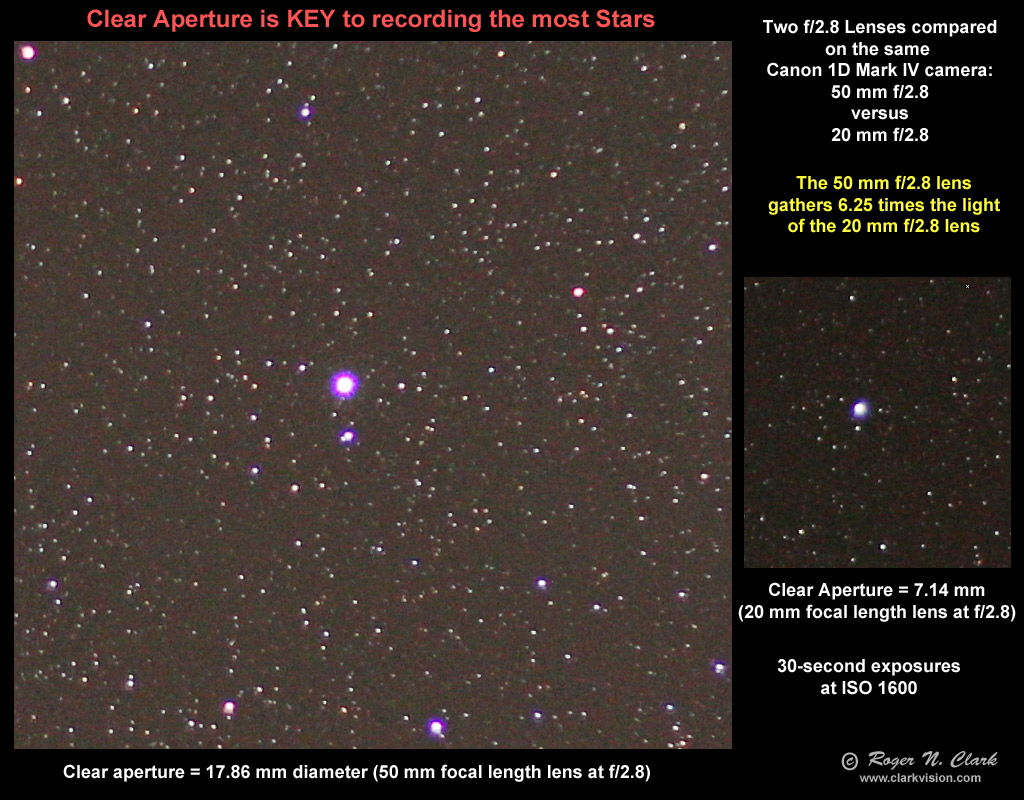
Figure 4. Two night sky images, both made with the same
camera, same ISO, same exposure time, same f/ratio, but different
focal lengths. ISO 1600, 30 second exposures. Image with the
50 mm f/2.8 lens clearly shows more and fainter stars
than that from the 20 mm f/2.8. The reason is the aperture
area of the 50 mm lens is much larger.
Let's compare the results from two f/2.8 lenses in low light imaging of
the night sky where noise is a common problem because one can rarely get
enough light. Figures 5a and 5b show images made at 15 mm f/2.8 and 35
mm f/2.8, using the same exposure time, ISO and sensor. The 15 mm lens
has a 5.36 mm aperture at f/2.8, while the 35 mm lens has an aperture of
12.5 mm. Thus the 35 mm lens collects (12.5/5.36)2 = 5.4 times
the light from the SUBJECT in the same exposure. Here, the subject can
be a star, a star cloud, or even the sky background. Note how many more
faint stars show in the 35 mm image. This is due to the larger aperture.
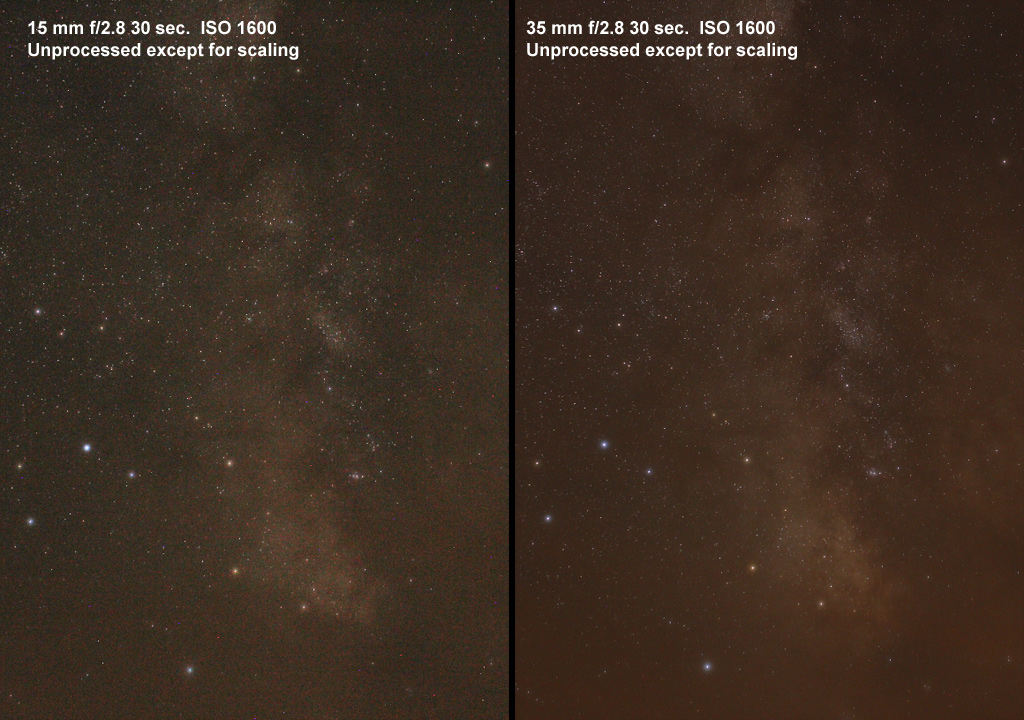
Figure 5a. Comparison out of camera jpeg images, unprocessed
except for scaling to the same size for this presentation.
On the left is the image one would get from a 15 mm f/2.8 lens,
while on the right is that from a 35 mm lens at f/2.8.
The noise difference between the two images is readily apparent.

Figure 5b. Comparison of best effort processing of the two images from
Figure 5a,
both made with f/2.8 lenses, ISO 1600, 30 second exposures with the
same sensor. The 35 mm f/2.8 lens collects 5.4 times the light from
the SUBJECT as the 15 mm f/2.8 lens. The higher noise in the 15 mm image
is due to the lower light, combined with light levels so low that
fixed pattern noise from the sensor also contributes.
Both images are crops from the full frame and downsized
for presentation. The proportion of noise on a subject is the same
in the original images. Sky conditions were slightly worse for the
35 mm image with more haze which also added to the light pollution,
yet the larger lens produced a better image despite worse conditions.
(The bright stars are somewhat enlarged due to haze in the atmosphere.)
Computing the A*omega Etendue Factor for a Spot on a Subject, EtS
The Etendue factor for a spot on the SUBJECT, EtS, needs 3 parameters:
1) lens diameter, 2) lens focal length, and 3) spot angular size.
Be sure to use consistent units. For example,
for lens diameter and lens focal length, use mm.
The lens area, A = pi * D2 /4, where
D = Lens diameter = focal length / f/ratio, and
pi = 3.14159.
If one use the smallest resolution element of a digital camera,
the pixel, then we need to compute the angular size of a pixel.
The angular size of a pixel, omega = (pixel size /lens focal length)2.
There a 1000 microns in one mm, so a camera with 5.7 micron pixels = 0.0057 mm.
This result of the pixel size and focal length ratio is in radians (57.29 degrees),
which results in very small numbers, so I use milliradians:
omega = (1000 * pixel size in mm / lens focal length in mm)2.
One can also use arc-seconds. There are 206265 arc-seconds in one radian,
so omega = (206265 * pixel size in mm / lens focal length in mm)2,
result in arc-seconds squared.
Examples.
In Figure 1a, the lens was 200 mm f/4 with a 1D Mark IV
camera with 5.7 micron (0.0057 mm) pixels. But we combined
4x4 pixels, so the added pixel size for our SPOT on the SUBJECT was 5.7*4 = 22.8 microns.
D = 200 mm /4 = 50 mm. A = pi * 50 * 50 /4 = 1963 sq mm.
omega = (1000 * 0.0228 / 200)2 = 0.013 milliradians squared
EtS = A*omega = 1963 * 0.013 = 25.5.
In figure 1b, the lens was 50 mm f/2 with a 1D Mark IV
camera with 5.7 micron (0.0057 mm) pixels.
D = 50 mm /4 = 25 mm. A = pi * 25 * 25 /4 = 491 sq mm.
omega = (1000 * 0.0057 / 50)2 = 0.013
EtS = A*omega = 491 * 0.013 = 6.38.
Thus, ratio of the A*omega factors is 25.5/6.38 = 4.0, just as we predicted and the
200 mm f/4 lens delivers more light from a spot on the SUBJECT.
In Figure 2, we combined 2x2 pixels with the image from the
200 mm lens, so we made 5.7*2 = 11.4 micron pixels.
D = 200 mm /4 = 50 mm. A = pi * 50 * 50 /4 = 1963 sq mm.
omega = (1000 * 0.0114 / 200)2 = 0.00325
EtS = A*omega = 1963 * 0.00325 = 6.3.
Thus, the Figure 2 image made with the 200 mm f/4 lens and 2x2
pixels combined produced the same signal-to-noise ratios
per pixel as that in the 50 mm f/2 image in Figure 1b, but
the Figure 2 image has double the resolution. I rank this
image as the best of the three (Figure 1a, 1b, 2).
Conclusions
We have shown 3 examples where f/ratio does not indicate the
true amount of light in a recorded image. The true
exposure is better described by Etendue, the A*omega
product, or EtS. This is the case for all photography.
But one need not do EtS calculations. Given a choice for
imaging a subject, use the lens that has the largest aperture
diameter, not the fastest f/ratio. Of course this applies
only if the selected lens will fit the subject in the frame,
or else you may need to do a mosaic.
In choosing a low light camera, forget sensor size. Choose
the camera with the largest diameter lens, again assuming
the lens focal length and sensor size will fit your
subject in the frame. Because lens size correlates with sensor size for
a given field of view, cameras with larger sensors tend to use larger
lenses, giving better EtS factors. This usually is not the case once
one moves into the DSLR world.
However, if you currently have a crop sensor DSLR, you can improve
low light photography by getting a lens with a larger diameter.
Changing sensor size (e.g. moving to full frame) will not help
low light collection unless you get larger lenses. For example,
see Figure 4b on the nightscapes web page (reference 3 below), where
the same lens is used on full frame, 1.3x crop and 1.6x crop
bodies. The 1.6x crop body (Canon 7D) records more and fainter stars
even though it has a reputation for being a poor low light
camera. Compare that to the Canon 5D Mark II full frame camera
which recorded less stars even though it has a reputation for being
a good low light camera. The reason is that` people making the
comparisons are not understanding Etendue; they change Etendue and
erroneously blame sensors.
I do low light night photography. I
was doing nightscapes with a 20 mm f/2.8 lens. I wanted to
record fainter stars in a wide field of view. I moved to
a 24 mm f/1.4 lens (which I operate at f/2), so a 12 mm diameter
aperture. Compare that to the 20 mm f/2.8 lens which has
a 7.1 mm diameter lens when at f/2.8. Thus, I get 2.9 times
more light (the ratio of the lens areas), and record significantly
more stars. See my
night
gallery for examples.
Be wary of reviews comparing cameras and attributing
sensitivity to sensors. Usually, they are changing lenses,
thus changing Etendue (A*omega) product. Most modern digital
cameras have close to the same sensitivity. The lens is the
key to collecting light.
If you find the information on this site useful,
please support Clarkvision and make a donation (link below).
Next:
Exposure and Digital Cameras, Part 4:
Low Light Capability and Upgrades: Digital Camera or Lens Upgrade?
References and Further Reading
1) Exposure, Light Meters, and Digital Cameras
http://clarkvision.com/articles/exposure/
2) ISO Myths and Digital Cameras, What is ISO on a digital camera?
http://clarkvision.com/articles/iso/
3) Nightscape Photography with Digital Cameras
http://clarkvision.com/articles/nightscapes/
4) Night and Low Light Photography with Digital Cameras
http://clarkvision.com/articles/night.and.low.light.photography/
5) Digital Camera Sensor Performance Summary
http://clarkvision.com/articles/digital.sensor.performance.summary
6) The f/ratio Myth and Digital Cameras
http://clarkvision.com/articles/f-ratio_myth
7) Digital Cameras: Does Pixel Size Matter?
http://clarkvision.com/articles/does.pixel.size.matter
8) Digital Cameras: Does Pixel Size Matter?
Part 2: Example Images using Different Pixel Sizes
http://clarkvision.com/articles/does.pixel.size.matter2
9) Equivalence (super article covering many aspects of what is discussed here)
http://www.josephjamesphotography.com/equivalence/
In particular, see the section f/2=f/2=f/2 (not).
Exposure and Digital Camera Series:
http://clarkvision.com/articles/low.light.photography.and.f-ratios
First Published August 11, 2013
Last updated October 5, 2014