ClarkVision.com
| Home | Galleries | Articles | Reviews | Best Gear | Science | New | About | Contact |
Meteor Photography
by Roger N. Clark
| Home | Galleries | Articles | Reviews | Best Gear | Science | New | About | Contact |
by Roger N. Clark
Meteor photography in the night sky poses a special challenge. Meteors move fast, but most are quite faint. To capture them you need large aperture area (meaning fast lenses). But meteors can occur all over the sky, so there is a balance in available lens technology and angular coverage. The best lenses for meteor photography are not necessarily very wide angle because their physical apertures collect too little light.
The Night Photography Series:
Contents
Introduction
The Lens Aperture Area versus Angular Coverage Trade
Camera Placement Strategy
Best Lenses for Meteor Photography
Longer Focal Lengths
In-the-Field Operations
Processing Meteor Composites
Is it a Meteor, Satellite, or Airplane?
Conclusions
References and Further Reading
Meteors in the night sky move fast, but they are commonly faint, similar in brightness to stars in the night sky, or occasionally as bright as planets, and rarely brighter. Typical night sky photography for stars requires many tens of seconds to minutes or hours of exposure time (see parts 1a, 1c of this series). But meteors move very fast, so one pixel in your camera may only "see" the meteor for a fraction of a second. Effectively, the exposure times for meteors are very short, even when you leave the shutter open for minutes. Thus, recording meteors with your camera is a significant challenge, similar to doing night sky photography with only a fraction of a second exposure time!
A simple test of your lens plus camera's ability to capture meteors is to go out on a clear dark night and make 1/100 second exposures of the night sky and count how many stars your record in one image (no stacking). Be sure to not count bad pixels!
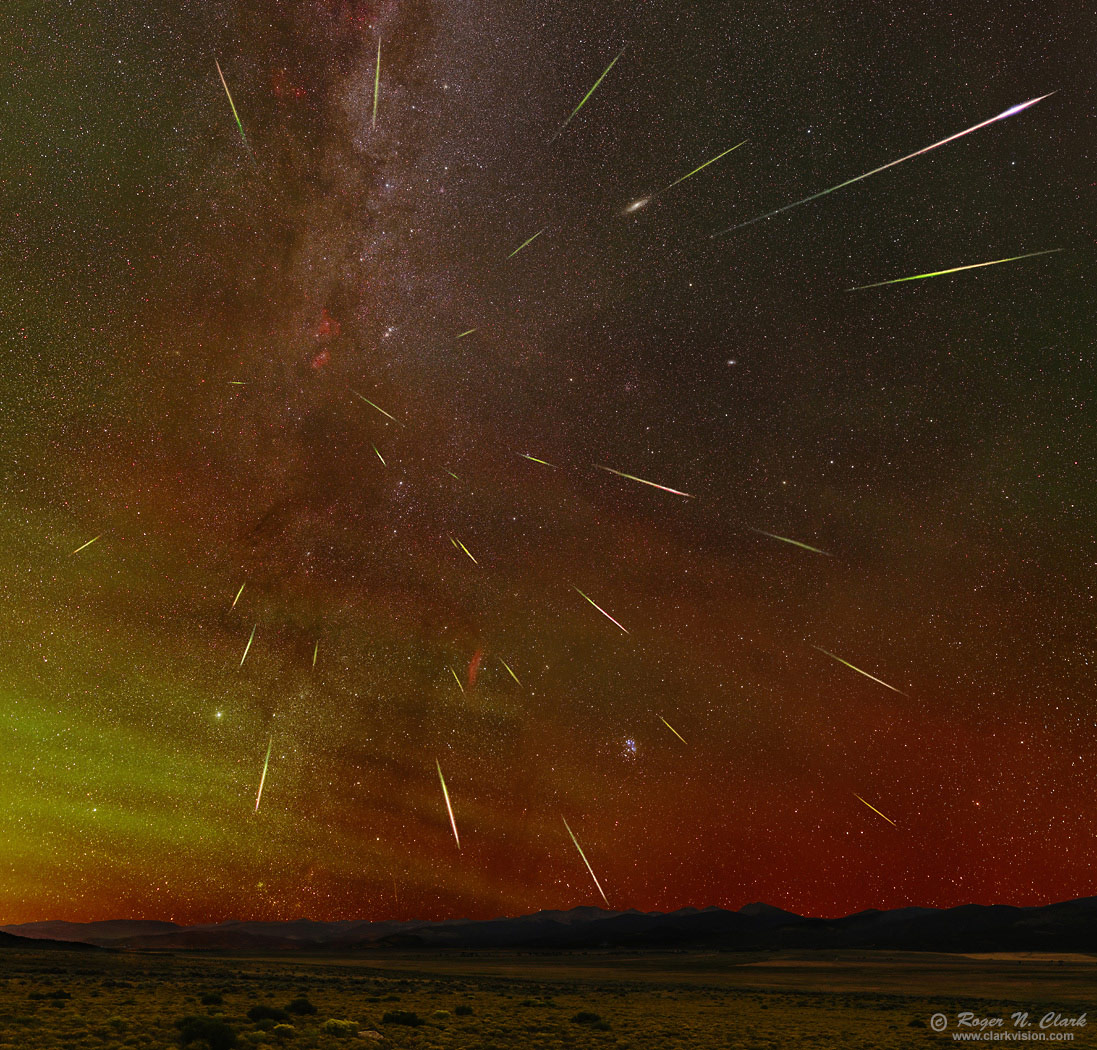
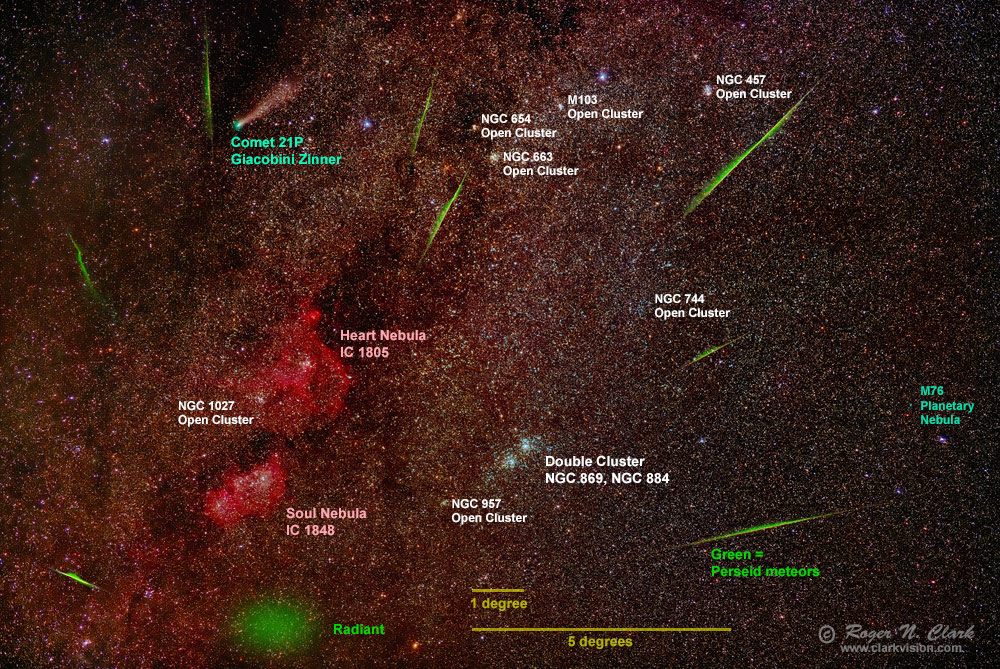
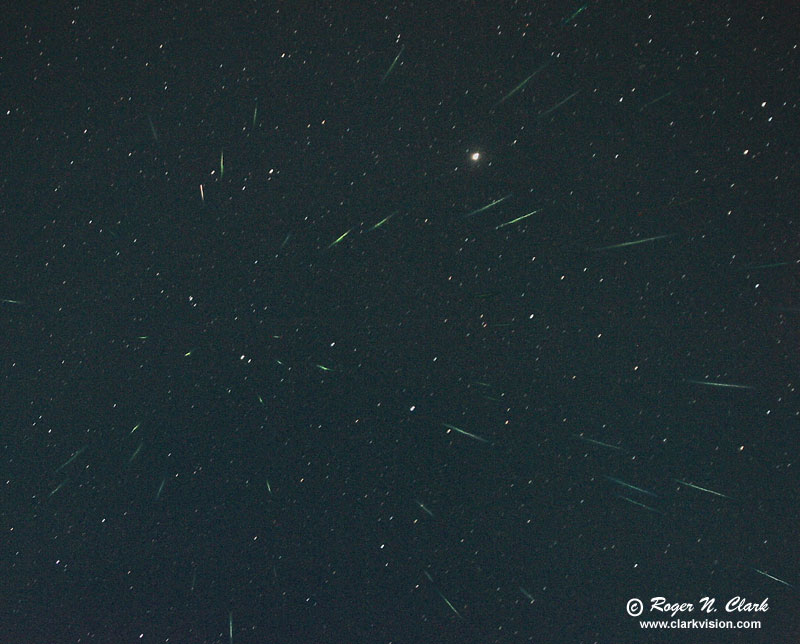
Another factor making meteor photography difficult is that their location in the sky is approximately random. Meteors during a meteor shower will appear to radiate from a point (Figure 1). The location of this point, called the radiant, is due to the relative velocity and direction of the meteors in space and the direction and speed that the Earth is traveling through space. Close to the radiant, the meteor trails are shorter and they increase in angular length away from the radiant. This property leads to specific strategies in recording meteors. Meteors not associated with a shower are randomly oriented and at random locations in the sky.
Because meteors appear in random location across the entire night sky, one might think that an all sky camera would pick up the most meteors. But this is not the case. Wide angle lenses mean short focal lengths and short focal lengths have smaller physical lens apertures, so collect less light. Thus, there is a trade between lens technology to collect a lot of light and angular coverage.
Here are some statistics of recorded meteors from the August 2015 and 2016 Perseid meteor showers used to make the images in Figure 1, 4, and 5.
Within about 45 degrees of the radiant:
2015: 1.3x crop camera, 24 mm lens at f/1.4: 26.2 meteors / hour. (Lens field of view = 60.33 x 42.36 degrees.)
2015: Full frame camera, 35 mm lens at f/1.4: 15.5 meteors / hour. (Lens field of view = 54.43 x 37.85 degrees.)
2016: Full frame camera, 35 mm lens at f/1.4: 33.0 meteors / hour (morning peak, 3:40 to 4:40 am). (Lens field of view = 54.43 x 37.85 degrees.)
2016: Full frame camera, 35 mm lens at f/1.4: 21.5 meteors / hour (morning average). (Lens field of view = 54.43 x 37.85 degrees.)
2015: 1.6x crop camera, 15 mm lens at f/2.8: 2.2 meteors / hour. (Lens field of view = 73.25 x 52.82 degrees.)
2016: 1.6x crop camera, 15 mm lens at f/2.8: 2.7 meteors / hour. (Lens field of view = 73.25 x 52.82 degrees.)
Greater about 90 degrees from the radiant:
Full frame camera, 35 mm lens at f/1.4: less than 1 meteor / hour. (Lens field of view = 54.43 x 37.85 degrees.)
The statistics are slightly biased between the 35 and 24 mm lenses because I was moving the position of the full frame camera with 35 mm lens to make the mosaic, but it illustrates the physics that the small aperture of the 15 mm lens collected too little light. In fact the 15 mm lens in 2015 recorded only 4 full meteors and one meteor cut by the frame edge for the early morning hours during the maximum meteor peak.
In Table 1 from Part 1a, I listed the relative meteor efficiency factors for various lenses, while Table 2 from part 1a lists faintest stars for various apertures and a 30 second exposure. But meteors travel fast, and the longer the focal length, the faster the meteor will move across a pixel. Combining Part 1a Tables 1 and 2, and assuming an average pixel gets exposed by a meteor 1/100 second with a 35 mm focal length, Table 1 below lists meteor efficiency and faintest meteor magnitudes one might expect (this is the same table as Table 3 in part 1a). Of course there are many variables, including actual meteor speed, light pollution, and pixel size, and where to point, so consider this a relative scale. All the values scale with sensor size as a smaller sensor covers less angular area, which lowers the probability of catching a meteor. The table also assumes equal lens quality, which is not the case in reality.
Another factor in meteor capture is where to point. If one points closer to the radiant then the angular velocity of a meteor decreases and the longer focal lengths are not impacted as much. The last two columns in Table 1 assume changing pointing with different focal lengths, pointing closer to the radiant with the longer focal lengths. Also assumed is the pointing for fixed position and variable position is the same for the 35 mm focal length.
                                      Table 1
================================================================================================================================
  A       B        C          J
----Lens-----   Clear      Relative     Faintest star        Faintest Meteor   Best Meteor Lens   Meteor     Best Meteor Lens
 Focal   f/    Aperture     Meteor    Stellar Magnitude   Relative   Stellar   Constant Pointing  Stellar    Variable Pointing
Length  ratio  Diameter   Efficiency     (30-second       Exposure  Magnitude  Meteor Efficiency  Magnitude  Longer Focal Length
 (mm)            (mm)      Factor         exposure)      (seconds)  Constant   * Meteor Stellar   Variable   = closer to Radiant
                        (from Part 1a)                              Pointing   Magnitude /10000   Pointing
                           Table 1
  10     4        2.50       6007           7.9            0.035      0.4          0.2             -1.0            0.3
  14     2.8      5.00      11873           9.4            0.025      1.5          1.8              0.5            0.6
  15     4        3.75       5715           8.8            0.023      0.8          0.5             -0.1            0.5
  15     2.8      5.36      11664           9.5            0.023      1.6          1.9              0.7            0.8
  16     2        8.00      22409          10.4            0.022      2.4          5.4              1.6            3.5

  18     3.5      5.14       6998           9.5            0.019      1.3          0.9              0.6            0.4
  18     2.8      6.43      10935           9.9            0.019      1.8          2.0              1.1            1.2
  18     1.8     10.00      26460          10.9            0.019      2.8          7.3              2.0            5.4
  18     1.4     12.86      43740          11.4            0.019      3.3         14.5 **           2.6           11.3 *
  20     2.8      7.14      10419          10.2            0.018      1.9          2.0              1.3            1.4
  20     1.4     14.29      41677 **       11.7            0.018      3.4         14.3 *            2.8           11.7 *

  24     2.8      8.57       9419          10.6            0.015      2.1          2.0              1.7            1.6
  24     2       12.00      18462          11.3            0.015      2.8          5.3              2.4            4.5
  24     1.4     17.14      37678 *        12.1            0.015      3.6         13.6 *            3.2           12.1 *
  28     3.5      8.00       5453          10.4            0.013      1.8          1.0              1.6            0.8
  28     2.8     10.00       8521          10.9            0.013      2.3          1.9              2.0            1.7
  28     1.8     15.56      20618          11.9            0.013      3.2          6.7              3.0            6.2

  30     2       15.00      15906          11.8            0.018      3.1          4.9              2.9            4.6
  35     2.8     12.50       7224          11.4            0.010      2.5          1.8              2.5            1.8
  35     2       17.50      14158          12.1            0.010      3.3          4.6              3.3            4.6
  35     1.4     25.00      28895 *        12.9            0.010      4.0         11.6 +            4.0           11.6 *
  50     2.8     17.86       5354          12.2            0.007      2.9          1.6              3.3            1.8
  50     2       25.00      10493          12.9            0.007      3.6          3.8              4.0            4.2

  50     1.8     27.78      12954          13.1            0.007      3.9          5.0              4.3            5.5
  50     1.2     41.67      29147 *        14.0            0.007      4.8         13.8 *            5.1           15.0 **
  50     1.4     35.71      21414          13.7            0.007      4.4          9.5              4.8           10.3 +
  85     1.2     70.83      17817          15.2            0.0041     5.3          9.5              6.3           11.2 *
  85     1.4     60.71      13090          14.8            0.0041     5.0          6.5              6.0            7.8

 100     2       50.00       5484          14.4            0.0035     4.4          2.4              5.5            3.0
 105     1.4     75.00      10674          15.3            0.0033     5.2          5.6              6.4            6.8
 200     2.8     71.43       1415          15.2            0.0018     4.4          0.6              6.3            0.9
 300     2.8    107.14        945          16.0            0.0012     4.9          0.5              7.2            0.7

================================================================================================================================
Stellar magnitude: larger number = better (fainter)
Constant pointing: pointing centered on the same field of view, thus pixel exposure time decreases with
                   increasing focal length.
Variable pointing: pointing moves toward the radiant with longer focal lengths to keep pixel exposure time the same.
** Maximum value in this column.
*  Second in this column (close values are also included)
+  Third in this column (close values are also included)
Example of using a full-frame 35 mm digital camera and 35 mm f/1.4 lens: the system gives an angle of view of 54.4 x 37.9 degrees, or about 2062 square degrees. There are about 20626 square degrees in the visible sky, so the 35 mm focal length lens covers about 10% of the sky. If the meteor rate were 60 meteors per hour observable visually, we could expect about 6 meteors per hour to be recorded by a 35 mm lens on a full frame camera if the sensitivity were similar to our eyes. But a 35 mm f/1.4 lens has an aperture of 25 mm, compared to dark adapted eyes of about 7 mm. That means the 35 mm f/1.4 lens collects (25/7)2 = 12.7 times more light. Digital camera sensors are more sensitive than our eyes (let's say 2x), thus the digital camera would record about:
meteor record rate ~ visual rate * lens sky coverage fraction * (lens/eye area ratio) * sensitivity increase
For 60 meteors per hour and a 35 mm f/1.4 lens on a full frame camera:
meteor record rate ~ 60 * 0.1 * 12.7 * 2 = 152 / hour, about 1 per 30-second exposure!
For a 15 mm f/2.8 lens on a 1.6x crop body (73.2 x 52.8 degrees) ~ 19% of the sky,
and an area ratio of 0.58, the camera + lens would record:
meteor record rate ~ 60 * .19 * .58 * 2 ~ 13 per hour ~ 1 per 5-minute exposure.
Obviously, the predicted meteors in the above exercise is much greater than the observed meteors used to make Figure 1. But I only included bright obvious meteors in my assessment using out-of-camera jpegs for make the image in Figure 1. I'm sure I could find many more meteors if I stretched the images hard to count all the faint meteors.
Note that even though the 20 mm f/1.4 is maximum meteor efficiency in Table 1, the faintest meteor is only magnitude 3.4. That means a meteor must be two or more magnitudes brighter to appear bright in the frame. How many meteors for a particular shower are that bright? So depending on the shower, even 20 mm f/1.4 may not have a large enough aperture. Thus, a balance of average meteor brightness must be considered when choosing lenses to record a shower, and a longer focal length, larger aperture lens may be the better choice in some cases.
Examining the data in Table 1 shows that for a given f-ratio, e.g. f/1.4 meteor efficiency increases as focal length decreases. But the meteor efficiency factor is not the full story in practice. There are fewer bright meteors than fainter meteors. For example, the brightness distribution of Perseid meteors is shown in Figure 2. If the lens chosen for meteor photography had an aperture so small that magnitude zero and brighter meteors are the only ones that would be recorded, then we would miss recording the majority of Perseid meteors. By incorporating the meteor efficiency data from Table 1 with the histogram of Perseid meteor brightnesses we can derive prediction profiles for different lenses. The result is shown in Figure 3. Considering that the Perseid meteor brightness peaks between magnitude 3 and 4, to make those meteors bright in the frame, a lens that records meteors to about magnitude 4 or fainter is needed. Examining the faintest meteor magnitudes in Table 1, we see a 35 mm f/1.4 lens fits the bill, as do 50 and 85 mm f/1.2 lenses.
One can see from the data in Table 1 and Figure 3 that variable pointing can have an effect on the number of meteors a camera + lens collects. But the largest factor is lens aperture diameter for a given focal length (which means f-ratio), with f/1.4 and f/1.2 lenses out performing slower f-ratios at most focal lengths. There are few f/1.4 lenses at shorter focal lengths (20 mm and lower) with good quality. The f/1.2 lenses also have lower image quality wide open, leaving the 24-105 mm f/1.4 lenses as the top meteor lenses.
Another factor in recording meteors is where you point your camera. Examine Figure 4 which shows frame sizes for the Perseid meteor image.
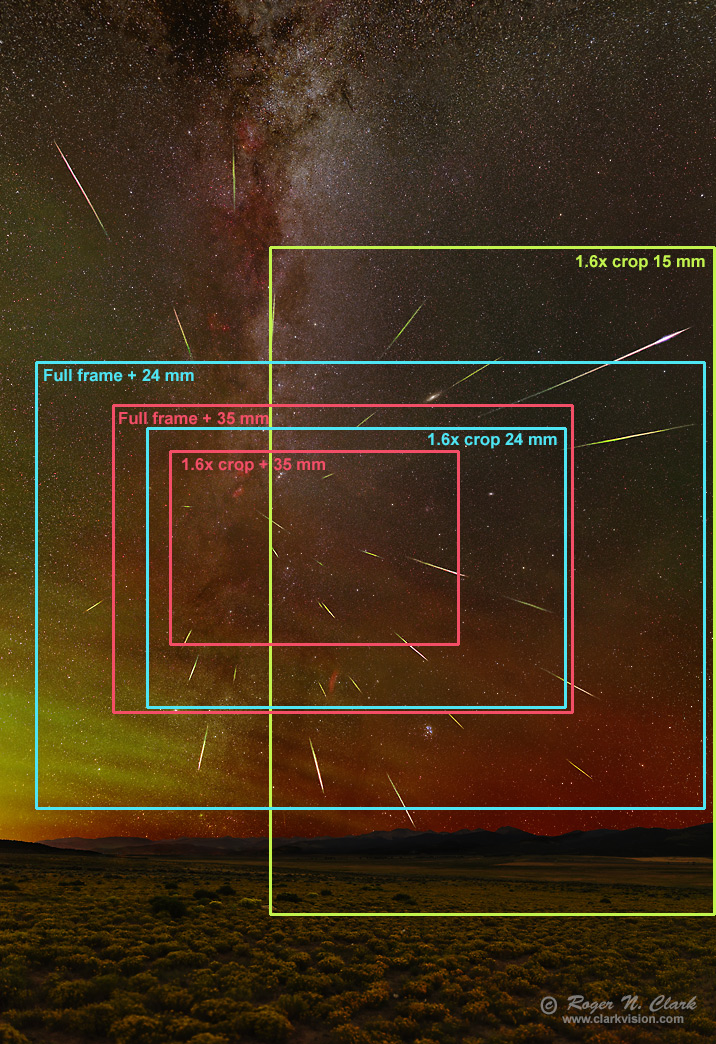
Note in Figure 4 that close to the meteor shower radiant (where all the meteor trails intersect) the meteor trails are short. Meteors close to the radiant are shown in more detail in Figure 5a, made with a 105 mm lens. Further from the radiant, the trails are longer. The meteor trail lengths lead to an interesting strategy. For longer focal length lenses and/or crop cameras, aim at or close to the radiant. For wider angle lenses, aim further from the radiant. If you have a longer focal length, and/or crop camera, the smaller field of view will likely mean more meteors get cut off if you aim away from the radiant. For very wide angle lenses, like 18 mm and shorter, the meteors near the radiant will be very small and not very impressive in the frame. But with a longer focal length, like 35 mm or 50 mm, meteors near the radiant can still be spectacular.
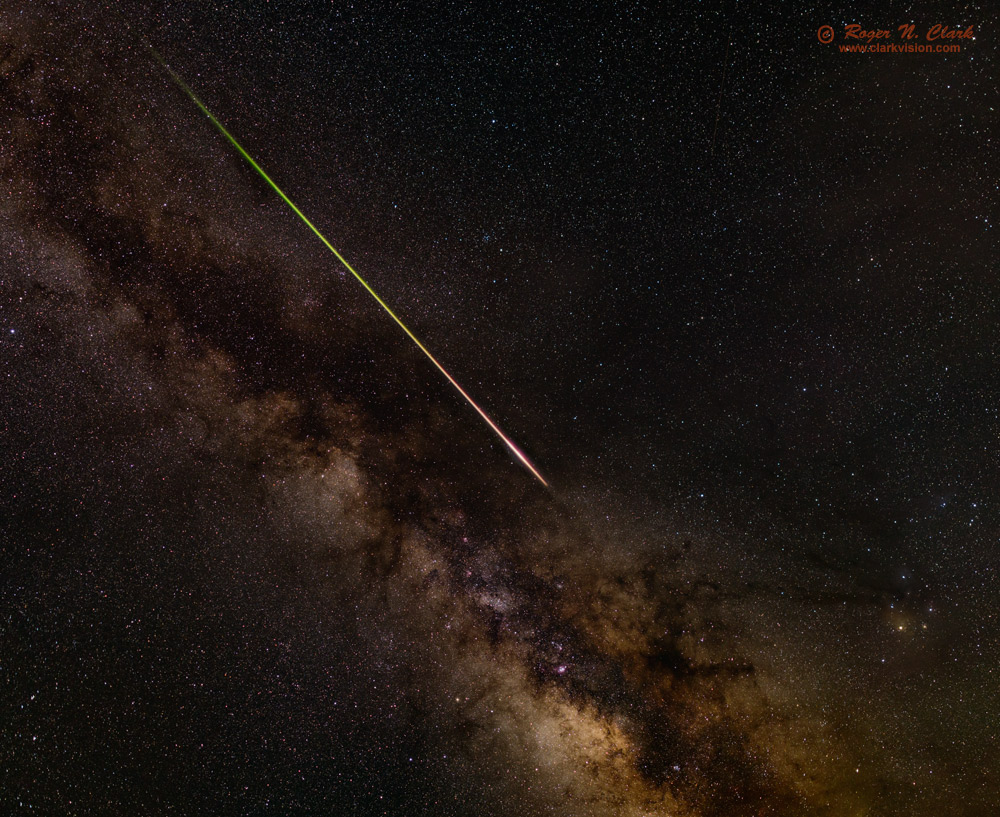
Further from the radiant, for example, toward the south with the Perseid radiant in the northeast, meteors are much longer (Figure 5b). It becomes rarer to catch a meteor, and unless the camera has a very wide angle field of view, many might be cut off at the edge of the frame. But because of their length, they can be more spectacular. The meteor in Figure 5b was the ONLY noticeable meteor recorded from 10:30 pm to 12:30 am, or 0.5 meteor per hour, about 30 times lower rate than the next couple of hours pointed to the northeast.
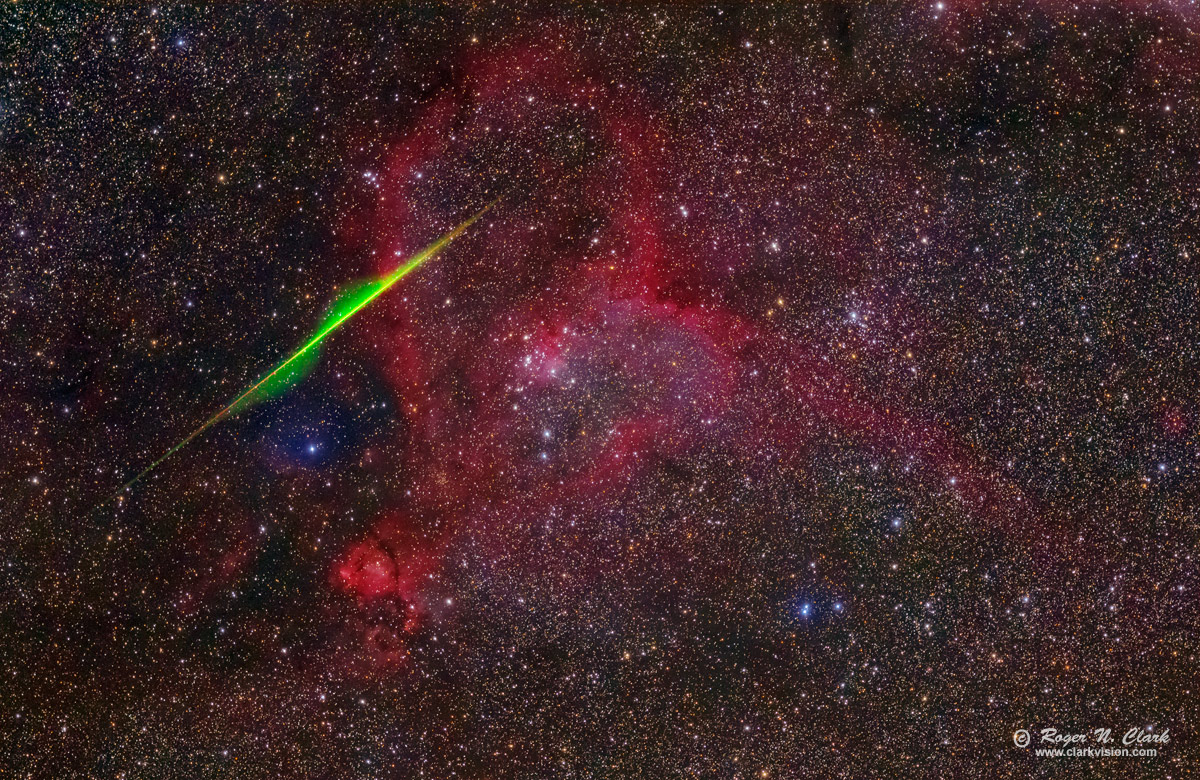
Measuring the meteor trail lengths and distances from the radiant, we can get a better idea of the angular coverage needed as a function of angular distance from the radiant (Figure 6). Close to the radiant, meteor trails are short, and a longer focal length is needed to make the meteors appear more impressive (e.g. as in Figure 7).
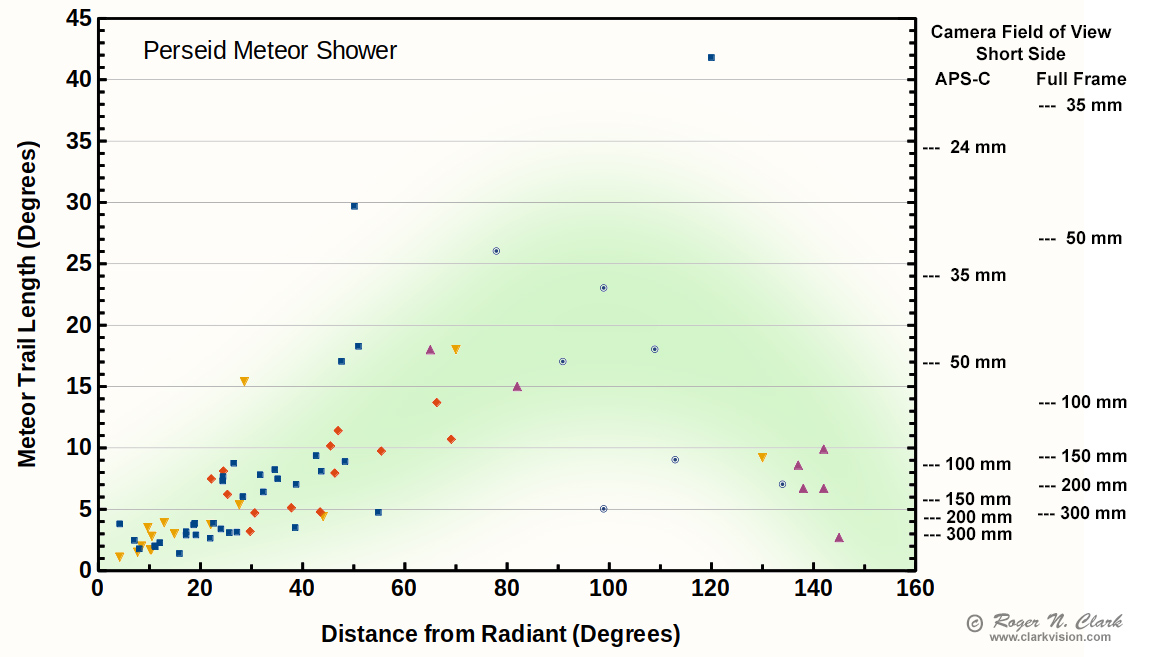
Using the data in Figure 6, and the angular distances to objects in Table 2, below, one could choose different focal length lenses to image those deep-sky objects and have a good chance of capturing a Perseid meteor. One could use the data in Figure 6 for other meteor showers and compute distances from those radiants to plan what lenses might be used.
               Table 2
Perseid Meteor Radiant to Object Distance

Object        Angular Distance (degrees)
----------------------------------------
Soul Nebula          2.2
Heart Nebula         5
Double Cluster       6
California Nebula   25
M31                 28
M33                 31
Pleiades, M45       37
----------------------------------------
Composition. For meteor images with the radiant, I prefer to place the radiant on a rule of third point or line. The radiant in Figure 1 and the gallery image has the radiant close to the rule of thirds line.
If you have multiple cameras with different focal length lenses, consider aiming the 35 to 50 mm (or so) lenses toward the radiant, and wider angle lenses further from the radiant such that you have continuous coverage (unlike the overlap of the frame boxed in Figure 4).
Wide angle lenses are not the only strategy for meteor photography. If one uses longer focal lengths and images closer to the radiant, then the meteor trail lengths can be smaller than the field of view and close-ups with deep sky objects are possible (e.g. Figure 7). In this case, meteor efficiency stays high (as discussed above).
Sometimes there is an advantage with a larger aperture lens which comes with longer focal lengths. As focal length decreases so the field of view gets larger, lens aperture area decreases. If the meteors are, say, magnitude 3 and fainter, and your wide angle lens only records magnitude 1 and brighter meteors, then you won't get many meteors, maybe none. If there more faint meteors, then the larger aperture lens will do better even though it has a smaller filed of view. That fact biases the meteor efficiency to larger lenses. Look at the "Faintest Meteor" column in Table 1 and note the stellar magnitude calculation. The meteor in my Heart Nebula image in Figure 7 was not seen by any of my wide-angle lenses. A faint meteor can appear spectacular in a large aperture, long focal length image.
Available lenses have certainly changed in the last few years. Sigma has launched its ART series with excellent build quality and superb optical quality. I own several Sigma lenses, including the Sigma Art 24 and 35 mm f/1.4 lenses, which are my top working lenses for night and meteor photography. I do not recommend shorter focal length f/2.8 lenses because the aperture areas are too small.
For photographers on a tighter budget, consider the manual focus only Samyang/Rokinon (same lens different brand label). Note these lenses have performance close to but not quite as good as the Sigma Art series with impressive stars for the price. Internet reports say there are poor copies out there. I do not know how common this is, but test your lens right after receiving it and return it for a different copy if it does not meet your expected quality (check return policies before purchasing). NOTE: the Sigma Art lenses have better build quality and with autofocus are also great lenses for other applications, for example low light indoor action (including people and pets). I prefer lenses I can use for many purposes, as it usually saves money in the long run.
Lens aberrations: on the internet, one commonly sees wide angle lenses cited as having coma. Coma shows as little comet-like star images with the head of the "comet" pointing toward the center of the frame. The aberrations in wide angle lenses is not coma, but dominated by spherical aberration and astigmatism. Such aberrations typically show as "bat wings" coming off stars. Coma is a common aberration of reflective telescope optics which use parabolic shapes for the mirror curvature.
From the list of lenses below, confirm compatibility with your camera before ordering.
Canon cameras:
For Canon users, my top choice for a meteor camera (and a nightscape camera) is Canon 6D 20-megapixel digital camera, with a Sigma 35 mm f/1.4 DG HSM lens or Sigma 24mm f/1.4 DG HSM Art Lens for Canon EF DSLR Cameras used at f/1.4 and ISO 1600. Then I would frame continuously with 30 second exposures from a dark site (shorter if the sky is brighter) on a stable tripod. You could also have the camera on a tracking mount so the stars stay round.
If I were planning to use multiple cameras for nightscape and/or meteor photography, I would set up an array of Canon 6D 20-megapixel digital cameras with Sigma 35mm f/1.4 DG HSM Art Lenses.
Sigma 24mm f/1.4 DG HSM Art Lens for Canon EF DSLR Cameras. On a full frame camera, I would crop the images. I use this lens on a 1.3x crop camera (a 1D Mark IV) and that gives a field of view close to a 35 mm lens.
Sigma 35mm f/1.4 DG HSM Art Lens for Canon DSLR Cameras. This is my preferred lens for nightscape and meteor photography.
Canon EF 35mm f/1.4L II USM Lens This lens is very slightly sharper than the Sigma Art 35 f/1.4, but about double the price.
Zeiss Otus 28mm f/1.4 ZE Lens for Canon EF The top performing lens in this focal length, but very expensive. The light fall-off is also significant.
Sigma 20mm f/1.4 DG HSM Art Lens for Canon EF DSLR Cameras. This lens also has a lot of aberrations toward the corners wide open. While it works on a full frame camera, I would use it on crop-sensor cameras.
Zeiss 55mm f/1.4 Otus Distagon T* Lens for Canon EF Mount Best in class lens in the 50-60 mm range, though still not perfect. It shows how difficult it is to make lenses in this focal length. Very expensive.
NOTE: the Canon EF 24mm f/1.4L II USM Lens has a lot of aberrations when used wide open. I recommend the Sigma 24 f/1.4 over this lens. The Sigma 24 f/1.4 produces better stars at f/1.4 than does Canon 24mm f/1.4L II at f/2. But if you already have this lens, by all means use it. You may need to crop the images some. It should be better on a crop sensor camera. But if you are in the market for a new 24 f/1.4, I recommend the Sigma over the canon lens.
Budget lenses for Canon: the manual focus only Samyang/Rokinon:
Rokinon 24mm f/1.4 ED AS UMC Wide-Angle Lens for Canon
Samyang 24mm f/1.4 ED AS UMC Wide-Angle Lens for Canon
Rokinon 35mm f/1.4 AS UMC Lens for Canon EF
Samyang 35mm f/1.4 AS UMC Lens for Canon EF
Nikon cameras:
Sigma 24mm f/1.4 DG HSM Art Lens for Nikon F
Sigma 35mm f/1.4 DG HSM Art Lens for Nikon DSLR Cameras
Zeiss Otus 28mm f/1.4 ZF.2 Lens for Nikon F The top performing lens in this focal length, but very expensive. The light fall-off is also significant.
Zeiss 55mm f/1.4 Otus Distagon T* Lens for Nikon F Mount Best in class lens in the 50-60 mm range, though still not perfect. It shows how difficult it is to make lenses in this focal length. Very expensive.
Sigma 20mm f/1.4 DG HSM Art Lens for Nikon F This lens also has a lot of aberrations toward the corners wide open. While it works on a full frame camera, I would use it on crop-sensor cameras.
Budget lenses for Nikon: the manual focus only Samyang/Rokinon:
Rokinon 24mm f/1.4 ED AS UMC Wide-Angle Lens for Nikon
Samyang 24mm f/1.4 ED AS UMC Wide-Angle Lens for Nikon
Rokinon 35mm f/1.4 AS UMC Lens for Nikon F (AE Chip)
Samyang 35mm f/1.4 AS UMC Lens for Nikon F (AE Chip)
Sony cameras:
Sigma 35mm f/1.4 DG HSM Art Lens for Canon EF and MC-11 Mount Converter/Lens Adapter for Sony E Kit
Sigma 35mm f/1.4 DG HSM Art Lens for Sigma SA and MC-11 Mount Converter/Lens Adapter for Sony E Kit
Budget lenses for Sony: the manual focus only Samyang/Rokinon:
Rokinon 24mm f/1.4 ED AS IF UMC Lens for Sony E Mount
Samyang 24mm f/1.4 ED AS UMC Wide-Angle Lens for Sony Alpha
Rokinon 35mm f/1.4 AS UMC Lens for Sony E Mount
Pentax cameras:
Sigma 35mm f/1.4 DG HSM Art Lens for Pentax DSLR Cameras
Budget lenses for Pentax: the manual focus only Samyang/Rokinon:
Rokinon 24mm f/1.4 ED AS UMC Wide-Angle Lens for Pentax
Samyang 24mm f/1.4 ED AS UMC Wide-Angle Lens for Pentax
Samyang 35mm f/1.4 AS UMC Lens for Pentax K
Once you have chosen a dark site (see Part 1b of this series), follow the basic setup described in Part 3a.
The general settings that will work great on many cameras are:
Focus manually with live view. Set ISO to 6400, zoom in on some stars with live view, 10x magnification or as high as your camera will go, point at some stars and move the focus to minimize star size and color fringing. Be sure the lens is in manual focus (a switch on the lens if it is an autofocus lens). Turn off live view and change back to ISO 1600. Through the night as temperature changes, check the focus because temperature changes can make the focus drift off of ideal.
Once the camera has reached ambient temperature, update the bad pixel list in the camera (see part 3a in this series).
Exposure times with f/1.4 lenses at ISO 1600 are typically about 30 seconds from a dark site, 60-seconds tops if really dark and very low airglow. If you are not tracking the stars, but are on a fixed tripod, your exposure times will need to be shorter if you want sharp stars without trailing. Use the 200 or 300 rule (See Part 1a for times with various lenses), NOT the 500 rule. Note, if aiming north, for example the Perseid meteors on August 12 which radiate from a position in the NE, you can lengthen the times from the "rule" by about 40%.
If you are doing landscape frames too, landscapes usually take 2 to 4 times longer exposure time as the sky. If you are in a deep canyon or valley, there is less light illuminating the landscape from the sky and you may need longer exposure times. If the landscape is high reflectance, e.g. snow, then shorter exposure times may work, perhaps equal to the sky exposure time will work. So you will need to test it for your location.
Once you know your exposure times, frame away continuously. With an interval timer, program the interval between frames long enough so that the data are completely written to the memory card before the next exposure starts. For example, with Canon cameras with a TC80-N3 interval timer, I use 2-second mirror lockup, so set the exposure time on the interval timer to be 32 seconds for a 30 second actual exposure, and 3 seconds between exposures. The results in imaging 30 seconds out of every 35 seconds, or 86% efficiency.
You will likely record a few meteors spread of many exposures during the night. You may wish to combine these into a composite like that in Figure 1. The challenge is how to accomplish that. The following is derived from this discussion on dpreview.
1) First collect the images that have meteors in them. Also stack your available images into the star background (for example, see part 3 of this series). You will use that image to place the meteors from other images that have recorded meteors. We will call this the base layer.
2) In a photo editor like photoshop that has layers, open your base layer and create another layer. Call this the meteor layer.
3) Open one of your images with a meteor (as a separate image from step 2).
4) Use a selection tool to select the meteor and a few reference stars. Feather the selection by approximately 5 to 10 pixels.
5) Copy the selection.
6) Move to your base layer image and paste the meteor you just copied. The meteor will be placed on a new layer (at least in photoshop).
7) Set the layer opacity on the new meteor layer to 50%.
8) Now move the meteor to align the few reference stars with stars in your base image.
9) Set the layer opacity to 100% and change the layer type to lighten. The erase the reference stars with a soft brush (no hard edge to the erase tool) and lock the position to the base image. Deselect the meteor.
10) Select the meteor layer and the new meteor layer and merge to one layer. Be sure the merged layer is locked so you don't accidently move the meteors around.
Repeat at step 3 until all meteors are placed.
You should now have two layers: base sky and meteors. I save this as a psd format file in photoshop so the layers are kept. If I have land, I keep the land as a third layer. Once the psd file is saved, you can flatten the image and save as regular images, like tif or jpeg for viewing outside your photo editor.
The above methods and strategies can be used to make nice meteor composites, even with slower lenses, like the 24 mm f/2.8 lens used to capture the images in Figure 8.
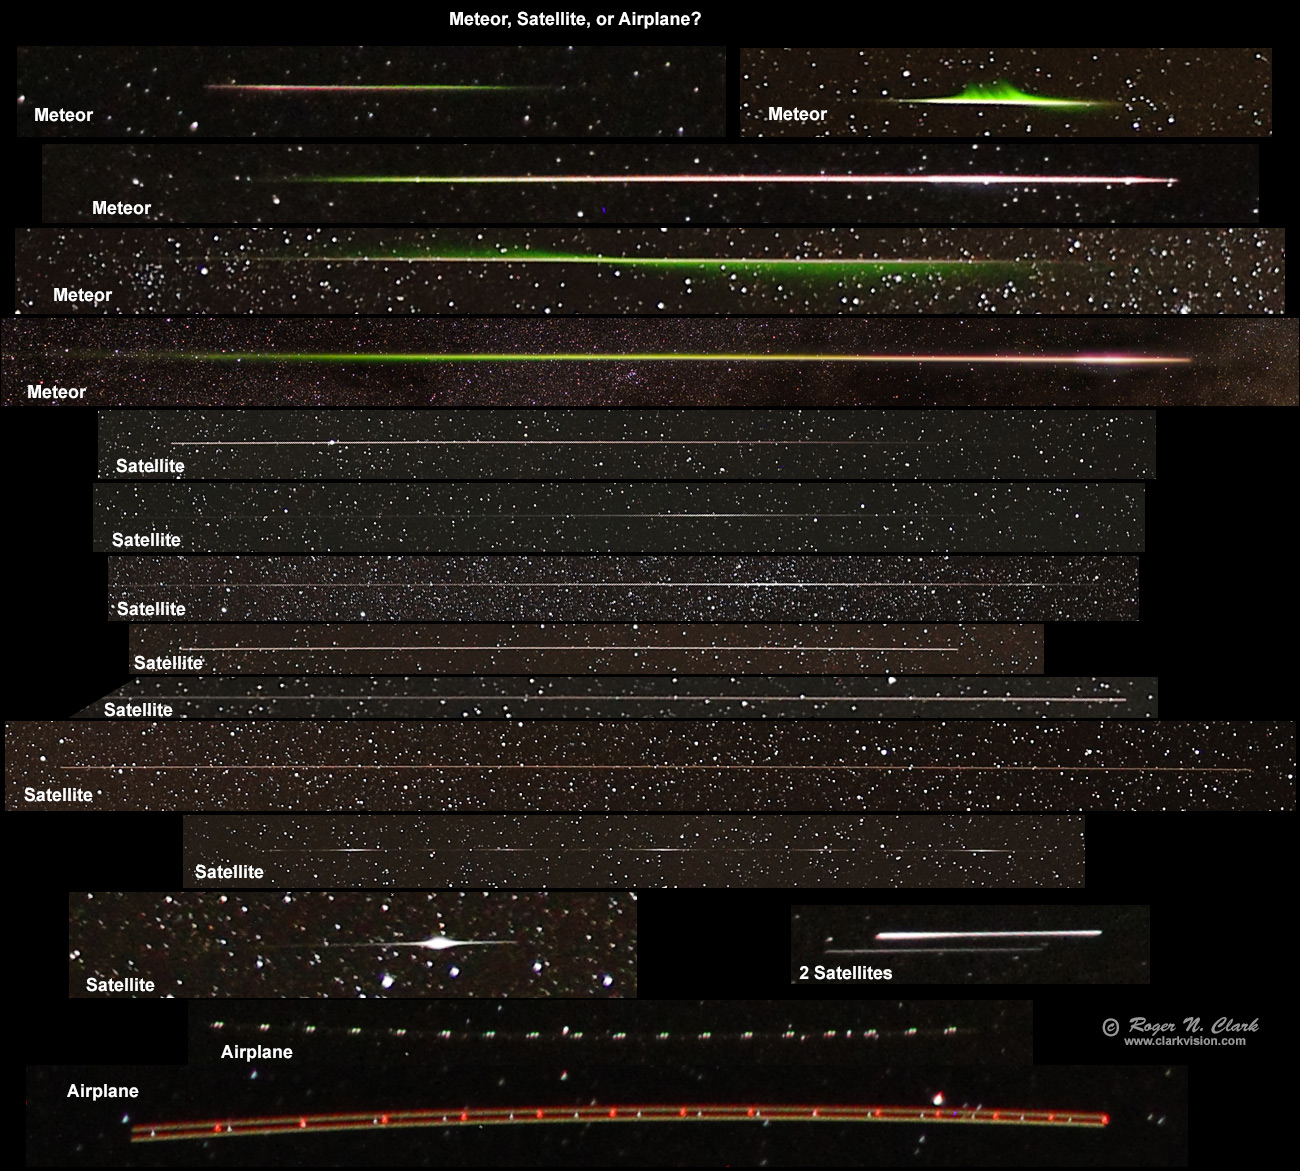
Meteors typically show beautiful colors, starting out green then changing to yellow and red as the meteor gets deeper into the atmosphere (Figure 9). The recorded track can appear white if the brightness saturated the track. Satellites can show similar brightening but do not show green when in orbit. Some satellites are covered in gold foil so can appear yellowish-reddish, and that is seen in some of the tracks in Figure 9.
Meteor photography is a challenging but rewarding type of night sky photography. For best results, consider large aperture fast lenses of moderate to wide angle focal lengths. As with other nightscape photography, the best ISO is typically around 1600 (note ISO does not change a camera's sensitivity--see part 1a of this series for more information). If the shower has fainter average brightness, bias your lens selection to larger apertures, longer focal lengths, and work closer to the radiant.
Considering wide open lens quality, the top lenses for meteor photography are f/1.4 lenses in the 24 to 105 mm focal length range. A strategy of imaging closer to the radiant with longer focal lengths can help mitigate the smaller field of view of those lenses. The Sigma Art series are the best performance per cost in my opinion and are available for cameras from several manufacturers. The Sigma Art lenses also include autofocus and are excellent for low light action photography, including pets and children at play indoors.
References and Further Reading
Meteor shower radiant positions.
Clarkvision.com Nightscapes Gallery.
Bone, N., 1993, Philip's Observer's Handbook, Meteors, George Philip Ltd, London, p. 101.
The Night Photography Series:
| Home | Galleries | Articles | Reviews | Best Gear | Science | New | About | Contact |
http://clarkvision.com/articles/nightscapes
First Published July 14, 2016
Last updated August 23, 2021