
Verifying Natural Color Astrophotography
Image Processing Work Flow with Light Pollution
by Roger N. Clark
Color accuracy in astrophotography post processing can be
difficult to maintain depending on the processing methodology.
Here I investigate some processing methods that maintain good
color versus steps that destroy natural color. A set of test
files are present for you to test your own methods.
The Night Photography Series:
Contents
Introduction
Tone Mapping at Raw Conversion Method
Other Methods
Challenge: Try Post Processing Yourself With These Images
About the Challenge
Conclusions
References and Further Reading
All images, text and data on this site are copyrighted.
They may not be used except by written permission from Roger N. Clark.
All rights reserved.
This tutorial includes raw camera image files which you may download for testing
your own work flow. These images are for personal use and not for resale or profit.
If you use these images to show a work flow and post results on public web sites
or send them to me, you agree that I may include small images (up to the size of those
in this article) for discussion of methods.
If you find the information on this site useful,
please support Clarkvision and make a donation (link below).
Introduction
The challenge in this article is to produce an accurate color image in the presence of
light pollution. Dealing with light pollution is a common problem in night sky and astro photography.
For this article I use a commonly available color chart: the GretagMacBeth color chart.
If you have one of these charts, and are viewing this article on a good color-calibrated
monitor, you should be able to hold up you color chart and see colors that
are very close to those in Figure 1. The bottom row of patches, between white to black
should look like shades of gray without any color. The measured RGB values in the
image in Figure 1 are very close for each patch.
For the astro-imaging test, "light pollution" was added to the scene by placing a grid
of orange threads in front of the lens (Figure 2a). The threads were illuminated by sunlight. The signal
from the threads is added light to the light coming from the chart. The threads blocked
a tiny fraction of 1% of the light from the chart, so is inconsequential. This setup
is an excellent analog for the light from an astronomical object with added light pollution in
our night sky. Included too is the transmission of the terrestrial atmosphere because
the illumination is the sun, which must pass through the atmosphere to illuminate the chart.
The light on the color chart and the threads were balanced so that the light pollution addition
is similar to the astrophotography guideline of exposing so that the histogram for the
sky with light pollution peaks about 1/4 to 1/3 of the way from the left to right sides
of the histogram on the Camera LCD (Figure 2b).
The resulting image of the color chart with "light pollution" is shown in Figure 3. The challenge
is to use a processing work flow that removes the light pollution and maintains
accurate colors.
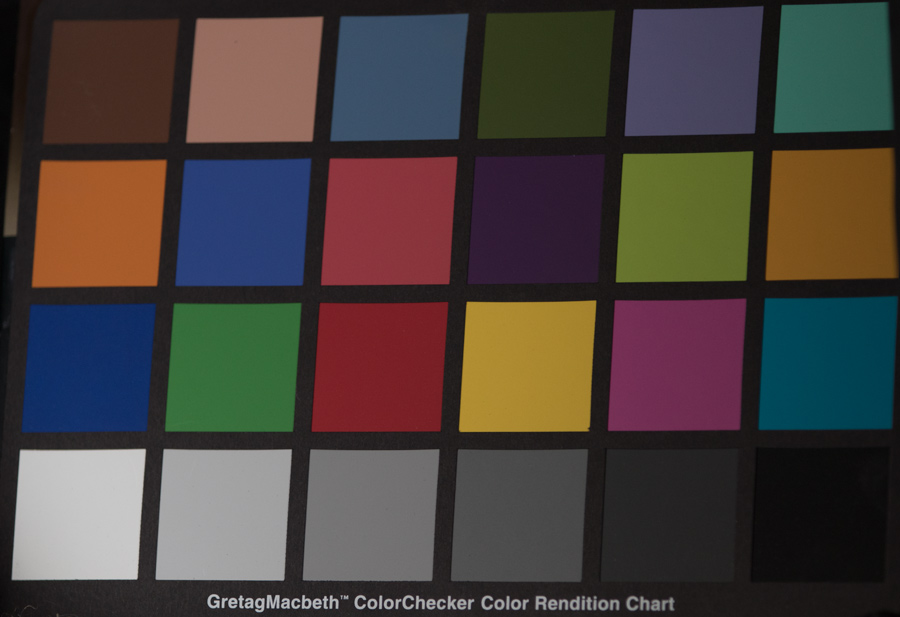
Figure 1. GretagMacBeth color chart imaged by a Canon 7D Mark II digital camera
and 70-200 f/2.8 lens at about 135 mm. The chart was illuminated by the
sun reflected off a white panel. The raw file was converted in Photoshop
CS6, ACR with daylight white balance with a slight adjustment for the low sun
to give a neutral color to the lower left white square. The raw file settings
are in the xmp file supplied below with the raw file.
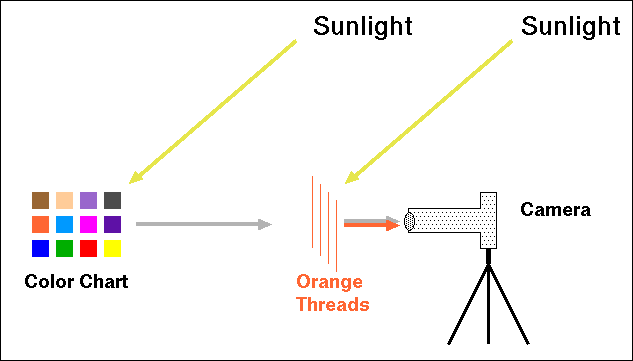
Figure 2a. The test setup. Sunlight illuminates the color chart (reflected off
of a white card, not shown). Sunlight directly illuminates a grid of orange threads
placed close to the camera so the threads are out of focus. This is added colored
light to the scene. The thread color mimics common light pollution that includes
sodium vapor lamps. The number of threads was adjusted to give "light pollution"
similar in intensity to a typical astrophoto exposure (Figure 2b).
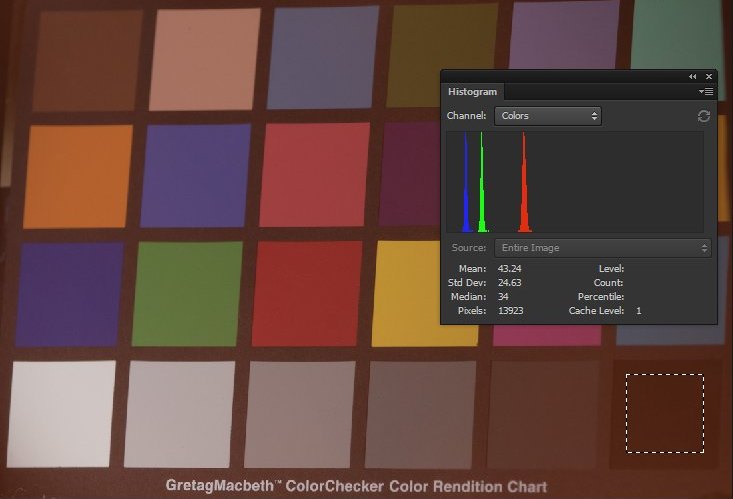
Figure 2b. The added "light pollution" has a red component at about the
1/3 distance from left to right, a typical level astrophotographers aim
for in astrophotography.
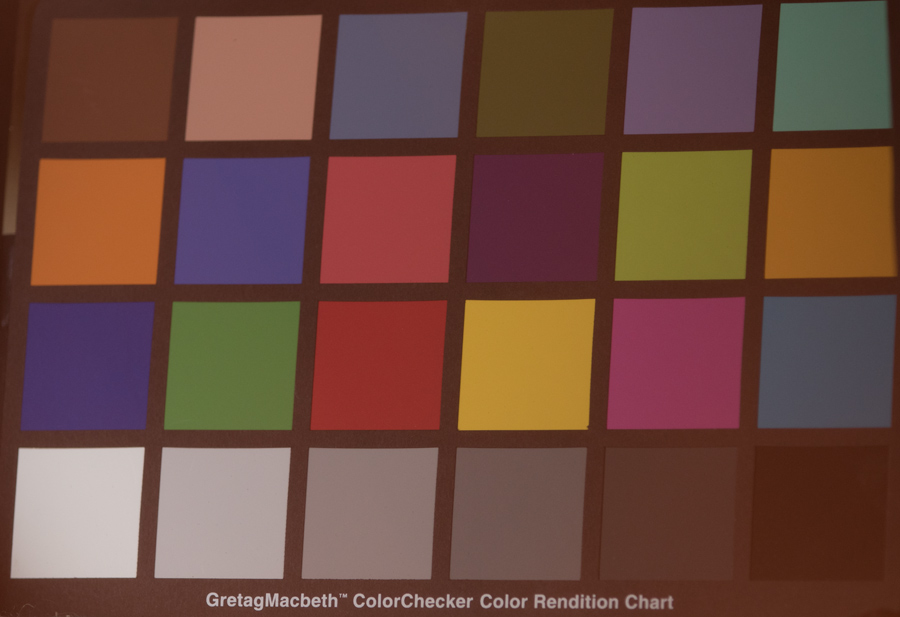
Figure 3. Recorded image with "light pollution" added.
Tone Mapping at Raw Conversion Method
My methodology is simple and is described in detail in this series. Basically, it is the
same color-managed work flow that I use for all my photography to produce reasonably
natural color images. I use a raw converter, such as photoshop's, ACR), convert the
raw file to a 16-bit tif image with Adobe RGB color profile, use lens profiles to
correct for light fall-off, chromatic aberrations, and a small amount of noise reduction.
I also use the black point slider to reduce the average offset from light pollution.
See parts 3a, 3b, and 3c for more details and example photoshop ACR settings.
After performing the above raw conversion and bringing the image into photoshop,
there was some additional light pollution gradient in the lower right corner.
A quick feathered selection and subtraction with the curves tool in photoshop
resulted in the corrected image in Figure 4a. Subtraction with the curves tool
is simply moving the lower left point to the right, as shown in Figure 4b.
The entire process from raw file to finished image took only a couple of minutes.
Compare the results in 4a with the colors in Figure 1. A smaller version of these
two images are shown in Figure 4c. The results are very very close.
This illustrates that color accuracy is maintained even when subtracting light
pollution from tone-curve data, contrary to the dire prediction of internet "experts"
who have proclaimed there would be horrible color shifts.
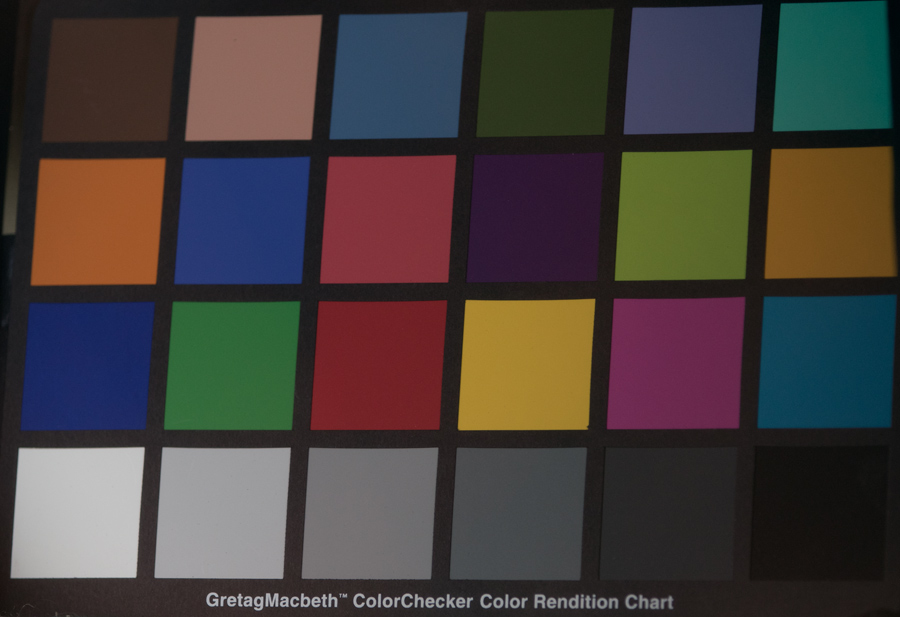
Figure 4a. Light pollution removed from the image in Figure 3 using the curves tool
in Photoshop to subtract the light pollution. Any photo editor with a curves tool
should be able to produce the same result.
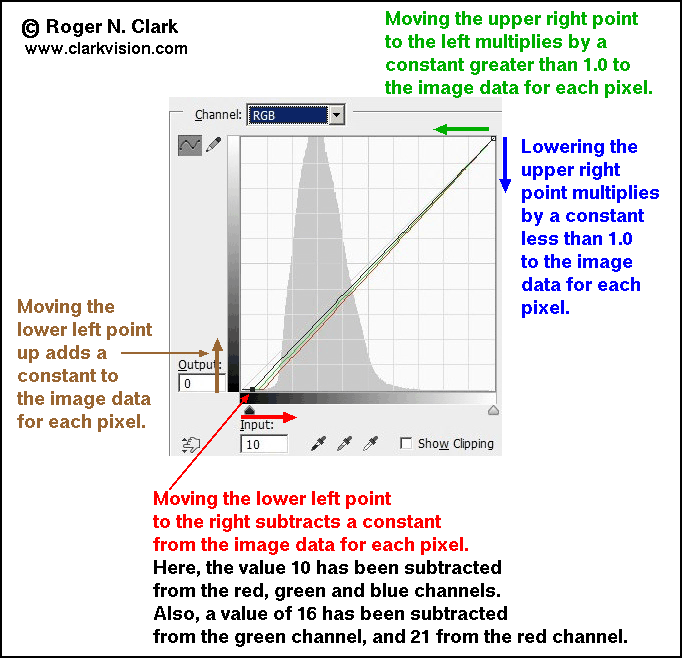
Figure 4b. The curves tool and the math applied to image intensity data.
The effects are:
Moving the lower left point up adds signal and reduces contrast at the low end.
Moving the lower left point to the right subtracts from the image data. Use this to subtract
light pollution. It increases contrast at the low intensity range.
Moving the upper right point down darkens the image, keeping contrast unchanged.
Moving the upper right point to the left brightens the image, keeping contrast unchanged.
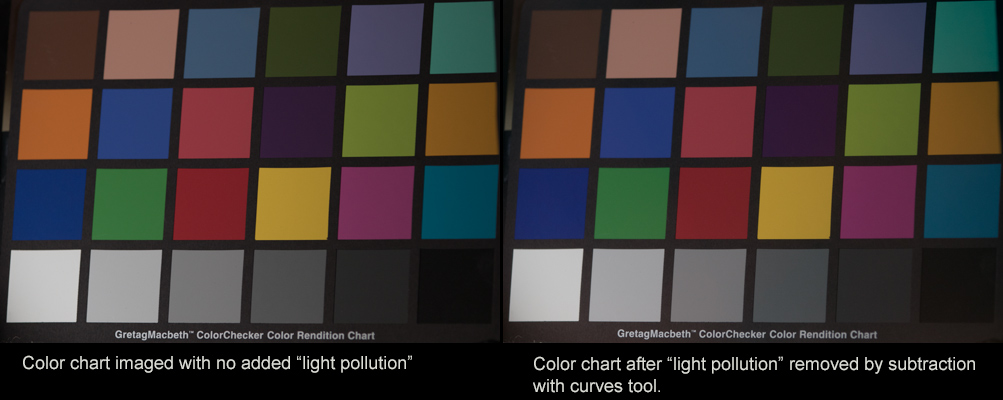
Figure 4c. Comparison of before and after simple curves tool subtraction of light
pollution.
Other Methods
The internet is full of methods for post processing night sky and astrophotos.
Most are not a color managed work flow, and many seriously warp colors to
something not real. Here are some examples.
Common on the internet, as described in part 2d of this series, is to use a low Kelvin
white balance temperature to reduce the effects of orange light pollution.
White balance is a multiply, but light pollution is added light, so needs
to be subtracted, not multiplied. Use of white balance to reduce effects
of light pollution causes a bluing of the scene, especially at lower scene
intensities (Figures 5, 6, 7). This produces very unnatural colors.
As light pollution increases, the bluing effect becomes stronger.
Online I see many tutorials that say to align the histogram peak of the 3 color channels.
That is WRONG. Aligning the histogram peaks suppresses the dominant color
in an image. The colorchart has a variety of colors, so the problems aren't nearly
as pronounced as in astrophotography, but we still see the detrimental effects. The image
in Figure 5 included choosing a color temperature that gave the most neutral
RGB values on the darkest square, and aligned the major histogram peaks. Clearly,
the result is poor color.
Steer clear of any tutorial that tells you to do this to your images!
Avoid any form of histogram equalization (see also Figure 9) if you want natural color.
Compare the most accurate color image of the color chart in Figure 8 with the results in
Figures 5, 6, 7, and 9.
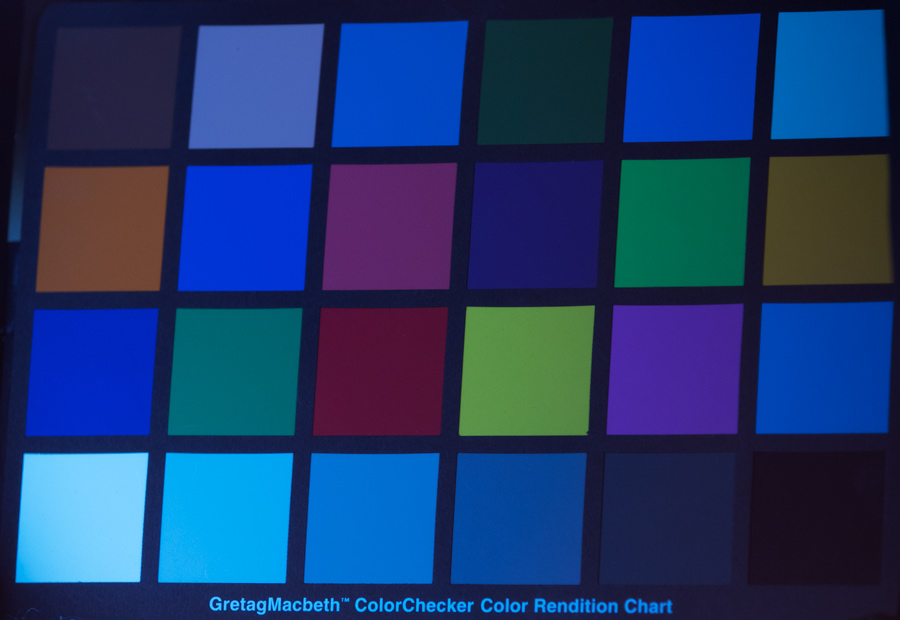
Figure 5. Raw conversion with white balance set to 2550 Kelvin, tint +2 and saturation +23 in
Photoshop ACR, then in photoshop boost contract with the contrast slider at +70.
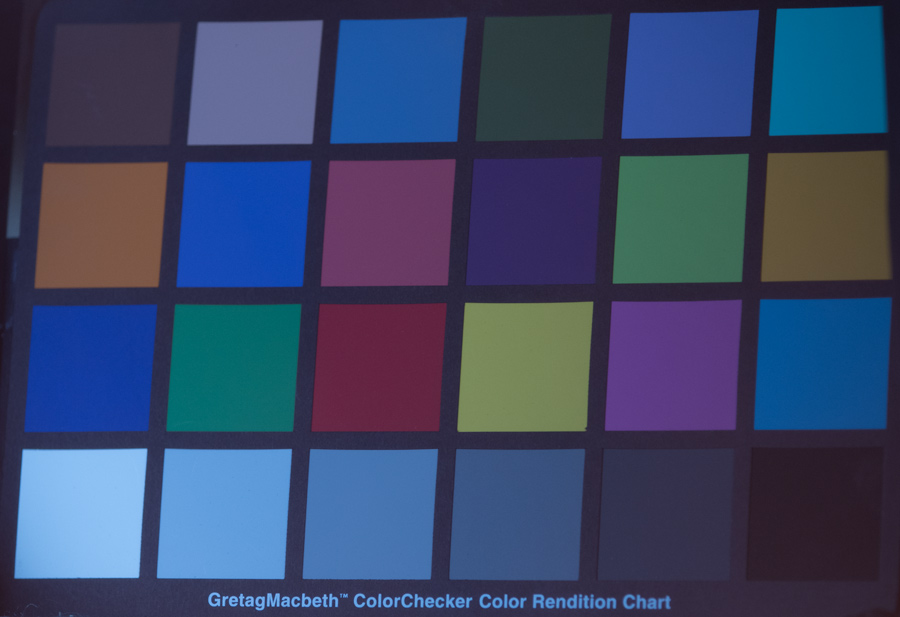
Figure 6. Raw conversion with white balance set to 2750 Kelvin, creating a blue
shift to the scene in order to reduce the orange cast from light pollution.
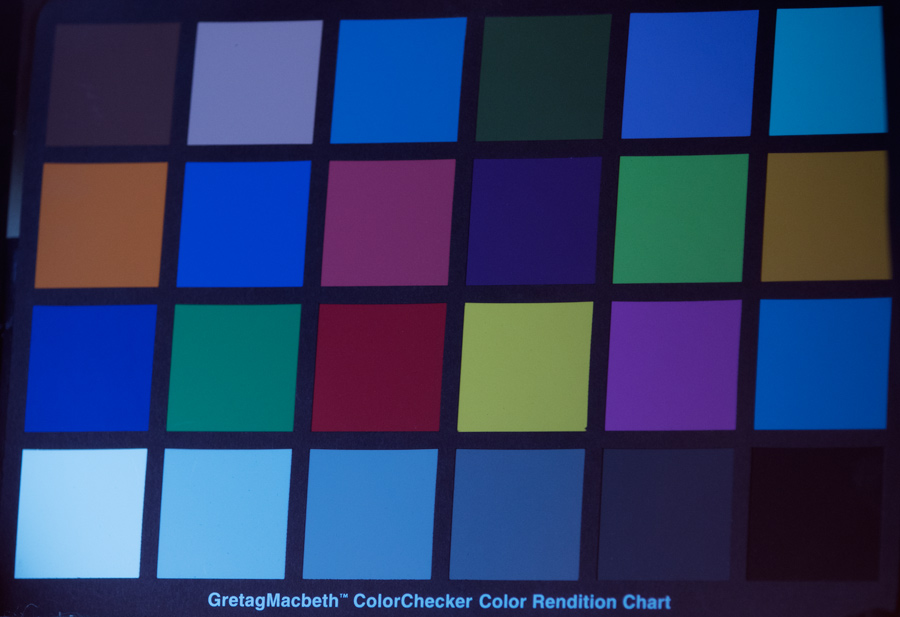
Figure 7. Data from Figure 6 with a S-curve applied to boost contrast and saturation.
The result are colors that are still too blue, though may be pleasing to some viewers
even though the colors are not correct.
Figure 8. Repeat of Figure 1: the color chart imaged with no added light pollution
in the path. These are the most accurate colors.
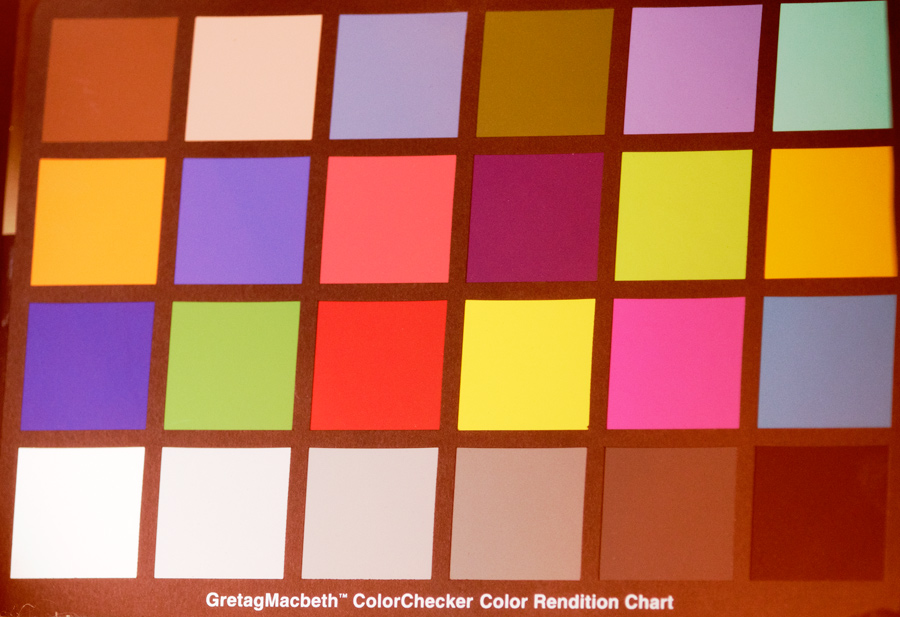
Figure 9. Many astrophotography methods include a form of histogram equalization. Obviously
the colors are far from accurate. This image is the result of the photoshop equalize tool.
Challenge: Try Post Processing Yourself With These Images
Use the files below to reproduce what I did above, or try your own methods. If you use a traditional
astrophotography linear work flow, I have included a bias frame and flat field. These are
high signal-to-noise ratio images, so stacking is not needed. Stacking does not change
intensities, it just improves signal-to-noise ratio. If your work flow needs multiple
images and stacking, just copy first frame and increment the frame number, e.g. 8365 to
8366, 8367, 8368... etc. Can you produce accurate colors with your processing method(s)?
canon-7d2-mb-colorchart+lp-0J6A8365.CR2 image with "light pollution" 23 MByte file
canon-7d2-mb-colorchart+lp-0J6A8365.xmp photoshop ACR xmp file, setting for raw converter, 7.3 KByte file
canon-7d2-biasframe-0J6A8408.CR2 bias frame 19.5 MByte file
canon-7d2-flat-field-for-colorchart-0J6A8393.CR2 flat field 25.1 MByte file
If you do the challenge with the above images and post your results,
you give permission for me to post a small version of your image here
so I can discuss results of different methods.
About the Challenge
The challenge is to check your work flow for color accuracy or present different work flows that
can produce accurate colors.
Conclusions
Producing natural color images of the night sky is a challenge with the added light from
light pollution. Color perception is complex, and a modern color-managed work flow
can produce excellent results if light pollution (and other sky glow) is properly
removed.
Obvious in the images produced here and in part 2d of this series,
many post processing methods that produce bluing of the scene are all
too common in the digital photography era as of this writing (circa
2000-2016). Natural color images of the night sky as of this writing
are quite rare.
The internet "experts" continue their attacks. They insist that
subtracting light pollution from tone-mapped data (like that produced
by photoshop) produces unnatural color. Obviously, those charges are not true.
Their ideas are based on a flawed understanding of tone curves and color spaces.
If you find the information on this site useful,
please support Clarkvision and make a donation (link below).
References and Further Reading
For linear processing of digital camera data, you must apply a color matrix conversion
to get accurate colors.
See this dpreview thread discussing the effects and how to appliy the matrix multiply.
Clarkvision.com Astrophoto Gallery.
Clarkvision.com Nightscapes Gallery.
The Night Photography Series:
http://clarkvision.com/articles/astrophotography-color-accuracy-and-light-pollution
First Published February 13, 2016
Last updated March 31, 2018