ClarkVision.com
| Home | Galleries | Articles | Reviews | Best Gear | Science | New | About | Contact |
Planning Nightscape Photography
by Roger N. Clark
| Home | Galleries | Articles | Reviews | Best Gear | Science | New | About | Contact |
by Roger N. Clark
Nightscape photography planning is simple using free tools available today.
The Night Photography Series:
Contents
Introduction
Planning Locations
Planning with Maps
Planning When to Image
Light Pollution
Planispheres
Weather planning
Safety
Discussion and Conclusions
References and Further Reading
Planning where and when to go to make nightscape images has never been easier. Things to consider include interesting locations, what direction you will image, when to go (when will interesting stars be in the right position), and what time of year will the foreground scene be interesting. Will light pollution be a factor, and will the weather cooperate? When will the Moon not interfere? What safety considerations might there be? I'll discuss these topics in this article.
Generally, things to consider when planning nightscapes includes the following.
Tools needed for planning.
The first thing in planning a nightscape photo is finding interesting locations where your might include a foreground to the stars. It might be a mountain, a lake, a river, a waterfall, or even an interesting tree or group of trees in a field. I generally look for landscape scenes that would make a great image during the day. If the scene works for daytime, sunrise or sunset landscapes, it will most likely work for nightscapes.
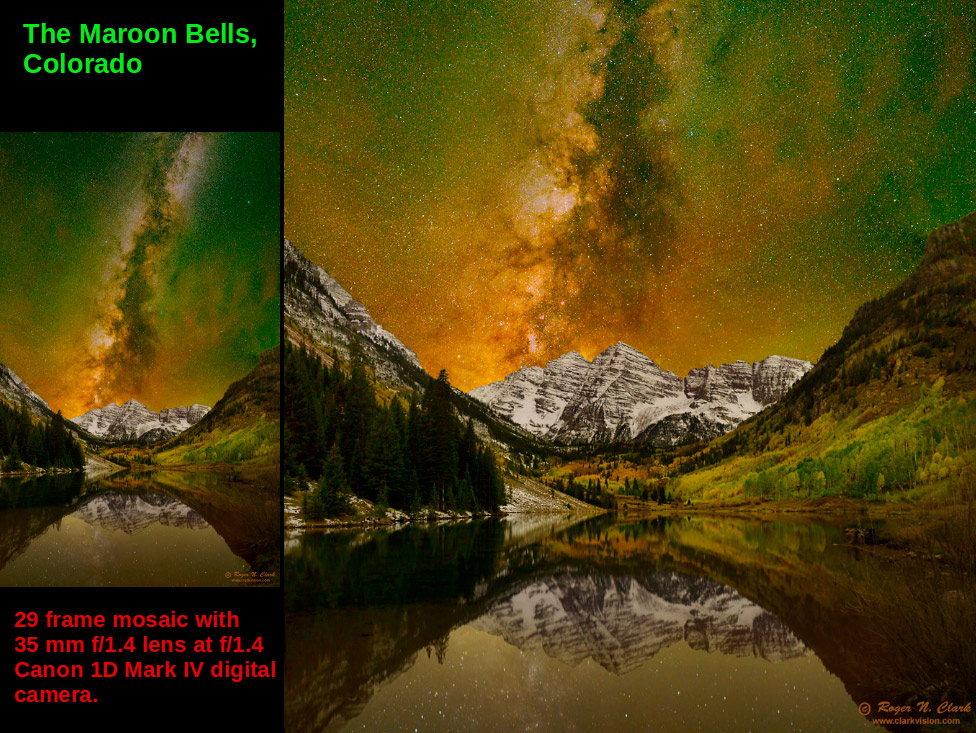
For this example, I chose a classic landscape scene in Colorado: the view of the Maroon Bells mountains as viewed from Maroon Lake. The Maroon Bells is one of the most photographed scenes in Colorado. In the fall, the aspen leaves turn a brilliant yellow and peak colors generally occur near the end of September. The site is a classic spot for sunrise and photographers line up shoulder to shoulder during peak fall colors for sunrise. A bonus is when a not too violent storm adds a blanket of snow to the peaks but without a lot of wind that blows the leaves off the trees.
I planned the Maroon Bells nightscape for several years. The Moon is near new near the time of peak fall colors only every few years. That occurred in 2013 and I was able to get the image in Figure 1. But before I made the effort to get the image, I needed to be sure everything would line up to make something interesting.
One can find many interesting locations to make nightscape images by examining beautiful landscape photos, and finding their locations on maps, which leads us to the next section.
One can use traditional paper maps to find locations and measure angles from a viewpoint to distant things like mountains or the direction of a lake. But now we have online an amazing resource: Google Earth. With Google Earth, one can zoom in or out, and get an Earth surface view as well as photos from different view points. If you have never been to the Maroon Bells area, just zoom in with Google Earth and go to the perspective view (Figure 2a). With this view (Figure 2a), I could see the location would be an amazing spot for photography even if I hadn't seen any landscape photos of that scene.
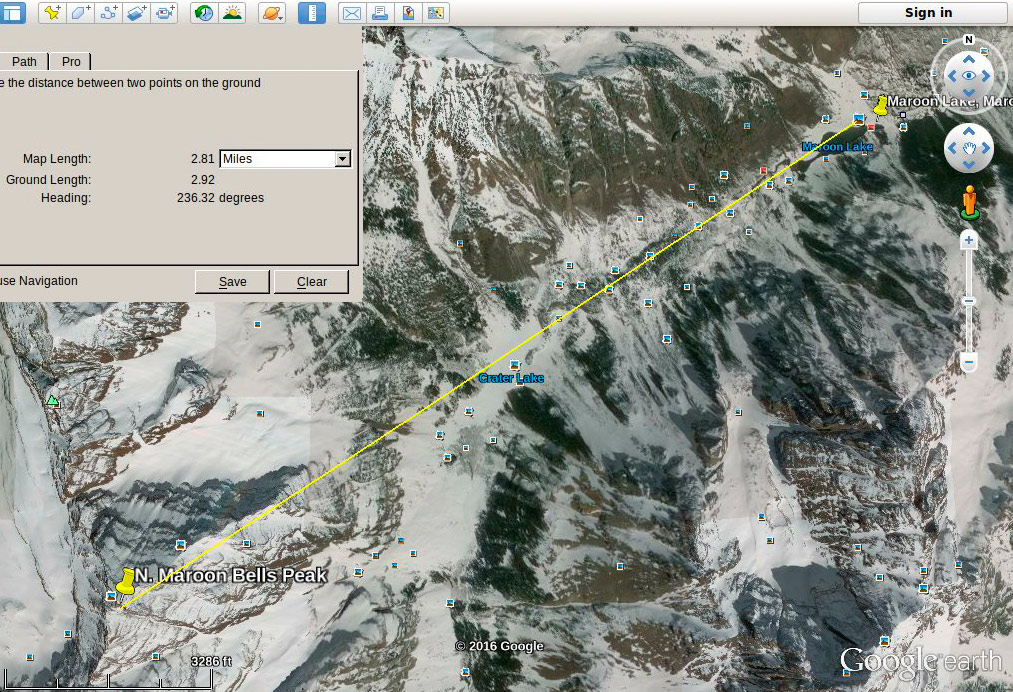
The next step in planning is to find what the azimuth angle one is looking at in the view in Figure 2a. Simple, just go back to the overhead view and bring up the measurement ruler tool (Figure 2b). To get the correct angle, start the measurement from the location your camera would be at (the lake in this case) and hold the left mouse button down and move to other things in the scene. In the example in Figure 2b, I chose North Maroon Peak, which is the tallest peak from the lake perspective. The measuring tool shows the straight line distance to the peak is 2.81 miles at an azimuth of 236 degrees.
By getting the elevations of the 2 locations, one can derive the apparent height from your cameras position. For example, the lake is at 9597 feet and North Maroon Peak shows as 14033 feet for an elevation difference of 14033 - 9597 = 4436 feet. With a distance of 2.81 miles or (2.81*5280=) 14837 feet, the ratio of height divided by distance is 4436 / 14837 = 0.299. The arc-tangent of 0.299 is 16.6, so the mountain peak will appear 16.6 degrees above the horizon. That is quite impressive. The next step is to find what time interesting stars will appear behind the mountains.

There are many times of year when one might make a nightscape image. But for the Maroon Bells of Colorado, I wanted fall colors. That pinned the time of year to later September or possibly early October. So what stars and at what time of night during that time period would be the most interesting and when no Moon is up?
The are many tools one might use to find what stars are in view at any time. There are several planetarium programs available these days, both commercial and open source. I have bought several, but the one I prefer is the free, open source, Stellarium ( http://www.stellarium.org/. Stellarium runs on OSX, linux and windows. It is a superb planning tool for any location on Earth and any time of year.
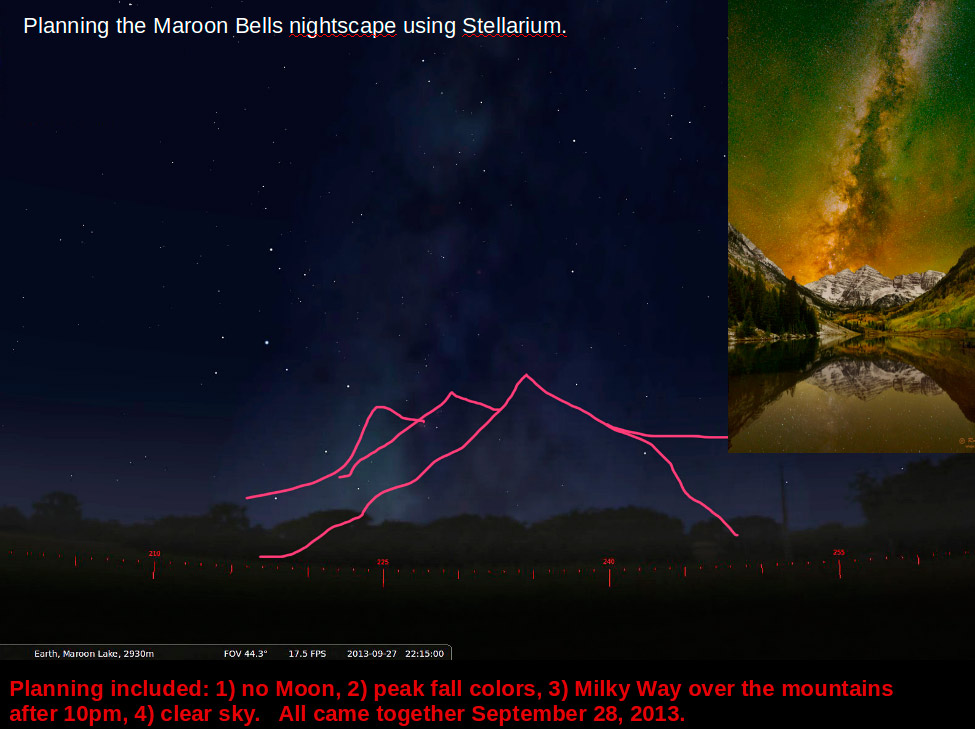
By making several azimuth measurements down the valley with Google-Earth's ruler tool, I found that azimuth angles between about 225 and 240 degrees nicely frames the mountain peaks. I started Stellarium and set the time to late September, and the location to the nearby town of Aspen (one can put in the exact coordinates if more precision is desired). I found that the Milky way would be nicely positioned over the mountain peaks between about 10 and 11 pm. I made a screen dump of stellarium and drew in a rough outline of the mountain peaks as seen from the lakes (Figure 3).
So at this point, the location has been identified, the azimuth direction found with the Milky Way in a great position over the peaks in late September between about 10 and 11 pm. Stellarium also showed me that the Moon would not interfere in 2013. This later evening is good, because earlier in the evening, there are often other photographers firing off their flashes trying to light the landscape (light painting). In most cases I dislike light painting as it does not look natural. Indeed on the night I imaged, there was a photographer trying to light the landscape with two 2-million candle-power lights. Fortunately, he finished just before my peak time so I did not lose too much of my intended composition.
Planning is not yet complete. While the location and time look good, will a night photo actually work? We need to know if there are cities nearby that would ruin the view with light pollution.
Light pollution is catalogued on the Bortle Scale and color coded from black = darkest sites to red and white in big cities. Maps of light pollution can be found at http://www.lightpollutionmap.info/, http://darksitefinder.com/maps/world.html and https://www.darkskysites.com/ for much of the world. Black and gray are the darkest sites, blue and green have only moderate light pollution, and yellow to orange, red and white increasing light pollution. Note the lightpollutionmap.info site does not include a white zone. In my experience, the data on the lightpollutionmap.info site falls off too rapidly with distance from cities, at least in the western US.
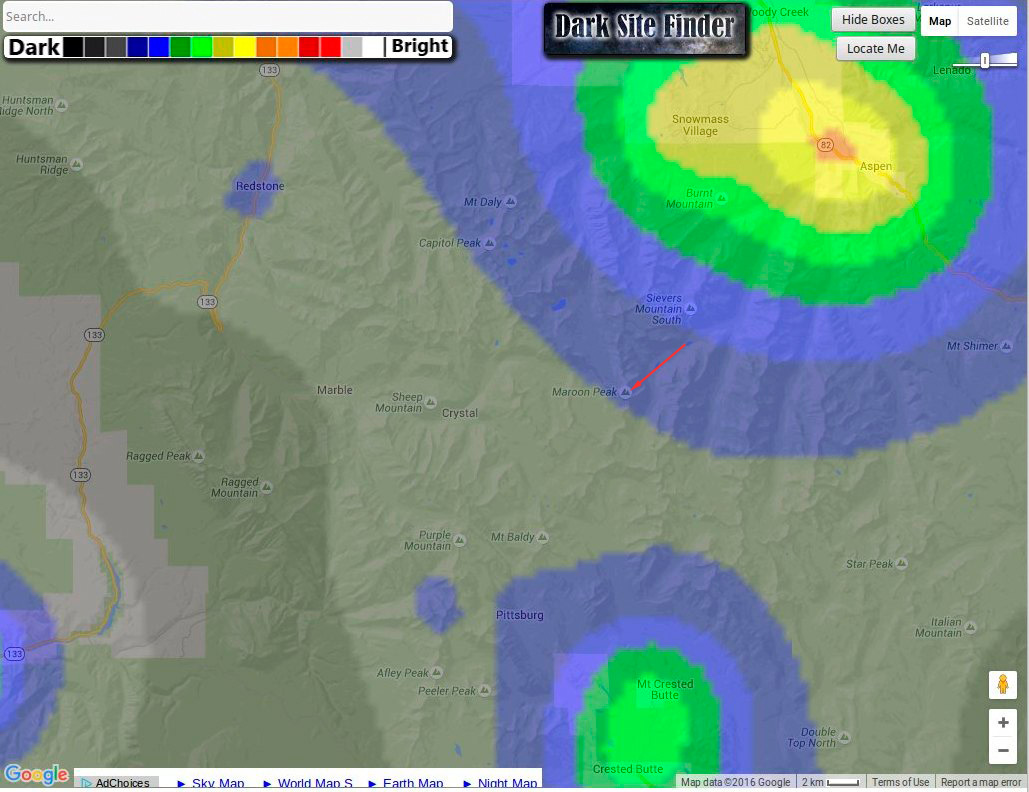
I used darksitefinder to check the light pollution in and around the Maroon Bells site (Figure 4). The light pollution is low, and mainly coming from the north from the town of Aspen. More importantly, there is little light pollution in the direction of the view (the red arrow I placed on the map). If you go to darksitefinder.com and this location, and zoom out, you will find there is little light pollution for many tens of kilometers (and miles) in the direction of the view. As a result, the Maroon Bells view is a low light pollution scene with no light pollution glow on the horizon behind the mountains.
So now we have established that the site is excellent candidate for a nightscape image, the time of year has been identified, the time of night when the Milky way is in position has been determined, and the site is superb with low light pollution. The next consideration is looking at weather predictions to find when the best night will be to go to the site. But first, I'll discuss other planning tools that can be used in the field offline and no electronics.
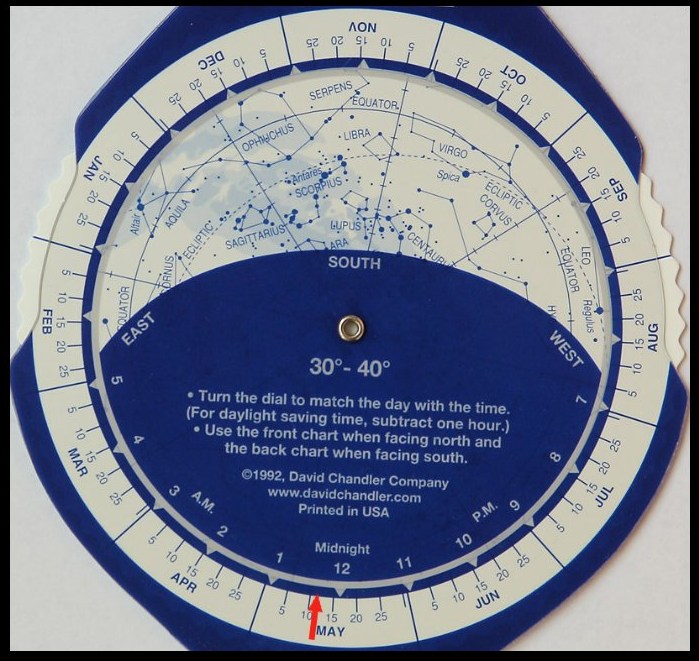
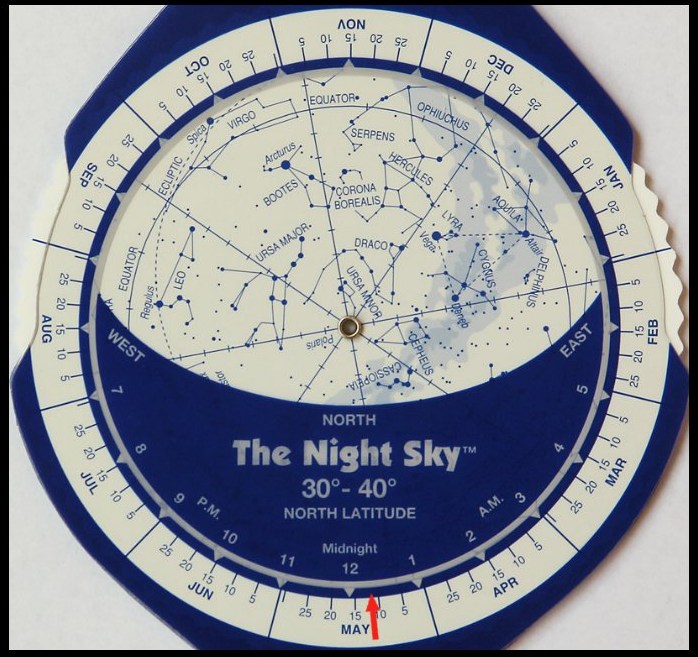
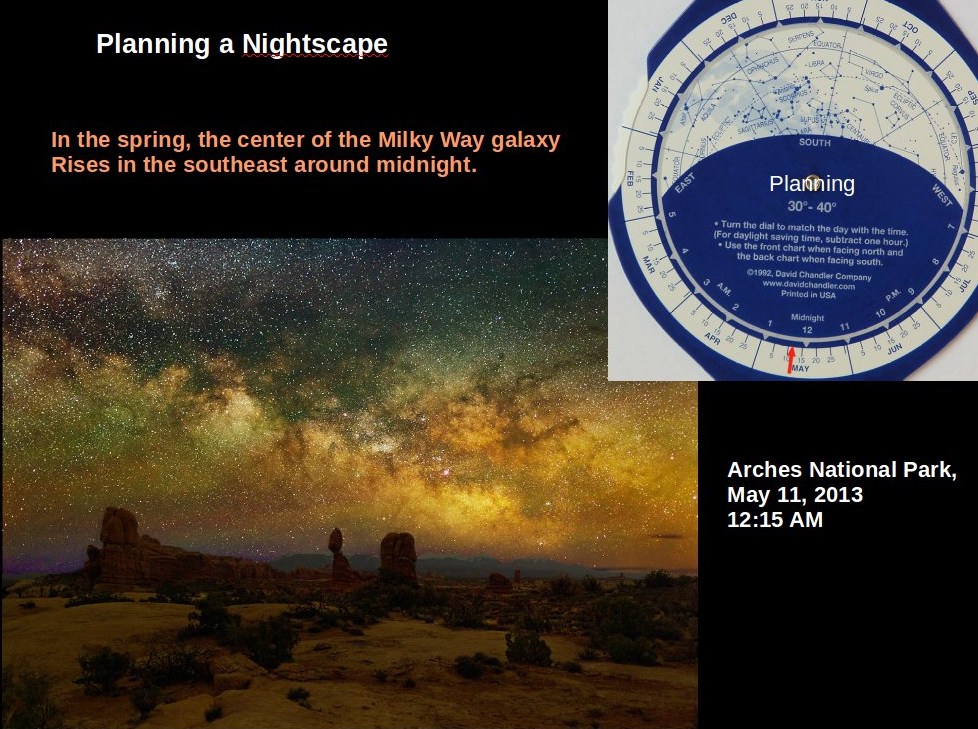
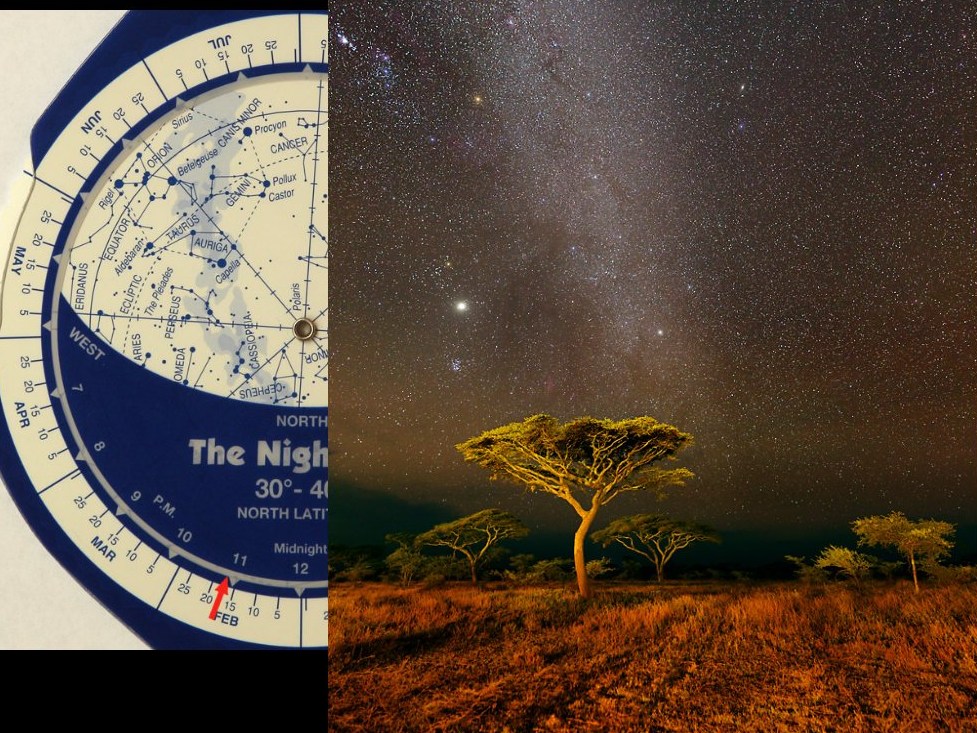
Planispheres are simple, light weight low cost tools that can be used at home or in the field to determine general direction of stars for a given time of year and time of night. I endorse the Planispheres from David Chandler http://www.davidchandler.com because they are well made, high contrast large lettering so easy to read day or at night with a red light. Figure 5a and 5b shows the two sides of one of David's planispheres. They also come in two sizes, and I always carry a smaller one in my backpack. That and along with a compass, and if I am hiking and come across a potential nightscape site, I measure the azimuth angle and check the planisphere for what time of year and time of night would make a great image. I write down the azimuth, location and when a good image might be made so that I know when I might return. Figures 6, 7 and 8 show example nightscapes along with the planisphere set to the date and time that the image was made. It shows that with the planisphere, one can envision what a nightscape might look like at any time of year and night.

So we have established the best time of year and night to make a nightscape. Then it is a waiting game for a clear night. As peak fall colors approached I watched the weather waiting for a clear night to make the Maroon Bells nightscape. But it is a 4-hour drive from my house, so I want a prediction of clear weather and cloud positions in the future.
The best source for your local forecast is likely your local forecast. But North American photographers have an impressive resource from the Canadian Meteorological Center. That data is used at ClearDarkSky.com to show cloud predictions, wind, humidity, temperature, and other parameters on a hour-by-hour basis for up to 2 days into the future. The images in Figure 9 show examples. The cross marks the position of a location, in this case the city of Denver and a site east of the city. For a cloud-free nightscape, there should be no clouds within about 100 miles from the imaging site. That is about 1.5 times the length of one rung of the cross in the cleardarksky chart (from center of the cross to one end), or about the distance from Denver to the Wyoming border.
Safety at night, often in remote locations, should always be a concern. Tripping and falling in the dark to getting attacked by predators are possibilities. Also to be considered is the safety of your equipment in the dark. You would not want to trip over a tripod leg knocking over the camera and smash it on the ground. It is best to be with a group and have adequate lighting/dark adaptation for safety. For example, I made some faint red LED lighting and place lights at the bottom of each tripod leg so I know where they are in the dark.
I have three flashlights on a strap I put over my shoulder outside my coat. The 3 flashlights are: 1) full brightness LED for emergencies. 2) Bright dim flashlight that I can see things on the ground with without impacting night vision too much. 3) very dim flashlight for working close (e.g. finding a camera button). Both flashlights #2 and #3 are standard LED lights covered with brownish-red plastic in layers. The layers are tuned for the brightness I want and produce a nice diffuse glow in one direction. See Part 6a) Lighting and Protecting Your Night Vision for more information.
If I am driving to a remote location, I take bear spray. I am often imaging in remote mountainous regions in the US, and bears are a possibility. Note bear spray is not allowed on airplanes, even in checked luggage. So if flying to remote bear country and you want bear spray, you'll need to buy it locally after the plane flight. I wear the bear spray outside my coat so it can be quickly accessed.
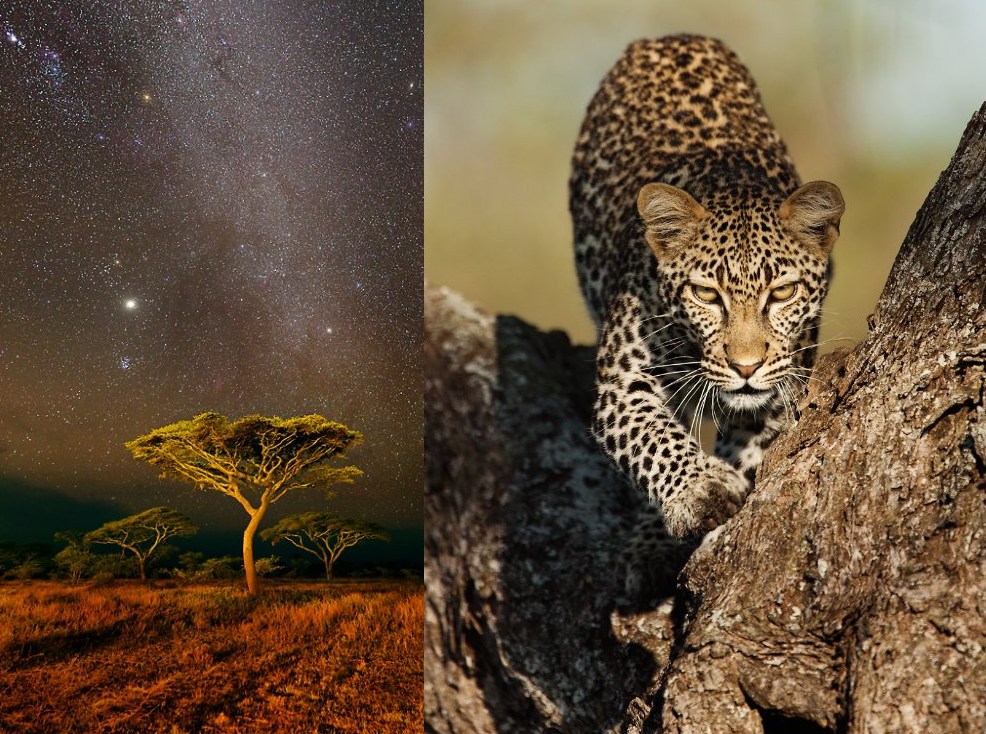
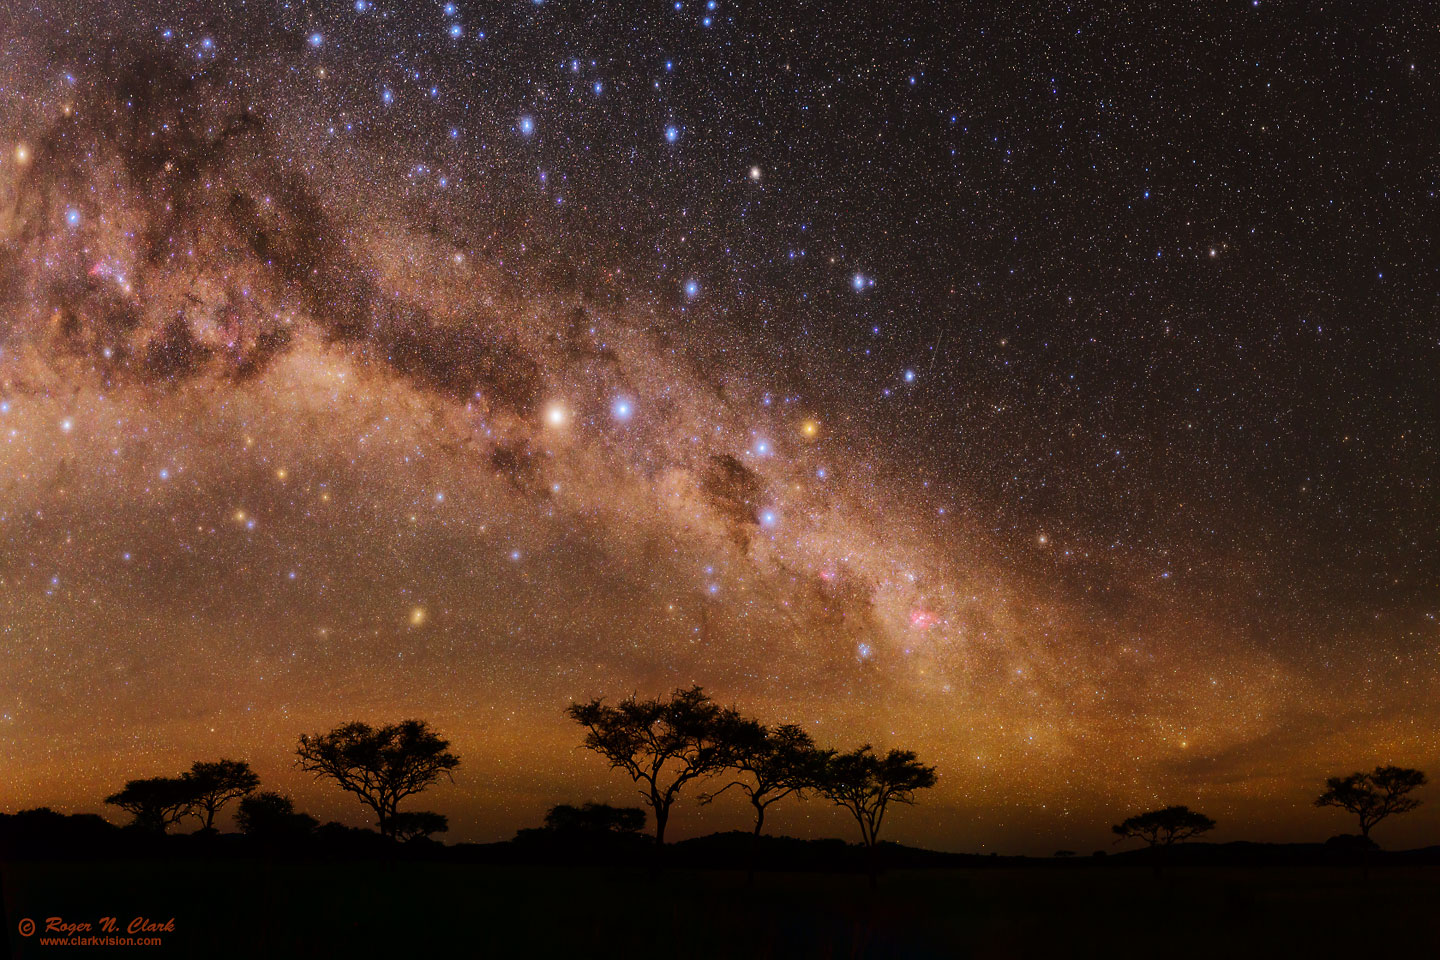
On the Serengeti I now hire local staff to act as guards while out at night. In 2013, a colleague and I arranged to meet outside our Serengeti cabins before 5 am. He got out about a minute before me (I heard him in the cabin next door). As I was reaching for the door handle to go out, as he started a mad dash back to his cabin, running and crashing into the door of his cabin. I went out to see what the problem was and he started yelling: Leopard! The leopard was charging at him and he made it back just in time. Side note, the guards usually freak out a little when I tell them no lights while we are imaging! They want to continuously scan for big cats with flashlights. Be sure and pay/tip guards very well. Figure 11 shows an image made in the central Serengeti with guards watching our backs.
In warm environments (like east Africa) watch out for snakes too!
I have had several close encounters with cows here in the US, but never close enough that I needed to retreat to the car. And fresh bear tracks in the snow after sleeping in my tent.
I consider cities more dangerous with human predators. I have had encounters in cities where I called police. But so far, after decades of being out at night, no encounter has resulted in injury to equipment or people.
Planning nightscape photography has never been easier with the online resources and free open source software available today. The multitude of landscape photo web sites shows many inspirational locations all over the world where one could make amazing nightscape images. Be safe and go out with friends for some amazing experiences. Being out under a dark moonless night sky away from cities is an awesome experience.
References and Further Reading
Clarkvision.com Nightscapes Gallery.
The Night Photography Series:
| Home | Galleries | Articles | Reviews | Best Gear | Science | New | About | Contact |
http://clarkvision.com/articles/planning-nightscape-photography
First Published March 6, 2016
Last updated June 23, 2025