ClarkVision.com
| Home | Galleries | Articles | Reviews | Best Gear | Science | New | About | Contact |
How to Photograph the Sun: Sunrise, Sunset, Eclipses
by Roger N. Clark
| Home | Galleries | Articles | Reviews | Best Gear | Science | New | About | Contact |
by Roger N. Clark
Photographing the Sun poses challenges but can be highly rewarding, from beautiful sunrises and sunsets, to recording sunspots and eclipses. But the Sun is extremely bright and proper safety precautions must be maintained for safe solar viewing and photography.
The Night and Astro-Photography Series:
Contents
Introduction
Energy from the Sun and Safety
Measure Your Filter Transmittance
Clean Optics are Needed for High-Dynamic Range Solar Photography
Sunrise / Sunset
The Green Flash
Solar Disk Photography
Eclipse Photography
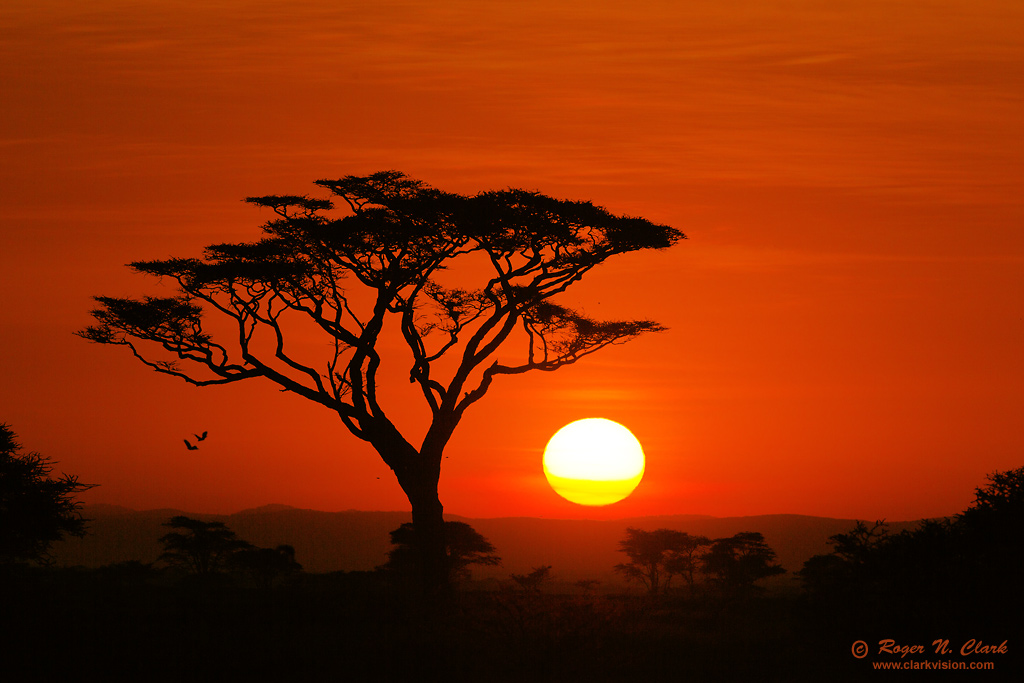
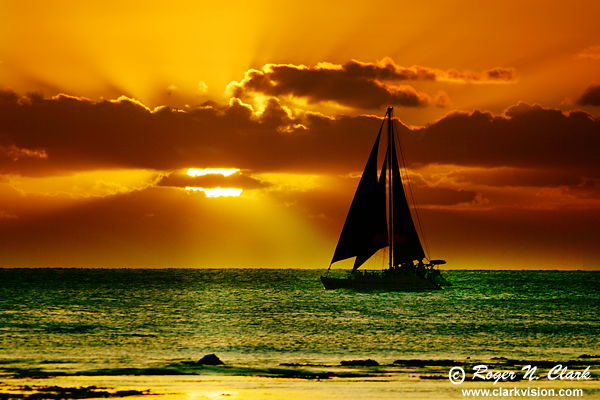
The Sun is a tremendous energy source, filling our daytime world with light and warmth. That light shows us the beauty of our world. Photographs with the Sun in the frame range from sunrise/sunset with foreground elements (Figure 1) to close-up images of the solar disk and eclipses.
The Sun illuminates the Earth with over 1,300 watts per square meter. That is like running a hair dryer every square meter! And most of the energy from the Sun is not light we can see; it is ultraviolet and infrared. This means photographing the Sun can be quite dangerous and if good precautions are not followed, you can damage your eyes and equipment. In any scenario, if the Sun is too bright to look at, STOP LOOKING, and you should never get in a situation where you have to do that. Even with a bright Sun, avoid long stares, because there may be more infrared light cooking your retina than you realize. This is especially true when doing sunrise/sunset photography with telephoto lenses--the larger apertures relative to the size of your eye collects a lot of energy, and viewing through the optical viewfinder directs that light into your eye.
Examine the solar spectra in Figure 2a, 2b and 2c. Zenith angle is the angle from the zenith, so the horizon at sea level would be at 90 degrees zenith angle. Visible light ranges from about 400 to 700 nm (0.4 to 0.7 micron). There is a lot of sunlight both at shorter (UV) and longer (IR) wavelengths. In fact, over 50% of the Sun's energy is infrared and above the atmosphere, less than 40% is in the visible (Table 1). At sea level with the Sun overhead, about 55% of the Sun's energy is infrared, and as the Sun appears lower in the sky, the proportion of infrared increases (over 80% at zenith angle 80 degrees). The changing proportions are due to the changing absorption in the Earth's atmosphere with different path lengths of sunlight at different zenith angles.
When the sunlight is not absorbed from a thick atmosphere (Sun near the horizon), a filter must be used to view or photograph the Sun. A filter needs to block at least as well in the IR as in the visible, and to at least 2000 nm and preferable 2500 nm (most materials if blocking to 2000 nm will block to 2500 nm).
In Figures 2a, 2b, and 2c, I show the level of 1 and 5 milliwatt red lasers. For anyone who has experienced a laser pointer into your eye, you know how jolting that can be. At 5-milliwatt, reports indicate this is about the level where eye damage might occur (depends on duration of exposure). Note that the solar spectra are significantly above the 5 milliwatt level except for the Sun at zenith angle 90 degrees at sea level (Figure 1b). If you have observed sunsets at sea level you know that if the atmosphere is clear, the Sun can still be extremely bright if the Sun is as little as a degree above the horizon. In such cases, clouds near the horizon can help to block some sunlight (Figure 6). At higher altitudes, the atmosphere tends to be less absorbing, and danger increases, even when the Sun is near the horizon. For example, note that the bottom portion of the Sun in Figure 1 is not overexposed, but the top is. A few moments after the image in Figure 1 was obtained, the Sun became too bright to safely image without filters.

If you are imaging the Sun with a telephoto lens, the amount of energy that goes into your camera, and your eye if looking through the viewfinder can be damaging. For example, a 300 mm f/4 lens has and aperture diameter of 75 mm, and a collection area of 44.2 square cm, and collects over 180 times the power of a 5 milliwatt laser when the Sun is about 20 degrees above the horizon. If you have ever unfortunately been exposed to a little red or green 5 milliwatt laser pointer for even a fraction of a second, you know that power level causes extremely uncomfortable reaction, and if exposed for a long period could damage the eye. Proper filtering is critical for safe solar viewing and photography, especially when the Sun is high in the sky.
I have seen people on the internet recommend using 10-stop ND filters to photograph the Sun, e.g. during an eclipse with the Sun high in the sky. This could be VERY DANGEROUS. Many high density filters have higher transmission in the infrared, and this is infrared beyond 1000nm, so your camera and eyes would not see the IR light, but you would be cooking them, potentially damaging your eyesight if looking through the viewfinder, or damaging the camera. Some on the internet advocated the Big Stopper 10-stop filter, saying it is "fairly good IR/UV." See http://breakthrough.photography/product/x4-neutral-density/, which shows the LEE Big Stopper filter transmission zooming up at 700 nm. THAT IS BAD FOR SOLAR VIEWING. The other filter on the page looks better, but the transmission curves only go to 700 nm.
Filter transmission curves to 1000 nm are also not good enough. Many materials become transparent beyond 1000 nm where there is a lot of solar energy. You can't see this light, but solar energy beyond the visible is larger than in the visible, and you can cook your eyes, giving permanent eye damage even if all visible light were blocked!
Second, a 10-stop filter has a transmission of 1/1000. A solar filter needs to block much more light. Typical solar filters transmit only 1/100,000 of the light from the Sun and block IR and UV at least as much as visible.
The heat can also damage cameras, especially if used with larger lenses, and the damage can be greater if your camera is on a tripod staring at the Sun.
I would not use a filter for solar viewing/photography unless 1) I
could see the transmission specifications to at least 2000 nm and down
to 280 nm, or is a solar filter deemed safe by a reputable manufacturer
of solar filters. Table 1 shows the relative spectral energy into the eye.
For example, examine the 2nd row: sea level, sun overhead. There is 0.1331
watts/square centimeter incident and 0.41 (41%) is visible light, 55% is infrared
(last column of numbers in burnt orange), and almost 4% is UV.
According to
Espenak and Anderson (2008) and other references, a safe filter
density for visible light is Optical Density (OD) of 4.5 or higher.
Optical Density is the -log base 10 of the transmission, so transmission,
on a 0 to 1 scale, so:
OD 0.0 = 1.0 transmittance = 100%,
OD 1.0 = 0.1 transmittance = 10%,
OD 2.0 = 0.01 transmittance = 1%,
OD 3.0 = 0.001 transmittance = 0.1%,
OD 4.0 = 0.0001 transmittance = 0.01 %,
OD 4.5 = 0.000031 transmittance = 0.0031 %,
OD 5.0 = 0.00001 transmittance = 0.001 %,
OD 5.5 = 0.0000031 transmittance = 0.00031 %,
OD 6.0 = 0.000001 transmittance = 0.0001 %.
Some references use substantially lower OD (more transmission) in the infrared, but I question if they did the detailed spectral modeling and integration of the spectral energy as a function of wavelength. I computed the integrated energy in several spectral ranges and based on the OD 4.5 visible criterion for the visible, and computed the equivalent IR energy into the eye (bottom rows in Table 1). I recommend querying manufacturers of solar filters for their spectral data to see if they meet the requirements in Table 1. See page 71 of Espenak and Anderson (2008) Figure 4.1 for a spectral plot of various filters. Some commercial filters do not even meet the relaxed criteria, let alone the values in Table 1. The data in Espenak and Anderson's Figure 4.1 appears to originate from publications in the 1990s and may not be indicative of current products.
Note that the recommended UV protection level of OD 4.5 or better in Table 1 is not relaxed even though the relative intensities are low than in the visible. This is because UV breaks chemical bonds, and low intensity means that the rate of bond breaking is smaller, but bonds are still being broken. Personally I want to minimize UV exposure to my eyes, and I recommend you should too. Figures 3a, 3b show spectra of some solar filters.
I have inquired with some solar filter manufacturers for spectral transmission data on their filters. I include information I have received below. Watch here for updates. It should be noted that the graph on page 71 of Espenak and Anderson (2008) is very out of date for current Thousand Oaks Optical products; see Table 1 and Figure 3a for more current data.
| Table 1: Relative Solar Energy Versus Wavelength | ||||||||
|---|---|---|---|---|---|---|---|---|
| Solar Irradiance | Modeled Relative Energy Fraction | |||||||
| 0.3-3.0μm W/cm2 | Ultraviolet (0.3-0.4μm) |
(0.4-0.7μm) |
IR 0.7-1.0μm | IR 1.0-1.4μm | IR 1.4-3.0μm | IR 1.0-3.0μm | All IR 0.7-3.0μm | |
| 0.1331 | 0.0739 | 0.3997 | 0.2321 | 0.1564 | 0.1386 | 0.2948 | 0.5269 | Above Atmosphere |
| 0.0790 | 0.0374 | 0.4129 | 0.2711 | 0.1639 | 0.1152 | 0.2791 | 0.5502 | Sea Level, Zenith angle = 0 degrees |
| 0.0771 | 0.0357 | 0.4104 | 0.2725 | 0.1655 | 0.1164 | 0.2819 | 0.5544 | Sea Level, Zenith angle = 20 degrees |
| 0.0705 | 0.0300 | 0.4001 | 0.2776 | 0.1713 | 0.1214 | 0.2927 | 0.5703 | Sea Level, Zenith angle = 40 degrees |
| 0.0556 | 0.0183 | 0.3669 | 0.2897 | 0.1885 | 0.1370 | 0.3255 | 0.6151 | Sea Level, Zenith angle = 60 degrees |
| 0.0208 | 0.0013 | 0.1976 | 0.2996 | 0.2695 | 0.2325 | 0.5020 | 0.8013 | Sea Level, Zenith angle = 80 degrees |
| 0.0004 | 0.0000 | 0.1774 | 0.3859 | 0.3125 | 0.1251 | 0.4375 | 0.8228 | Sea Level, near horizon, airmass =33 |
| 0.0887 | 0.0407 | 0.4166 | 0.2686 | 0.1614 | 0.1132 | 0.2746 | 0.5431 | 1 km elevation, Zenith angle = 20 degrees |
| 0.0938 | 0.0429 | 0.4175 | 0.2667 | 0.1605 | 0.1129 | 0.2735 | 0.5401 | 5000 feet elevation, Zenith angle = 20 degrees |
| 0.1014 | 0.0460 | 0.4169 | 0.2634 | 0.1598 | 0.1144 | 0.2742 | 0.5376 | 8000 feet elevation, Zenith angle = 20 degrees |
| | ||||||||
| 4.5 | 4.5 | 4.3 | 4.1 | 4.0 | Sea Level, Sun high in the sky | |||
| 4.7 | 4.6 | 4.4 | 4.2 | 4.1 | 8000 feet elevation, Sun high in the sky | |||
| | ||||||||
| 5.7-6 | 5.7-5.1 | 5.2-5.5 | 5.5-6 | (6) | Thousand Oaks Optical Glass 2+ (Reflective) 2017 | |||
| 5.7-6 | 5.7-5.1 | 5.1-5.7 | 5.7-6.1 | (6.1) | Thousand Oaks Optical RG Film (Reflective) 2017 | |||
| 5.6-6 | 5.6-5.0 | 5.0-4.8 | 4.7-4.8 | (4.6) | Thousand Oaks Optical Black Polymer (Absorptive) 2017 | |||
| 5.6 (at green) | Orion glass solar filter TAC-ORI-FIL-S70-9 (digital camera measurement) | |||||||
| 5-5.5 +/-0.5 | 5.7-5.0 | (5.0-4.4) | Orion glass solar filter TAC-ORI-FIL-S70-9 (spectrometer measurement) | |||||
Amazon search:
Thousand Oaks Optical glass solar filters
Amazon search:
Thousand Oaks Optical solarlite solar filters
Amazon search:
Thousand Oaks Optical solar filter sheet
Amazon search:
Thousand Oaks Optical solar eclipse glasses CE and ISO Certified


Your eye safety is not worth the risk to use any filter that simply looks dark in the visible. Be sure it adequately protects UV and IR.
You can test your own filters with a digital camera and a thermometer. I want to stress that this test may not guarantee your filter is safe for solar viewing or solar photography, but it might expose a filter to alert you that it might not be safe.
To measure the transmittance of a filter with a digital camera, simply make an exposure without the filter, and one with the filter in place. Image a scene that has at least a small area of uniform brightness. Choose a location for your tripod-mounted camera in shade viewing a sunlight scene. The shade is important to reduce ambient light on the camera. This is a tough measurement with a brightness difference of about 100,000:1 and you do not want stray light entering the camera. NOTE: this exercise also has lessons for imaging during the eclipse to minimize stray light.
For example, I placed my tripod-mounted camera in shade with the back of the camera facing a dark indoors. I imaged the cloudy sky between the branches in the middle of the scene in Figure 4 and used that small area for measuring brightness in the scene. Selecting a small box in the middle of the scene with clear boundaries (the branches in Figure 4) means accurate placement of a selection box to get an average intensity value in the filtered and non-filtered images.
Make the exposure with no filter at ISO 100, f/16, manual exposure. Choose an exposure time to put the histogram near mid scale on the camera LCD. On the right image (no filter) in Figure 4, the center cloudy area had a luminance value of 170.6 on a 0 to 255 scale. Next put on the solar filter. Cover the camera in a black cloth or mostly opaque blanket or coat. With your head under the blanket viewing the exposure indicator, move the ISO to 1600, and the f-ratio to wide open. I used a 70-200 mm lens at 70 mm. Next adjust the exposure to give close to the same histogram level as the image with no filter. Cover the viewfinder and make an exposure. Once you have obtained the images, toggle between the two, filter and no filter images, viewing the LCD on the back of the camera to see if there is a shift in the histogram position. I look at only the green channel because a color balance shift will cause the blue and red channels to shift relative to green. If you see a shift in the histogram peak, adjust the exposure and try again. Once you have a pair at the same level, within what is possible with your exposure increments, look at the exposures. The example in Figure 4 was:
No filter: ISO 100, f/16, 1/200 second.
Filter: ISO 1600, f/2.8, 4 seconds.
Next compute the exposure change: 1/200 to 4 seconds is 4 / (1/200) = 800. The f/2.8 to f/16 is 5 stops, so 25 = 32. The ISO change is 1600 / 100 = 16. Because the intensities in the two images are close to the same, the transmittance, T, is
T = 1/(800 * 32 * 16) = 1 / 409600 = 0.0000024
The optical density is -log10(0.0000024) = 5.6.
You could do a more accurate transmission for all three colors by converting the raw images with a linear output, and including the ratio of the linear intensities of the two images.
Infrared Assessment. There are two crude methods for checking infrared light if you don't have a near infrared camera with response to 3-microns (3000 nm), or an infrared spectrometer. Put your solar filter on a lens, the largest aperture lens the filter can cover. Put the lens on a tripod with no camera attached. Aim the lens at the sun with the filter in place. Hold the palm of your hand at about the position of the focal plane (typically 43 to 47 mm behind the flange of the lens). Do you feel any heat? If you do, especially it it hurts, that is IR light passing through the filter. If you can feel heat, that is not good. Next try putting a thermometer at the focal plane in the position of the sun in the focal plane. Over a minute or so, do you see a rise in temperature? If so, that is bad. If you move the thermometer away from the focal plane and the sun, does the temperature go back down? If so, that is an indicator of heating that might be damaging to your eyes. I personally would not use such a filter. While this test can show a dangerous filter, it is not a precise test to prove safety. If the filter passes this test, not having an IR spectrometer measurement, I would still not use the filter visually. If you use it on a mirrorless camera, so you do not look at the image visually, your eyes would be safe, but the camera may still suffer damage, so always be cautious.
A solar transmission measurement like that in Figure 4 also shows if the filter changes white balance. The filter used in Figure 4 significantly changes white balance. Make a custom white balance for your camera + solar filter.
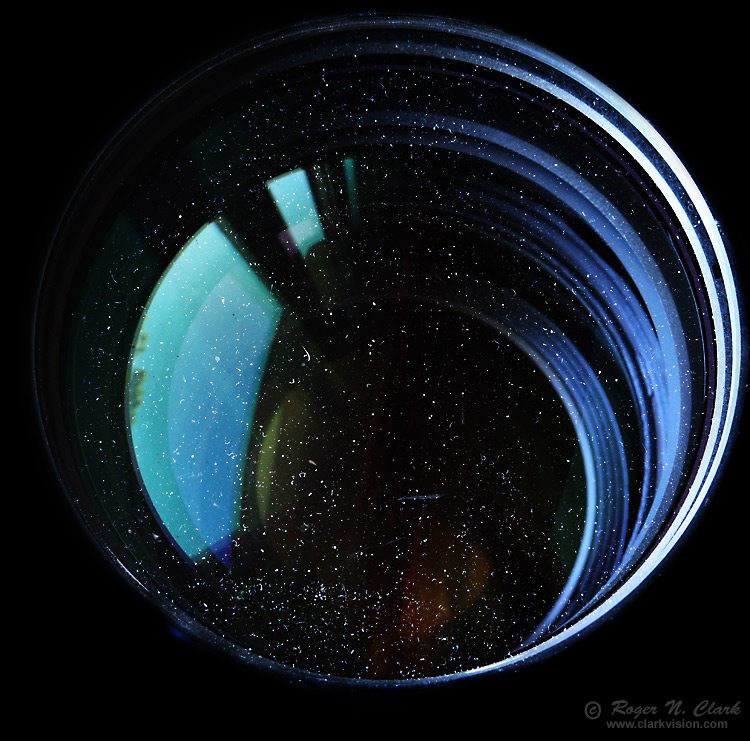
If you plan on photographing a solar eclipse, especially the earthshine during a total solar eclipse, this is a very high dynamic range situation, on the order of 30-million to 1 (30,000,000:1). Photographing the landscape with the sun in the frame at sunrise and sunset are also high dynamic range situations. Even tougher is earthshine during the partial phases of a solar eclipse, 10 billion to 1 (10,000,000,000:1). To image high dynamic range situations like these, optics must be very clean and high quality. Dust on lenses, e.g. Figure 5, scatters light, reducing contrast, and can destroy the ability to record and bring out the fainter parts of the scene.
If the Sun is low in the sky, the atmosphere absorbs a lot of the energy. so you can image the Sun without filters unless the atmosphere is very clear and the sun remains bright on the horizon. When the Sun is higher in the sky, the danger mounts. A quick image with a wide angle lens, which has a small aperture will not damage a camera quickly, but as the aperture diameter increases, the risk increases. And by that I do not mean f-ratio.
For example, consider a landscape scene with made with a 15 mm f/2.8 lens versus a 50 mm lens. The key to light collection is not f/ratio, it is lens aperture area. For example, the 50 mm f/1.8 lens has an aperture diameter of 50/1.8 = 27.8 mm, an area of 606 square mm. A 15 mm f/2.8 lens has an aperture diameter of 15/2.8 = 5.36 mm, or an area of 22.5 sq mm. The 50 mm f/1.8 collects 606 / 22.5 = 26.9 times more light. That means about 27 times more heat into the camera and your eye if looking through the viewfinder.
About an hour after sunrise on a cold February morning, I took a 50 mm f/1.8 lens outside (no camera) (Sun quite low at 10 degrees altitude) and focused the Sun on the palm of my hand. Within a few seconds it burned my hand, and 2-hours later that burn spot still hurt. And that was less than 10 seconds of exposure. Put that lens on a camera aimed at the Sun, especially on a tripod, and you can damage the camera electronics and shutter. If you looked through the viewfinder, you can damage your eye.
And even if you image at f/8 or f/16, the camera does not close the aperture until you press the shutter on most modern cameras (film or digital).
When the Sun is low in the sky near sunrise or sunset, the Sun many be photographed without a filter if there is sufficient haze or clouds in the atmosphere as illustrated in Figure 1, 6 and 7. Note that none of those images were made in a clear atmosphere. The haze and clouds add color and interest. Note in Figure 1 the bottom 1/3 of the solar disk is dark and the top 2/3 is already overexposed. When the Sun rises more than a solar diameter above the horizon, it may already be too bright to safely photograph without a filter. An exposure of 1/8000 second, f/8, ISO 100 is about an upper limit for safety, as this is already 20 times brighter than daytime landscape exposures on a clear day with the Sun high in the sky. Even at these levels eye protection must be worn. I was wearing sunglasses that significantly reduced the intensity. Note that most modern cameras keep the lens aperture wide open and only close the aperture when the shutter button is pressed to take the picture.
The image in Figure 7 was obtained just after sunrise and is near the upper limit for safe imaging without a filter. The image illustrates another aspect of solar photography: the Sun is out of focus and the focus is on the nearby eagle.

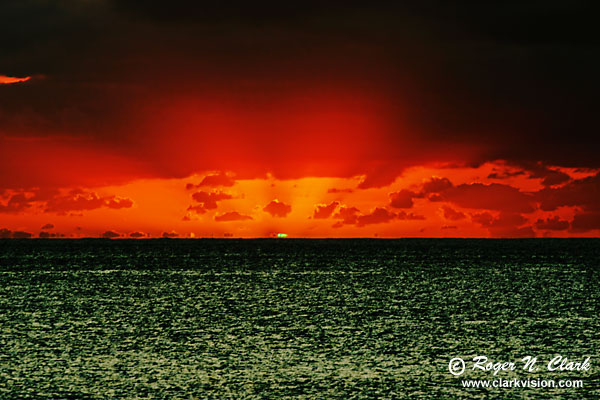
Any object beyond the earth, when viewed low in the sky is stretched out into a small spectrum due to differential refraction in our atmosphere. For example, view a bright star near the horizon and it will likely show as a small spectrum (assuming it is not bouncing around a lot from atmospheric turbulence) when viewed in a telescope. Blue is bent the most, so is on top, then green, yellow, orange and red on the bottom. As the object is viewed nearer the horizon, the shorter wavelengths are absorbed and scattered away so we only see the longer wavelengths.
For extended objects like the Sun or Moon, the spectra from adjacent spots on the solar or lunar disk means the spectra overlap. Only at the very top of the Sun or Moon will the spectrum be distinct. Most of the time there is too much haze and the blue and green colors and sometimes even the yellow color is lost due to absorption and scattering. As the atmosphere becomes clearer, the shorter wavelengths may be seen. In exceptionally clear conditions, the last spec of the Sun before dropping below the horizon at sunset, or the first spec that appears at sunrise can appear green. This tiny spot is more like "The Green Blip" rather than a flash. In theory, if the atmosphere were clear enough, a "blue flash" can be seen. Indeed, my father described to me seeing a blue flash, from a Navy ship in the South Pacific.
I have observed thousands of sunrises and sunsets, in all kinds of conditions, from sea level looking over the ocean to 14,000 foot mountain tops overlooking ocean or land. I have seen the green flash many times. Most commonly in Hawaii. From Mauna Kea, Hawaii I have see it with a cloud bank as the horizon line, but that is unusual as cloud banks usually have fuzzy boundaries. Viewing a green flash at sunset one needs to be careful not to expose your eyes to the bright Sun. Wait for the last bit of Sun to drop below the horizon before looking. Binoculars or viewing with a telescope or camera telephoto lens in the viewfinder usually helps.
Photographing the green flash can be challenging to get the exposure correct. If you meter, you stand a chance of overexposing the spot. If manual, there is no time to change as it happens in only a second or so. The image in Figure 8 was done by metering and setting the exposure compensation to -1.3 stops. More recently I tend to use manual and set the exposure just a few seconds before the flash is set to appear.
Imaging the solar disk to show detail on the disk with telephoto lenses and telescopes can be very dangerous. Such imaging is typically done with the Sun higher in the sky so atmospheric turbulence is lower, and more detail can be recorded on the Sun. But that means the atmosphere is not filtering the sunlight. Danger to your eyes is much greater, and so is danger to equipment. With telephoto lenses and telescopes, fires might be started.
Use only SOLAR FILTERS from reputable dealers and filters that are specified safe for solar viewing. See:
http://www.thousandoaksoptical.com/solar.html
Amazon search:
Thousand Oaks Optical glass solar filters
Amazon search:
Thousand Oaks Optical solarlite solar filters
Amazon search:
Thousand Oaks Optical solar filter sheet
Amazon search:
Thousand Oaks Optical solar eclipse glasses CE and ISO Certified
Note: I have limited data on the optical density of these filters (see Table 1).
http://www.telescope.com Orion Solar Filters
Amazon search:
Orion solar filters
To image detail on the Sun, one needs a combination of pixel size and focal length. This is called the Plate Scale. See Image Plate Scale for more details and how to compute plate scale for your cameras and lenses. For camera plus lens fields of view, see Field of View. Unless you have extraordinary atmospheric conditions, it is usually difficult to resolve features smaller than about 2-src-seconds. Figures 9 and 10 show possible detail on the Sun from 6 to 2 arc-seconds per pixel. To achieve finer resolution than 2-arc-seconds, photographers usually make a short video and apply software that assembles the best parts of the image using multiple frames.

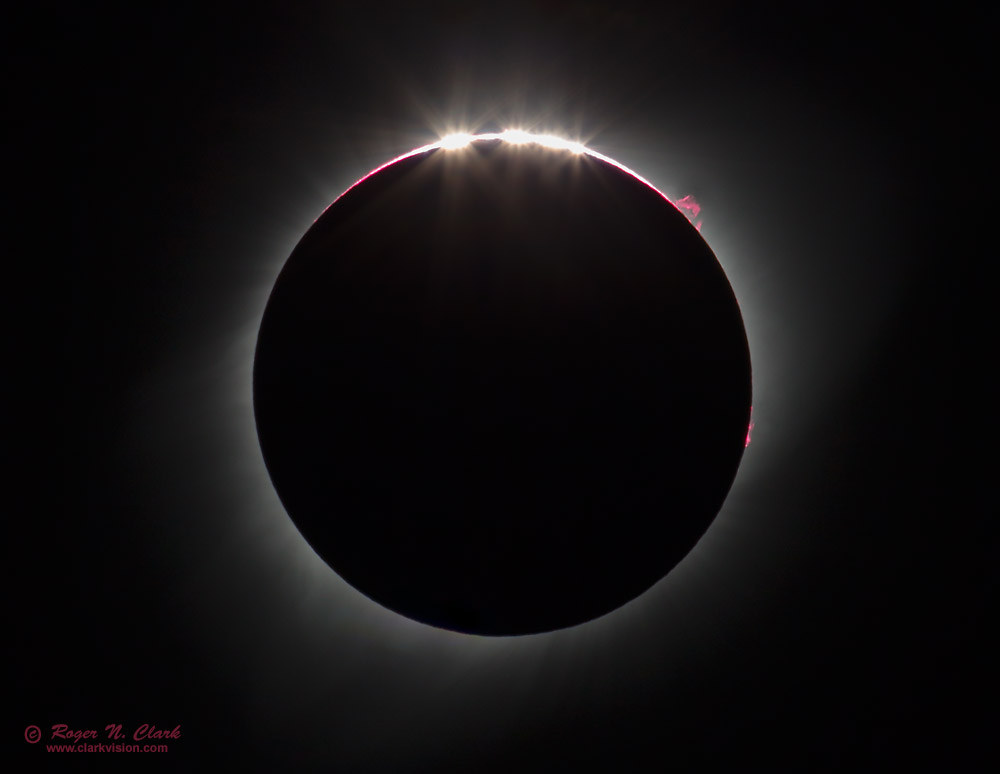
Partial Phases. Even a small part of the Sun is extremely bright. Precautions for partial phases are the same as imaging the full disk of the Sun.

Totality Phase. For totality you do not need a filter, but it would be good to have a timer that is set to go off a few seconds before the end of totality so you can put the filters back on.
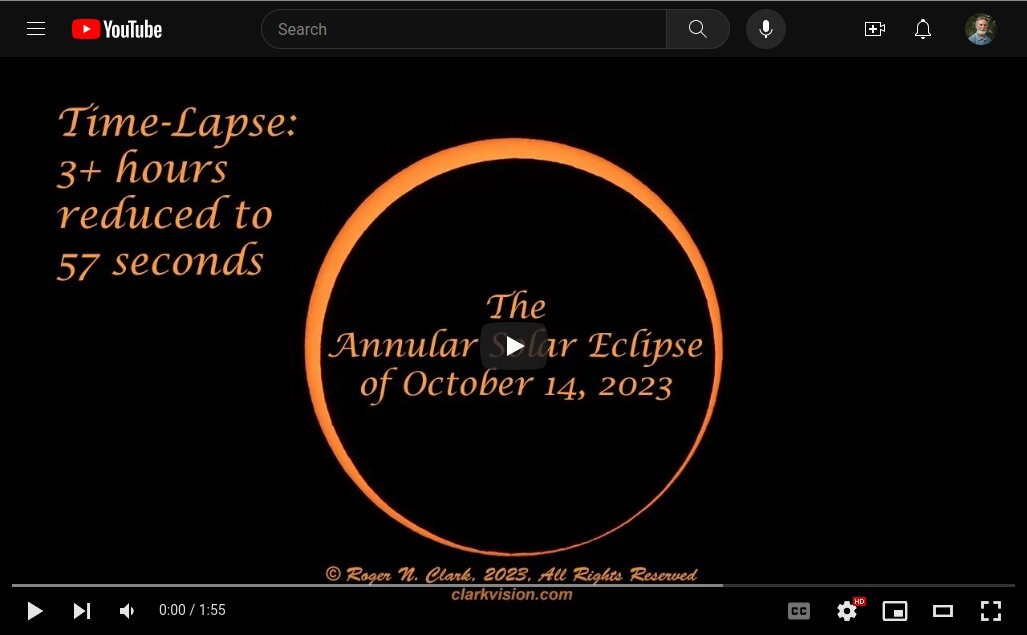
Timelapses. Create timlapses by photographying at regular intervals, as shown in Figure 12c.
Perhaps the best tool for knowing what the corona of the Sun will look like during a total eclipse is data from the Large Angle and Spectrometric Coronagraph (LASCO) on the SOHO spacecraft. The latest images are located here. The relevant images are the C2 and C3 images:


There are many strategies on the internet for exposure times during a totality. The inner corona and solar prominences are quite bright, though much fainter than the solar disk. However, I find much of the information out of date. I see recommendations on focal lengths, but more important is plate scale:
plate scale = 206265 * pixel pitch in mm / focal length in mm (result in arc-seconds per pixel).
The 206265 is the number of arc-seconds in one radian. For more information and tables of plate scales for various pixel sizes and focal lengths see Plate Scale
Examine the image in Figures 9 and 10 and decide on the plate scale you would like for your images. Be aware that imaging finer than 2 arc-seconds per pixel becomes difficult due to atmospheric turbulence, especially during the rapid temperature changes around totality. My choice is close to 2-arc-seconds / pixel and not worse than 3 arc-seconds per pixel.
With today's high resolution digital sensors, typically in the 4 to 5 microns per pixel (0.004 to 0.005 mm), diffraction limits resolution at f-ratios slower about f/8 (e.g. f/11, f/16). Diffraction limits contrast of fine details, so I prefer quality lenses that are very sharp at f/8 and faster.
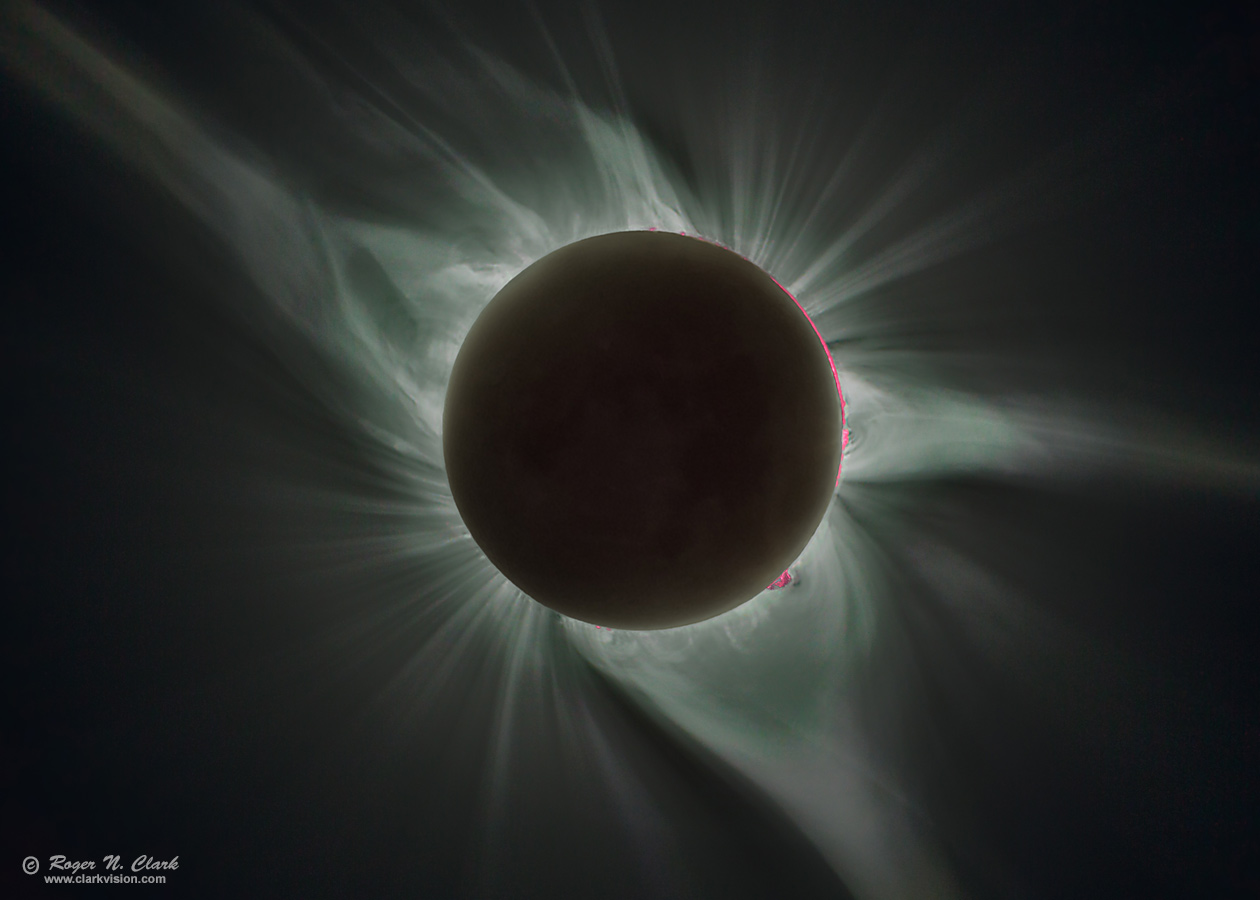
The brightness of the solar corona varies by over a factor of 10,000,000,000 (10 billion), or about 33 photographic stops, far greater than the range of any digital camera (Figure 15a, 15b). The brightness of the sky during totality limits seeing the fainter parts to perhaps 100,000,000 or about 27 photographic stops. With the typical dynamic range of a digital camera of 11 or so stops, a range of exposures is needed to cover the full intensity range.
The solar corona consists of 5 components (Shopov et al., 2008 and references therein):
All 5 components can be observed during a solar eclipse, along with solar prominences and flares.
The dynamic range of the corona with camera exposures to cover that range is illustrated in Figure 15a. The inner corona is very bright and can be imaged with a lens on a fixed camera tripod. For the outer portions, greater than 1.5 to 2 degrees from the center of the Sun, tracking is need for longer focal lengths. For example, the Sun will be moving in the sky due to the earth's rotation at a rate of about 15 arc-seconds per time second. The maximum exposure time for a fractional pixel blur would be no more than:
fixed mount maximum exposure time = plate scale * fractional pixel blur / (15 arc-seconds per time second) (eqn 1a),
For blur of 1/2 pixel blue, the equation is:
fixed mount maximum exposure time = plate scale / 30 (for 0.5 pixel blur) (eqn 1b).
For example, with a camera + lens giving 2-arc-seconds per pixel, the maximum exposure time would be 2/30 = 1/15th second. That is not long enough for the faint outer portions so tracking would be needed. Note, this is a much more stringent requirement than the commonly cited "500 rule" or "200 rule" which is designed for wide open lenses in night sky photography where the resolution is less. For maintaining detail in coronal structures with the lens stopped down to optimum resolution, shorter exposure times on a fixed tripod are needed than in wide field night sky photography.
To record the fainter outer portions of the solar corona, and the earthshine on the Moon, relatively long exposure times are needed. The guideline of exposing the sky histogram at about the 1/3 level in deep sky astrophotography also applies to recording the faint outer corona. Ideally one would adjust the exposure time to make the sky histogram peak about 1/3 of the way from the left to right on the camera LCD. However, there is no time to fiddle with settings during the short totality--you might end up looking at your camera for the whole eclipse and never SEE the eclipse, nor get a decent image!
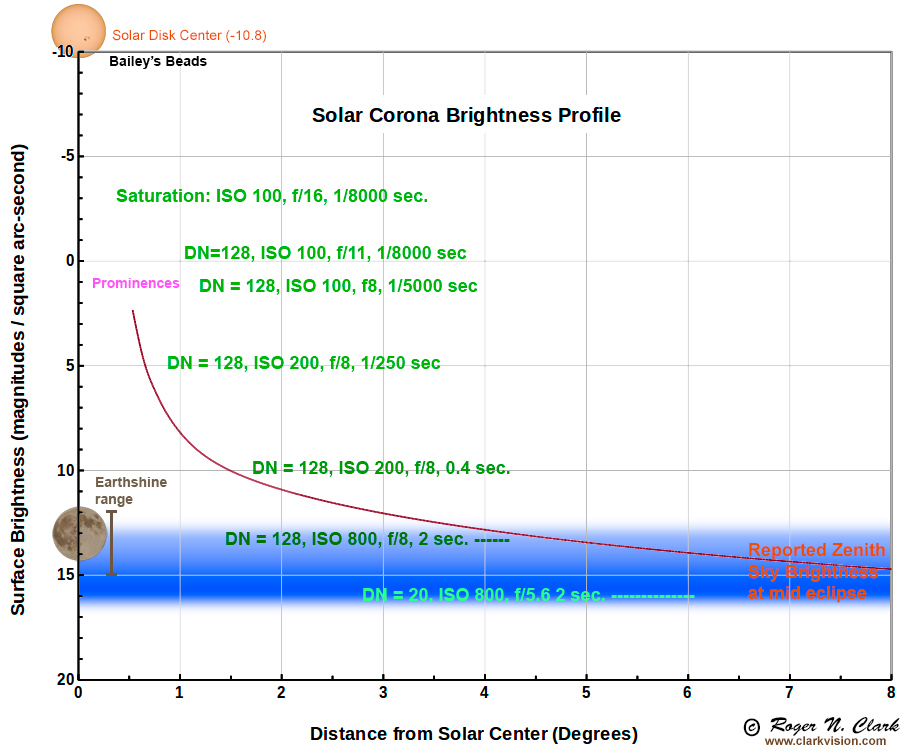
The intensity of the solar corona drops off according to the following equation derived from November and Koutchmy (1996), and the summary equation on the wikipedia page on Corona Brightness Profile, scaled to surface brightness:
Coronal Surface Brightness,
CSB = - 2.5 log10((10.0-6.0) * ( 3.670/(R18.0) + 1.939/(R7.8) + 0.0551/(R2.5))) - 10.8 (eqn 2),
where R is the solar radius. Scaling to degrees, a mean solar radius of 16.0 arc-minutes was used. The resulting brightness curve is shown in Figures 15a and 15b along with typical exposure times, to achieve camera exposure levels. The above equation is also a reasonable description of the solar F-corona at large solar distances. For example, it is within 0.5 magnitude of the profile in Kimura and Mann (1998) out to 30 degrees.
How faint one can record depends on sky conditions and how high the eclipse is in the sky. If you have a clear, low humidity sky at a high altitude, the zenith sky brightness might get as dark as 16.2 magnitudes per square arc-second. By averaging a few frames, you might be able to extract information to magnitude 18 or so in exceptional conditions. If your site is near sea level with high humidity and/or aerosol scattering, reaching to only mag 13 per sq arc-second might be difficult. Sky brightness reported in the scientific literature varies considerably, e.g. see Penaloza-Murillo (2002), Zainuddin et al. (2009), Wijaya et al. (2016) and references therein.
To get a rough approximation of the zenith sky brightness at an eclipse site, before the day of the eclipse, record the sky in twilight with the sun 8 degrees below the horizon. Use Stellarium to find the time before sunrise or after sunset. For low humidity, clear sky conditions, this might be a reasonable approximation, but is based on few data points. If the sun position at your eclipse site is significantly lower in the sky, the sky brightness will be higher than this zenith measurement.
To illustrate that one can record the solar corona to at least 6 degrees radius, as indicated by the data in Figure 15a, see this image by Miloslav Druckmüller: Solar corona up to 13 radii and 220 stars, 2006 eclipse. With improvements in digital camera technology and processing algorithms available today, this image quality should be possible with more modest equipment.

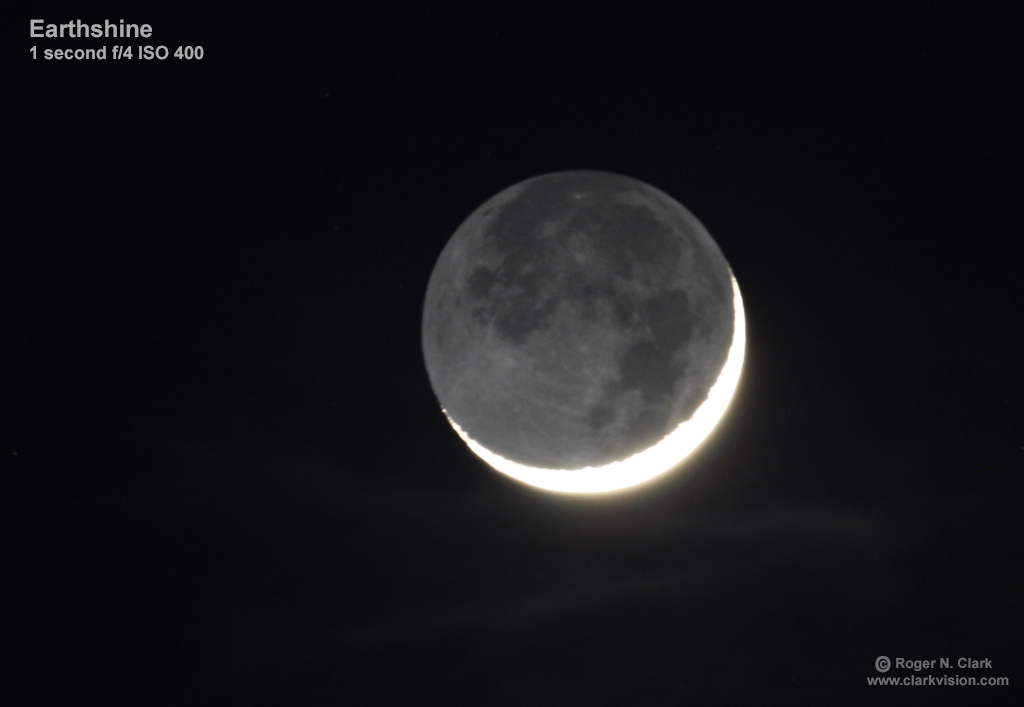
During the totality in a solar eclipse, light from the Earth illuminates the Moon (Figure 12b). To see what exposure time you would need to record the earthshine, practice on a thin crescent Moon in deep twilight, like that shown in Figure 16. Montanes-Rodriguez and Palle (2007) studied the earthshine brightness for a large number of observations. Projecting their data to new Moon at solar eclipse totality, the mean earthshine is about V-magnitude 13 per square arc-second, with a range of about 12 to 15. The earthshine brightness depends on the Earth's cloud and land cover on the hemisphere facing the Moon, and can vary by 1/4 magnitude on an hourly basis.
To record the eclipse with its huge dynamic range AND watch the eclipse, I strongly recommend setting up an exposure sequence to be executed by a phone, laptop application, or camera bracketing sequence. Then at the start of totality, take off filters, start the application and sit back and enjoy the view. If the application fails to start (practice beforehand), do not try and fix it. Let it go and just enjoy the moment.
Should you photograph your first total eclipse? Here is my cheetah story which might be relevant. On my first safari on the Serengeti after several days and after I had already photographed many cheetahs, I had the opportunity to photograph a cheetah chase. We were in an optimum position and I was ready as we knew it was about to happen. I had top gear for the era: Canon 500 f/4 L IS and 1D mark II camera. The cheetah broke into its run. I could have photographed the entire chase and the take down which was at optimum distance for the telephoto. But as the cheetah broke into its sprint while I was looking through the viewfinder, I was in such awe that I just looked up and watched. I never took a single frame. I have been back to the Serengeti many times and never been in such optimum position since, though I do have other cheetah chase scenes, none that would have been as good as that one. I do not regret it. That chase is burned into my memory like no other.
Full Range Totality Exposure Sequences, Best With Computer Control
OK, now that I have reviewed the conditions, here are recommended exposure sequences assuming excellent clear sky conditions (Tables 2, 3). I assembled my lists based on earlier recommendations (you can find them in my reference lists near the bottom of this article), and considering advancements in camera technology for post circa 2012 cameras that have lower noise and better uniformity that older model cameras. NOTE: the sequences in Tables 2 and 3 would be best under computer control of the camera. Trying to do this by hand during the excitement of totality would likely result in missing the eclipse visually. See the following section for simpler unattended operation.
Exposure sequences for telephoto focal lengths more than about 200 mm:
Daylight White Balance
        Table 2
 ISO    f-ratio  Exposure time (seconds)
ISO 100   f/16   1/8000
ISO 100   f/11   1/8000
ISO 100   f/11   1/8000
ISO 100   f/11   1/8000
ISO 100   f/11   1/8000
ISO 100   f/8    1/4000
ISO 200   f/8    1/1000
ISO 200   f/8    1/1000
ISO 200   f/8    1/1000
ISO 200   f/8    1/250
ISO 200   f/8    1/60
ISO 200   f/8    1/60
ISO 200   f/8    1/60
ISO 200   f/8    1/30
ISO 200   f/8    1/15
ISO 200   f/8    1/8
ISO 200   f/8    1/4
ISO 200   f/8    1/2
ISO 200   f/8    1
ISO 200   f/8    2
ISO 800   f/5.6  2
ISO 800   f/5.6  2
ISO 800   f/5.6  2
ISO 800   f/5.6  2
For shorter focal lengths (less than about 200 mm) intended to capture the wider field of view and corona further from the Sun:
        Table 3
 ISO    f-ratio  Exposure time (seconds)
ISO 100   f/11   1/8000
ISO 100   f/8    1/4000
ISO 200   f/8    1/1000
ISO 200   f/8    1/250
ISO 200   f/8    1/60
ISO 200   f/8    1/30
ISO 200   f/8    1/15
ISO 200   f/8    1/8
ISO 200   f/8    1/4
ISO 200   f/8    1/2
ISO 200   f/8    1
ISO 200   f/8    2
ISO 800   f/5.6  2
ISO 800   f/5.6  2
ISO 800   f/5.6  2
ISO 800   f/5.6  2
ISO 800   f/5.6  2
ISO 800   f/5.6  2
ISO 800   f/5.6  2
ISO 800   f/5.6  2
Simplified Totality Exposure Sequences Using Bracketing, No Computer Control
The exposure sequences in Tables 2 and 3 require computer control in the field to execute smoothly. If you do not want to do that, and your camera has bracketing ability, here is what I recommend (Table 4) and this is what I do. I have decided that with the hot temperatures of a mid-day August eclipse which might overheat a laptop, and the possibility of something not working right with finicky software, I avoid the use of any computer for camera control. I also plan to not touch the camera during totality, so I can enjoy the view.
I set up bracketing sequences on each camera to get a large slice of the huge dynamic range and use an intervalometer to control the camera. My strategy:
Canon and the Timer Remote Controller TC-80N3 intervalometer is an excellent solution for use during an eclipse without computer commanding. (Be sure your camera is compatible with the TC80-N3 before purchasing.) The settings I used on the TC-80N3:
Resources:
Lens Field of View with different sensors
Plate Scale
Set the camera to mirror lockup, and set your bracketing sequence (e.g. 5 or 7 frames), manual mode, and set the mid point exposure time and f-ratio (e.g. as in Table 4 below). Set the drive mode to continuous high speed (not the delay modes). The interval timer will raise the mirror wait 1 second, then open the shutter, wait one second and repeat. For long exposures, e.g. 2 seconds, the timer will just continue to the next step if in mid exposure.
The interval timer and bracketing sequence provides the simplest setup and operation for the totality phase. No computers, no computer software, no USB cables. In the excitement of totality, you can push the start button on the intervalometer well before the excitement starts, and sit back and enjoy the show.
If your camera has only 5 brackets, drop the bottom two exposures in Table 4, camera 1. If your camera tops out at 1/4000 second, reduce all exposures 1 stop.
Cameras like the 7D Mark II, 6D, 5D3, 5D4, and 1D series can do a 7-image bracketing sequence, covering +8 to -8 stops (16-stop dynamic range). Lower-end Canon cameras typically have only a a 3 frame range, so my be of limited use for this strategy
Daylight White Balance
                      Table 4
Bracketing Sequences, Two or Three Cameras, Solar Eclipse Totality

         Camera 1:
7 frame bracket for inner corona, 2 stops between frames
 ISO    f-ratio  Exposure time (seconds)
                 ---------------------------------------
               2-stop intervals   1 2/3 stop intervals (for fixed tripod)
ISO 100   f/11   1/8000                1/8000
ISO 100   f/11   1/2000                1/2500
ISO 100   f/11   1/500                 1/800
ISO 100   f/11   1/125  *              1/250
ISO 100   f/11   1/30                  1/80
ISO 100   f/11   1/8                   1/25
ISO 100   f/11   1/2                   1/8

         Camera 2:
5 frame bracket for outer corona, 2 stops between frames, tracking with long focal lengths
 ISO    f-ratio  Exposure time (seconds)
ISO 800   f/5.6  1/125 *
ISO 800   f/5.6  1/30
ISO 800   f/5.6  1/8
ISO 800   f/5.6  1/2
ISO 800   f/5.6  2

         Camera 3:
3 frame bracket for outer corona, 2 stops between frames, short focal length
 ISO    f-ratio  Exposure time (seconds)
ISO 800   f/5.6  1/8
ISO 800   f/5.6  1/2
ISO 800   f/5.6  2

* Matched exposure
The 1/8000 second to 2 seconds + f/5.6 to f/11 is a light collection range of 2 * 8000 * 4 = 64,000, or 16 stops. With the camera dynamic range, the brightness range covered is about 25 to 27 stops.
NOTE: the long exposures above assumes a clear sky. If the sky is hazy, the sky brightness will be higher and the longer exposures will need to be shortened.
Use the U.S. Navy's solar eclipse computer for specific timings from specific locations:
http://aa.usno.navy.mil/data/docs/SolarEclipses.php
Here are my plans for the 2017 total solar eclipse.
BE SURE YOU HAVE ADEQUATE PROTECTION FOR VIEWING AND PHOTOGRAPHING THIS ECLIPSE
Amazon search:
Thousand Oaks Optical glass solar filters
Amazon search:
Thousand Oaks Optical solarlite solar filters
Amazon search:
Thousand Oaks Optical solar filter sheet
Amazon search:
Thousand Oaks Optical solar eclipse glasses CE and ISO Certified
Locate a site where you will observe the event. I use http://eclipsetracks.org/
I used the following cameras and lenses:
My plan for the August 21, 2017 eclipse was:
For 200 mm and longer focal lengths, I used Astrotracs.
Amazon search:
AstroTrac TT320X-AG Tracking Mount
For focal lengths shorter than 200 mm, I used an iOptron Skytracker.
Amazon search:
iOptron Skytracker
(Note the iOptron Skytracker Pro is a newer version of the iOptron Skytracker and has an internal
battery. The original iOptron Skytracker has a battery compartment that is too small,
so it is best to use an external battery older.)
For focal lengths less than 100 mm and no long exposures, a fixed tripod mounted camera would be fine.
In testing software I find many deficiencies. At the longer exposure times (longer than 1/focal length in mm) mirror lockup should be used with abut a 2-second delay. This consumes significant time, but it is better to have a few sharp images than a lot of blurry ones. The software needs to read a script file with settings and set ISO, f-ratio, and exposure time independently for each frame. Ideally one could set mirror lock-up independently too. If you know of software that can do the job, please let me know and I will list it here. As noted above, I used no computers, and only use camera bracketing sequences with intervalometers for the 2017 eclipse.
Software control of Cameras.
For eclipse photography, the software must:
I am researching the following software for eclipse photography. If you have experience with any of these, please email me your experiences or point to reviews and I'll add links to reviews.
Search for software:
https://www.google.com/search?q=dslr+scripting+camera+control
Gphoto2 for linux. Looks like it will do what eclipse photographers need.
(I have only got it to partially work on linux mint 17 as of this writing.)
http://gphoto.org/
ImagesPlus Camera Control (Windows, reports from users say it will do the job):
https://www.mlunsold.com/ILCameraControl.html
But ImagesPlus is no longer supported so will only work with cameras
up to when support stopped.
digiCamControl (free, open source, windows)
http://digicamcontrol.com/
SET'n'C: Solar Eclipse Timer and Camera controller
http://robertnufer.ch/06_computing/setnc/SETnC_page.htm
Backyard EOS and Backyard Nikon
https://www.otelescope.com/index.php?/home/
ControlMyCanon
http://www.controlmycanon.com/
SmartShooter https://kuvacode.com/
Solar Eclipse Maestro for MacOS X
http://xjubier.free.fr/en/site_pages/solar_eclipses/Solar_Eclipse_Maestro_Photography_Software.html
Email about this application from Michael S. 3/24/2017:
I downloaded the Solar Eclipse Maestro for MAC OS-X, and found that it
is obsolete - won't run on any version of MacOS from the last 5 years
or so. However, as of March 28, 2017 it has been updated. Be sure to get
the latest version.
Eclipse Orchestrator (Updated June 15, 2017)
http://www.moonglowtechnologies.com/products/EclipseOrchestrator/index.shtml
Looks very capable.
Smart Phones
EclipseDroid
http://www.strickling.net/eclipsedroid.htm
DSLRcontroller (Android) (Does not appear to have scripting at the level needed--I made a request to add it)
https://dslrcontroller.com/
Last update: August 2017.
My plan for the April 8, 2024 eclipse. (Also see the above 2017 eclipse plan above for more general info.)
I plan to run 5 cameras on trackers:
Wikipedia List of solar eclipses in the 21st century.
I have a dozen or so research papers with some data. But researchers tend to make zenith sky brightness measurements which may not be relevant to moderately wide fields around the sun. If one can set accurate maximum exposure times, one can in theory stack images and pull out more coronal structure and further from the sun. For example, the range of zenith sky brightnesses in research papers I have ranges from 12.9 to 16.2 V magnitudes / sq arc-second. That corresponds to DN (data number on a 0 to 255 jpeg image) of:
DN = 40 at mag 12.9/sq arc-sec, ISO 200, f/8, 2 second exposure
DN = 40 at mag 16.2/sq arc-sec, ISO 800, f/8, 10 second exposure
But what are the corresponding intensities at say 10 solar diameters from the sun? A jpeg image can tell by scaling the above values to other exposures.
The Sun can be an exciting subject, whether in sunrise or sunset photos, or the solar disk with varying sunspots, and eclipses. But extreme care must be used because the ultraviolet to infrared energy is very intense and can cause eye and equipment damage. When the Sun is high in the sky (which can mean only a degree or so above the horizon or higher), use of an appropriate solar filter that blocks energy to at least 2000 nm (2 microns) is critical to avoid damage.
References and Further Reading
International Astronomical Union, Working Group on Solar Eclipses.
Includes links to many many web sites and resources.
Espenak, F. and J. Anderson, 2008, Annular and Total Solar Eclipses of 2010,
NASA/TP-2008-214171, 80 pp.
https://eclipse.gsfc.nasa.gov/SEpubs/2010/TP214171a.pdf
Excellent reference with great data showing darkest point of
2009 eclipse at 16.2 mag/sq arc-sec.:
Zainuddin, M. Z., S. Haron, M. A. Niri, N. Ahmad, M. S. A. M. Nawawi, S. Man,
M. Z. Rodzali, R. Ramli, R. A. Wahab, K. Ismail and N. H. A. Zaki,
2013, Sky Brightness Condition During Total Solar Eclipse on July 22, 2009
Middle-East Journal of Scientific Research 13 (2): 220-223.
https://www.idosi.org/mejsr/mejsr13(2)13/15.pdf
Golub L., Pasachoff J. M., 1997. The Solar Corona, Cambridge University Press, Cambridge 316 pp.
Kimura, H. and I. Mann, 1998, Brightness of the solar F-corona Earth Planets Space, v50, p. 493-499.
Montanes-Rodriguez, P., and Enric Palle, 2007, Measurements of the Surface Brightness of the Earthshine with Applications to Calibrate Lunar Flashes, Astronomical J., v134, p. 1145-1149.
Solar corona profile:
November, L. J., S. Koutchmy, 1996, White-Light Coronal Dark Threads and
Density Fine Structure, Astrophysical Journal, v466, p. 512-528.
http://adsabs.harvard.edu/full/1996ApJ...466..512N
http://articles.adsabs.harvard.edu/cgi-bin/nph-iarticle_query?1996ApJ...466..512N&defaultprint=YES&filetype=.pdf
see wikipedia plot:
https://commons.wikimedia.org/wiki/File:Corona_Brightness_Profile.png
excellent twilight sky brightness (includes spectra):
Patat, F., O.S. Ugolnikov, and O.V. Postylyakov, 2006,
UBVRI twilight sky brightness at ESO-Paranal,
Astronomy and Astrophysics, 455, 385-393.
https://arxiv.org/PS_cache/astro-ph/pdf/0604/0604128v1.pdf
Penaloza-Murillo, M. A., 2002, Optical Response of the Atmosphere During the Caribbean Total Solar Eclipses of 26 February 1998 and of 3 February 1916 at Falcon State, Venezuela.
Shopov, Y.Y., D. A. Stoykova, K. Stoitchkova, L.T.Tsankov, A. Tanev, Kl. Burin, St. Belchev, V. Rusanov, D. Ivanov, A.Stoev, P. Muglova, I. Ilievm, 2008, Structure of the Solar Dust Corona and its Interaction with the other Coronal Components, J. Atmospheric and Solar-Terrestrial Physics, 70, p. 356–364.
Stewart, J. Q., and C. D. MacCracken, 1940, The General Illumination
During a Total Eclipse, Astrophys. J., 91, 51S.
http://articles.adsabs.harvard.edu/cgi-bin/nph-iarticle_query?1940ApJ....91...51S&defaultprint=YES&filetype=.pdf
Wijaya, A F C, C P Asmoro, A A Rochman, T R Ramalis, J A Utama, N D Ardi, Amsor, M G Nugraha, D Saepuzaman, A Sutiadi and D Nurfiani, 2016, Zenith sky brightness and celestial objects visibility during total solar eclipse on March 9, 2016 at Terentang Beach Bangka Island, Journal of Physics: Conference Series 771 (2016) 012012.
twilight sky brightness:
Guo, D-F., S-M. Hu, X. Chen, D-Y. Gao, and J-J. Du, 2014,
Sky Brightness at Weihai Observatory of Shandong University
Publications of the Astronomical Society of the Pacific,
v126, p496-503.
http://iopscience.iop.org/article/10.1086/676819/pdf
http://www.mreclipse.com/SEphoto/SEphoto.html http://www.astropix.com/HTML/I_ASTROP/ECLIPSE.HTM http://www.zam.fme.vutbr.cz/%7Edruck/eclipse/TSE2009_Instructions.pdf
Clarkvision.com Astrophoto Gallery.
The Night and Astro-Photography Series:
| Home | Galleries | Articles | Reviews | Best Gear | Science | New | About | Contact |
http://clarkvision.com/articles/astrophotography.image.processing
First Published March 14, 2017
Last updated March 22, 2024