ClarkVision.com
| Home | Galleries | Articles | Reviews | Best Gear | Science | New | About | Contact |
Nightscape Photography with a Barn Door Tracking Mount
by Roger N. Clark
| Home | Galleries | Articles | Reviews | Best Gear | Science | New | About | Contact |
by Roger N. Clark
A simple tracking mount, which can be made with a few dollars in parts cam really enhance night photography.
The Night Photography Series:
Introduction
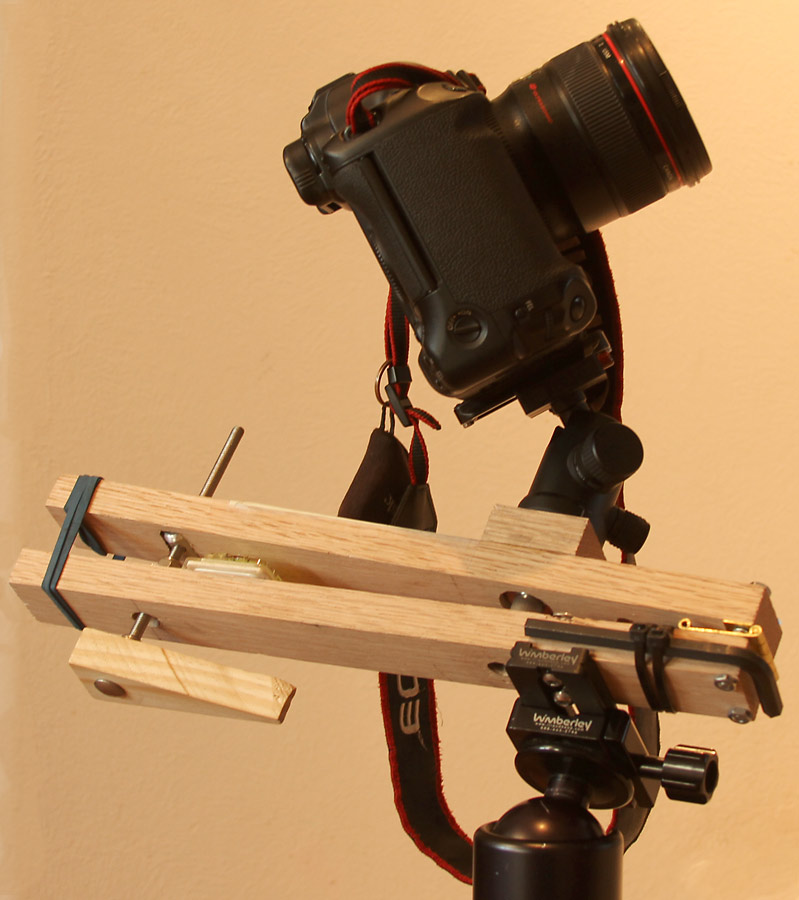
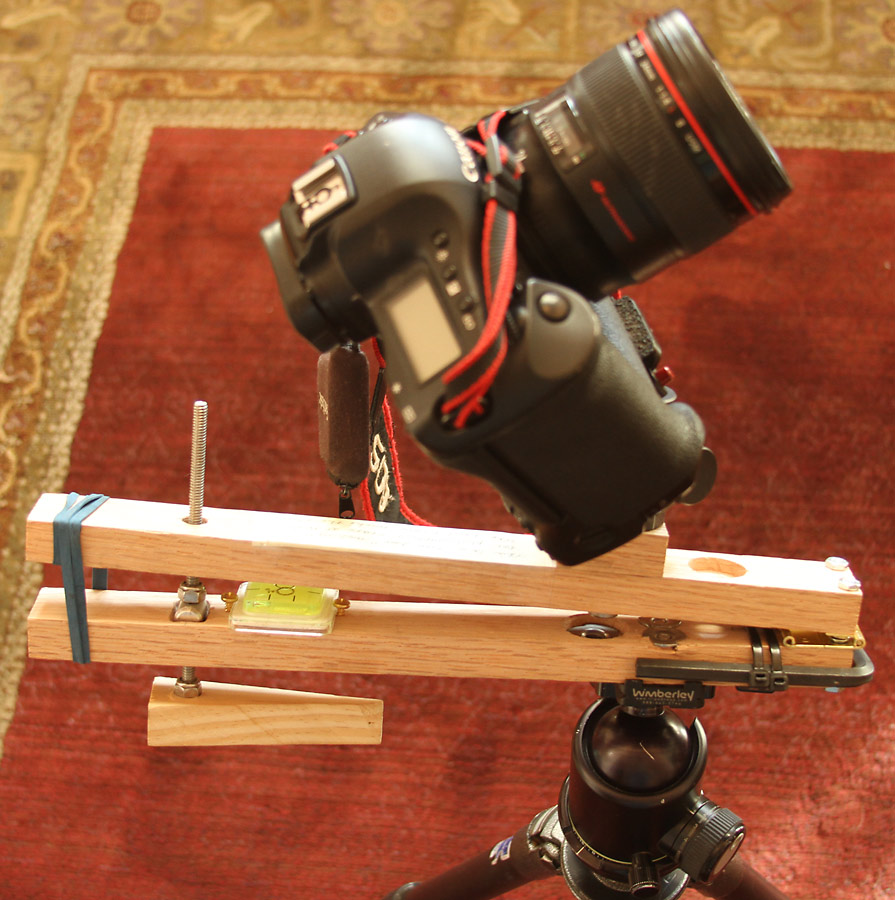
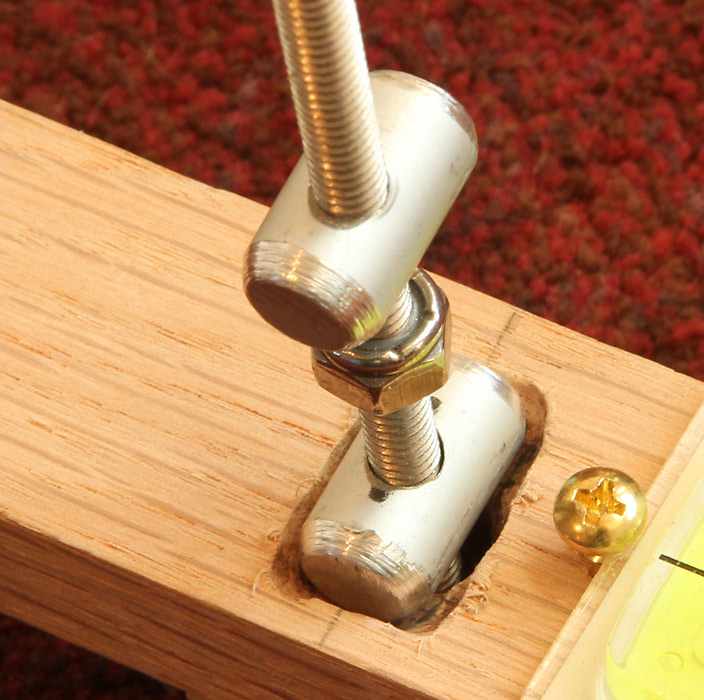
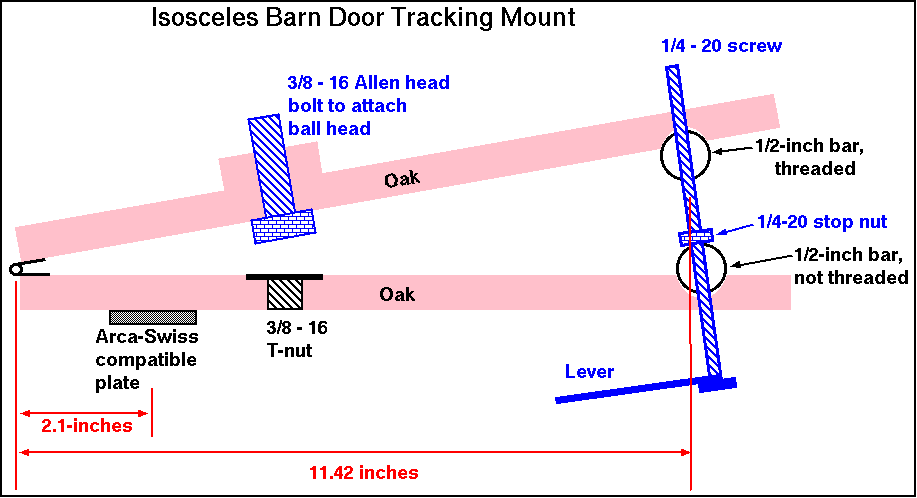
An isosceles type barn door tracking mount tracks well for about 20 minutes if the polar alignment is good. Here are images for my barn-door mount. Using a 1/4-20 screw, the distance from the hinge pivot point to the center of the screw is 11.42 inches. I used two 1.5 x 3/4 inch oak boards cut to 14-inch lengths (NOTE: I recommend using a 2-inch wide board because putting some of the hardware on is pushing the limit (e.g. Figure 6, below). I mounted a Giotto MH1302 ball head (which is impressively sturdy for such a small low cost head) to hold my camera. It holds a Canon 1D Mark IV with 24 mm f/1.4 lens (2.17 Kg = 4.77 pounds) very well. The entire rig with ball head and arca-swiss mounting plate and Allen wrench for the 3/8 bolt, as shown in Figure 1) weights just 0.99 kg (2.18 pounds).
To track the stars, I orient the mount to push the boards apart (hinge on the west side in the northern hemisphere). Then I turn the crank by hand with 1 rotation per minute. I typically do 30-second exposures with my 24 mm f/1.4 lens at f/2. Thus 1/2 rotation. So at 15 seconds, it should be at 1/4 rotation.
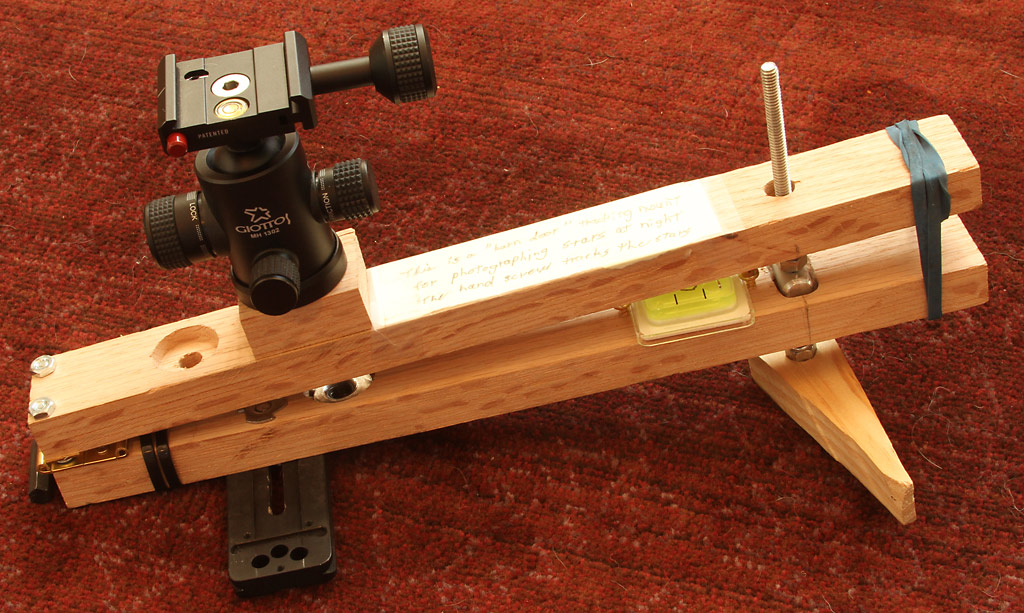
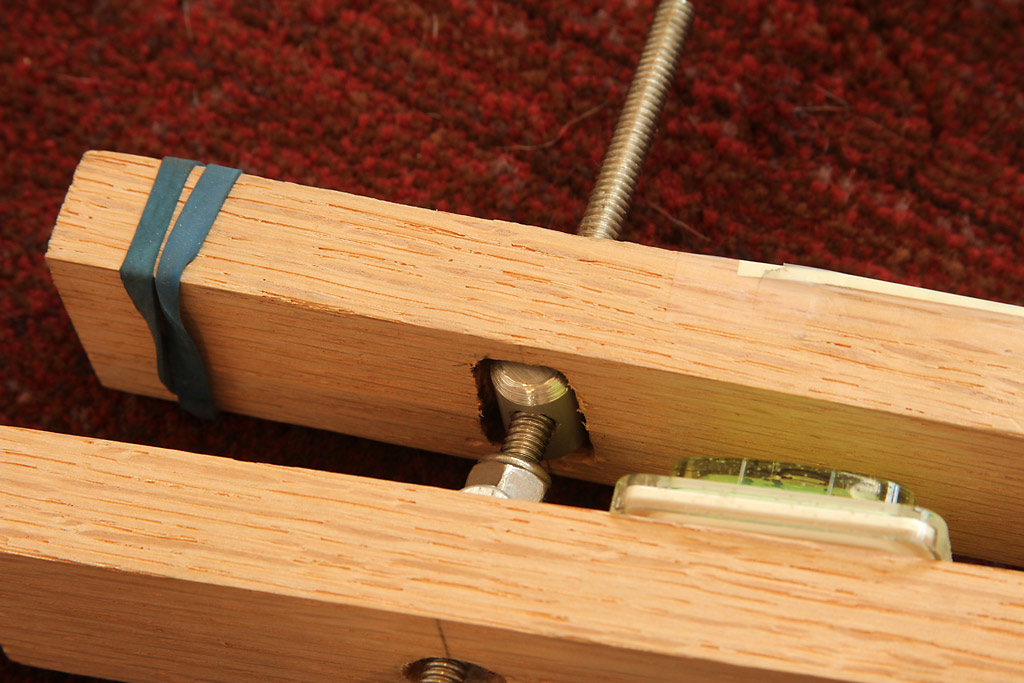
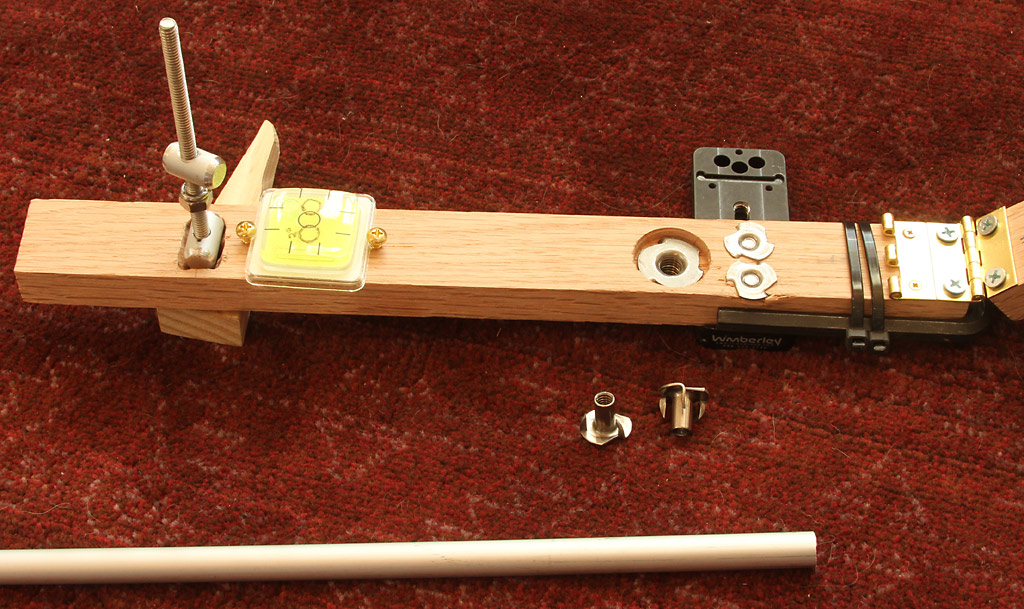
On the bubble level shown in Figure 6, I drew circles for 2 degrees off vertical. So in Tanzania I use a compass to orient to north (there is little offset between the magnetic pole and true pole there), and the level to set the angle down to the celestial pole. As one may pretty restricted in location, one may not be able to see the either pole due to trees or clouds on the horizon. The bubble level and compass works just fine. One could construct wedges for other commonly used latitudes and mount a bubble level on the wedge. An error of a few degrees off the pole is of no consequence for short exposures of less than about a minute with wide angle lenses.
I was initially concerned about vibration from hand cranking, but it does not seem to be a problem. But do note, that I have the screw coming up from the bottom. Thus, most stresses from touching the crank are on the arm that is on the tripod ball head, and not on the arm with the camera ball head. One might get more vibration with the crank on the arm holding the camera. I use one finger touching the side of the crank lever to turn it, so vibrations are minimal and I have never seen a problem. But I have not tried to track with anything longer than 24 mm.
A diagram with other details is shown in Figure 7.
Other notes. The tracking screw (see Figure 1) is too long in my design. I had one case with the camera pointing up where the screw touched the camera and destroyed the tracking. The screw should be at least an inch shorter than shown here.
Results
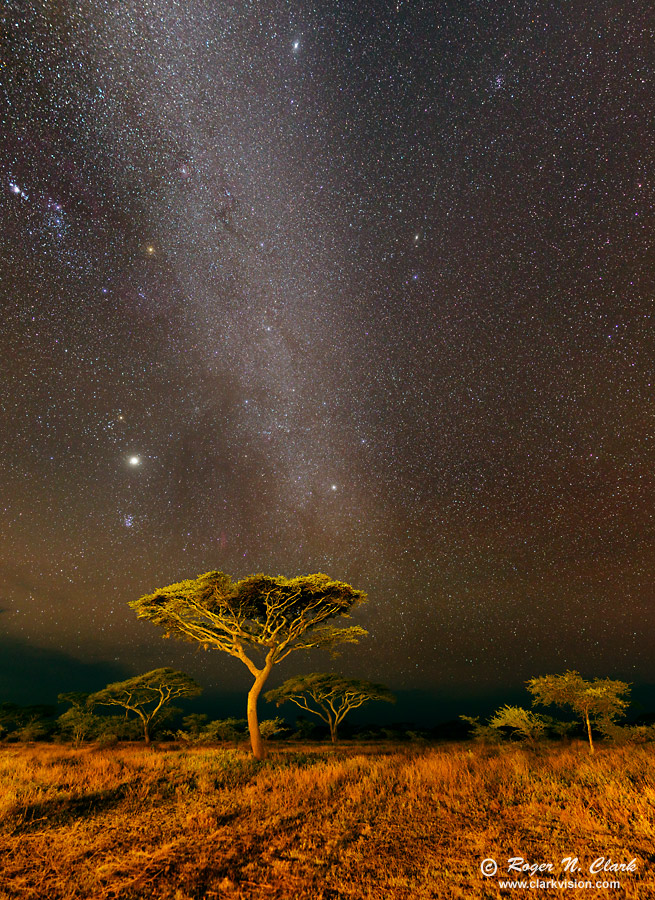
Figure 8. The Milky Way Galaxy Over the Serengeti.
The Milky Way galaxy stands tall over the Serengeti in this view to the northwest from Ndutu. This view is
about 110 degrees tall and 80 degrees wide in this 10-frame mosaic. The Pleiades star cluster is just above
the left edge of the large acacia tree, and above the Pleiades is the planet Jupiter. Just above the largest
acacia tree, center, is a red smudge: that is the California nebula, NGC 1499. The constellation Orion is at
the upper left edge and with Orion's belt nearly vertical. The 3 stars in the sword has the bright Orion
nebula (M42) in the center of the 3 stars. The sword stars point toward the north celestial pole, which is 3
degrees below the horizon near the left side of the image. The bright star at the center near the top edge is
Procyon, Alpha Canis Minor. The small star cluster to the upper right is M44. The Milky Way Galaxy in this
part of the sky is the faint part of the Milky Way, as we are looking away from the Galactic center. Toward
the bottom of the image we see faint red and some green in the sky: this is auroral airglow. Visually, the
northern horizon appeared bright, even though this is some of the most remote and darkest places on Earth.
Lights from the Ndutu lodge illuminated the trees.
Technical. Canon 1D Mark IV, 16 megapixel digital camera, 24 mm f/1.4 L lens at f/2. This is a 10 frame mosaic, with each frame 30 seconds at ISO 1600. Stars were tracked with a barn door tracker, hand cranked. The terrestrial scene was made with identical 30-second exposures and no tracking. The images were carefully assembled to select untrailed stars and unblurred terrestrial landscape. Full resolution image is 8846 x 12158 pixels, or 107 megapixels.
See also my nightscape gallery.
References and Further Reading
1) Nightscape Photography with Digital Cameras
http://clarkvision.com/articles/nightscapes/
2) Night and Low Light Photography with Digital Cameras
http://clarkvision.com/articles/night.and.low.light.photography/
The Night Photography Series:
| Home | Galleries | Articles | Reviews | Best Gear | Science | New | About | Contact |
http://clarkvision.com/articles/barn.door.tracking.mount
First Published March 9, 2013
Last updated August 24, 2014