ClarkVision.com
| Home | Galleries | Articles | Reviews | Best Gear | Science | New | About | Contact |
Aurora Photography
by Roger N. Clark.
| Home | Galleries | Articles | Reviews | Best Gear | Science | New | About | Contact |
by Roger N. Clark.
We are in the midst of a unique combination of natural events and technology that enables photography like never before. The technology is the digital camera and the natural event is the current solar maximum which brings aurora, sometimes to the northern US and states as far south as Nevada, Colorado, and east to Kansas, Kentucky and Virginia.
The Night Photography Series:
Introduction
Lenses and Digital Cameras
ISO Myths
Planning for Aurora Viewing and Photography
Spaceweather.com and Solar Flare Alerts
Wing Kp Index
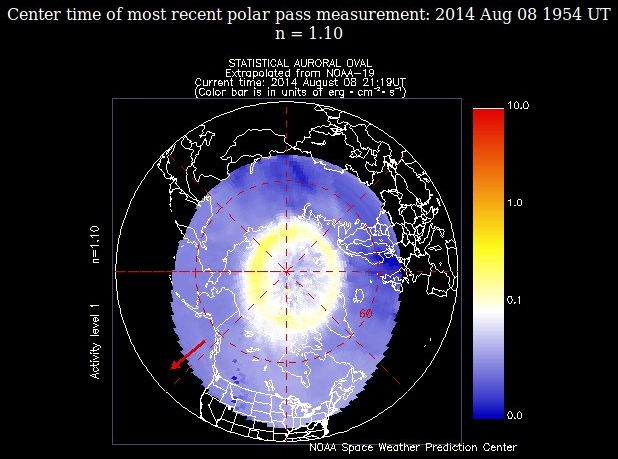
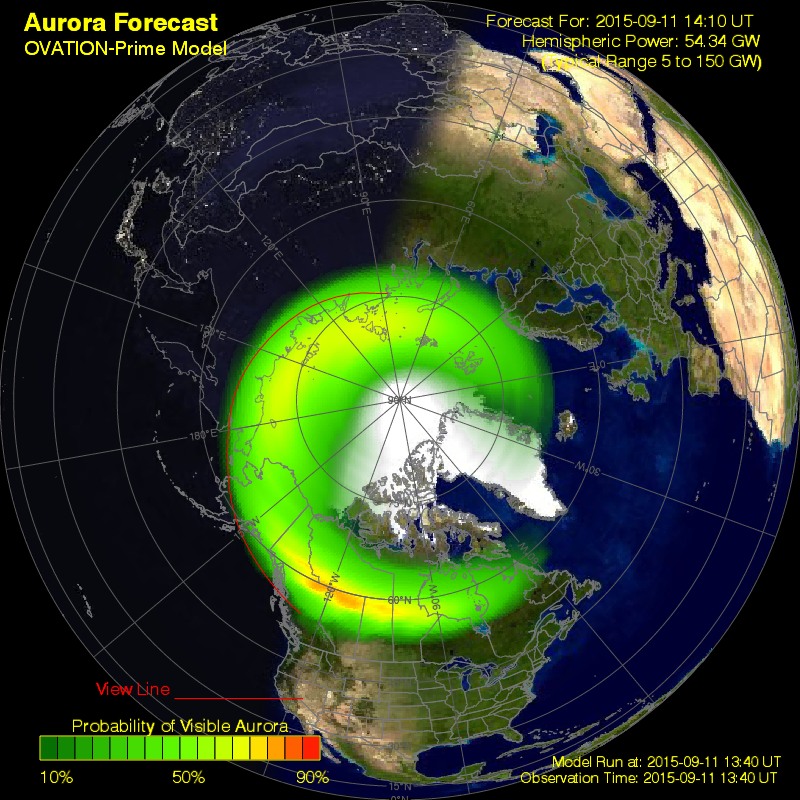
NOAA POES satellite images
Aurora Live Cameras
Weather Knowledge
Focusing Your Camera
Short Exposures to Star Trails
Causes of the Colors in Aurora
Color Balance and Photographing Aurora
Conclusions
References and Further Reading
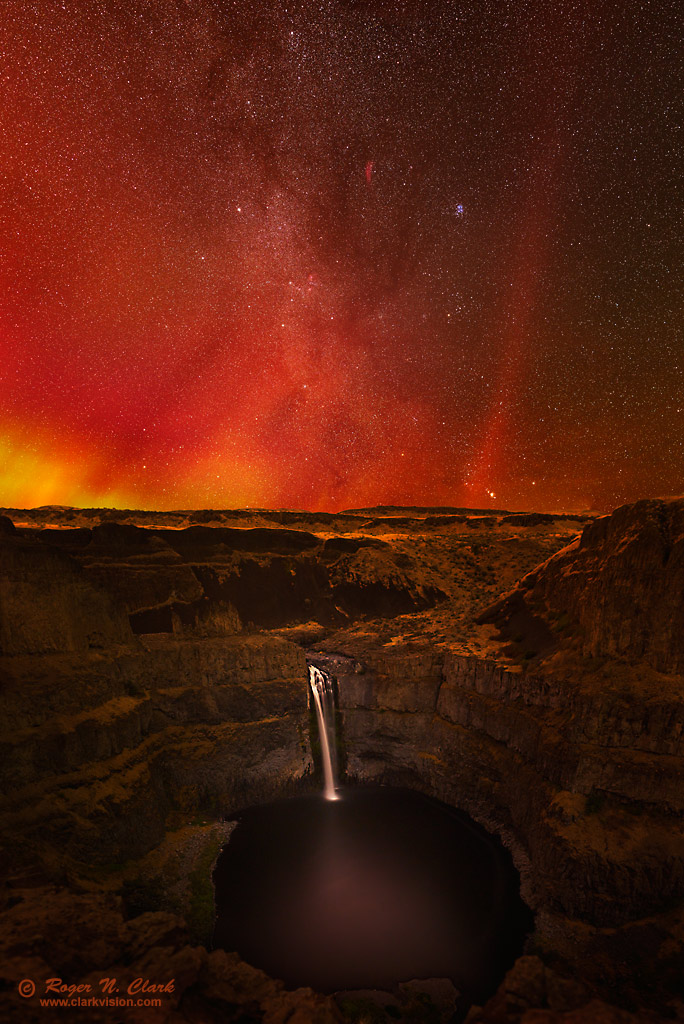
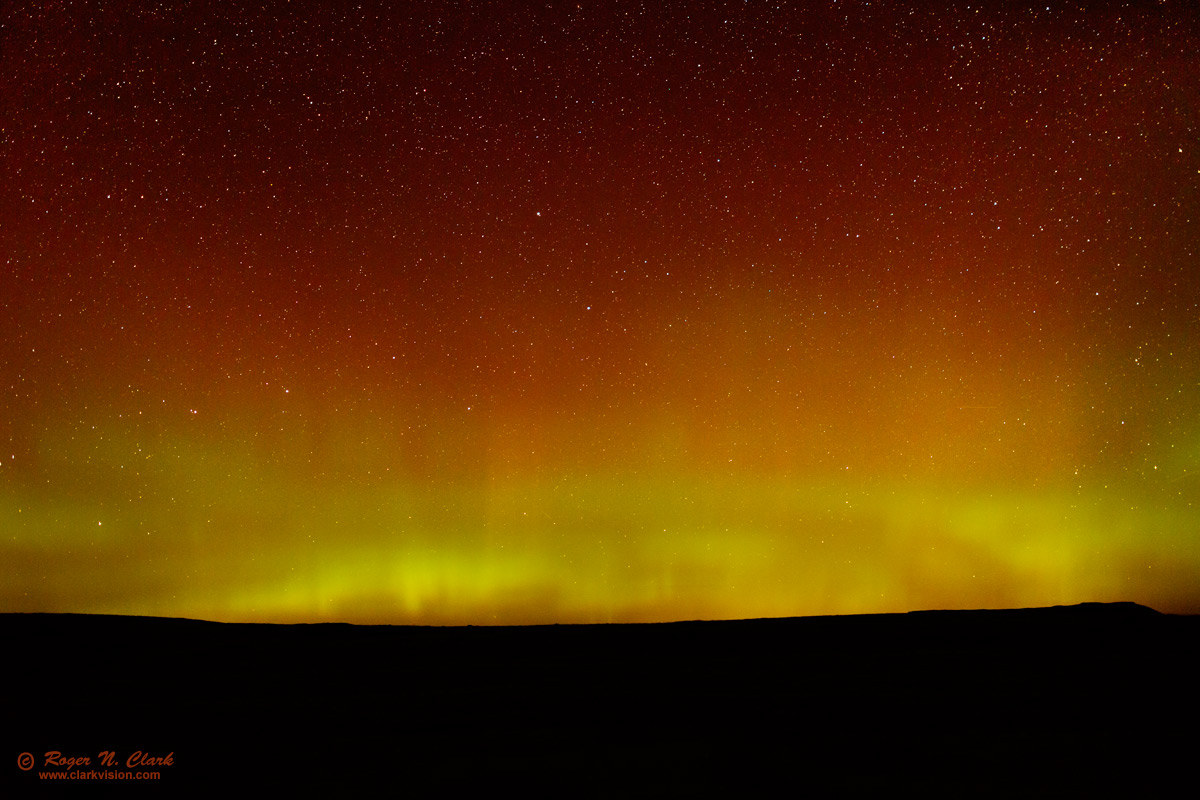
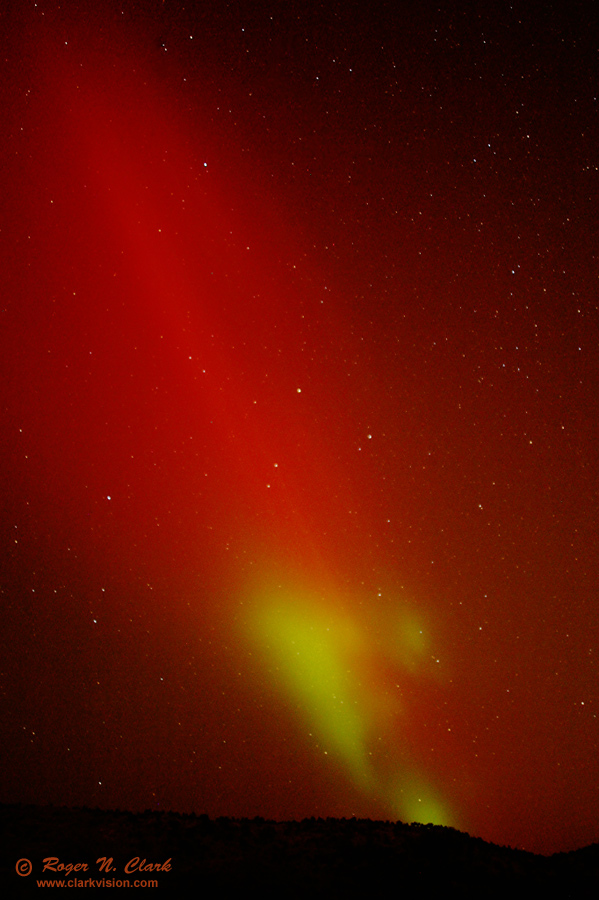
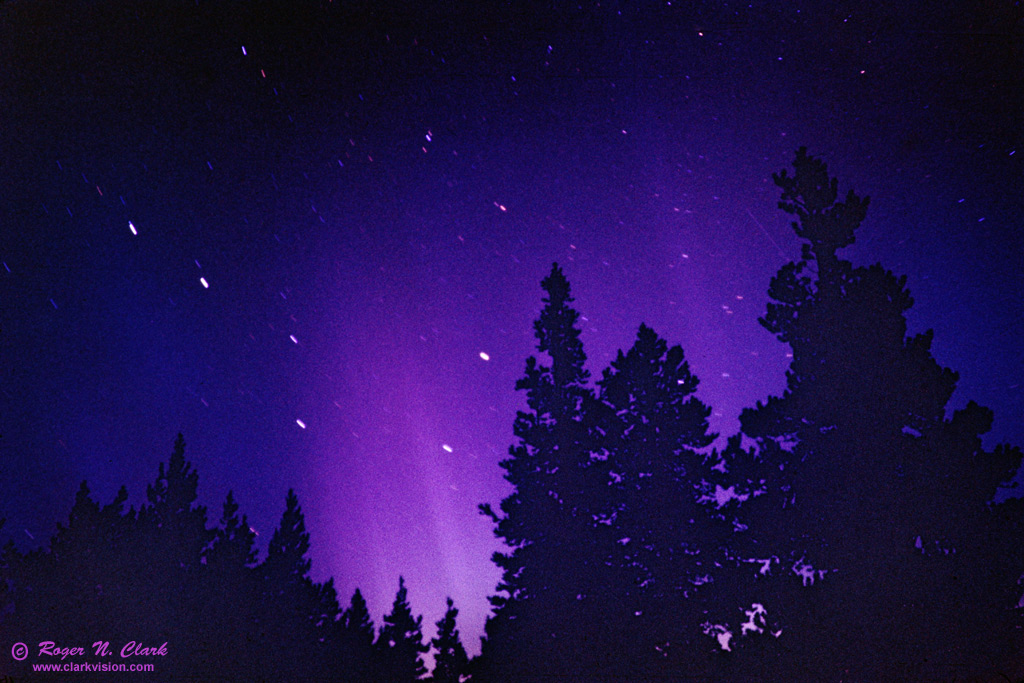
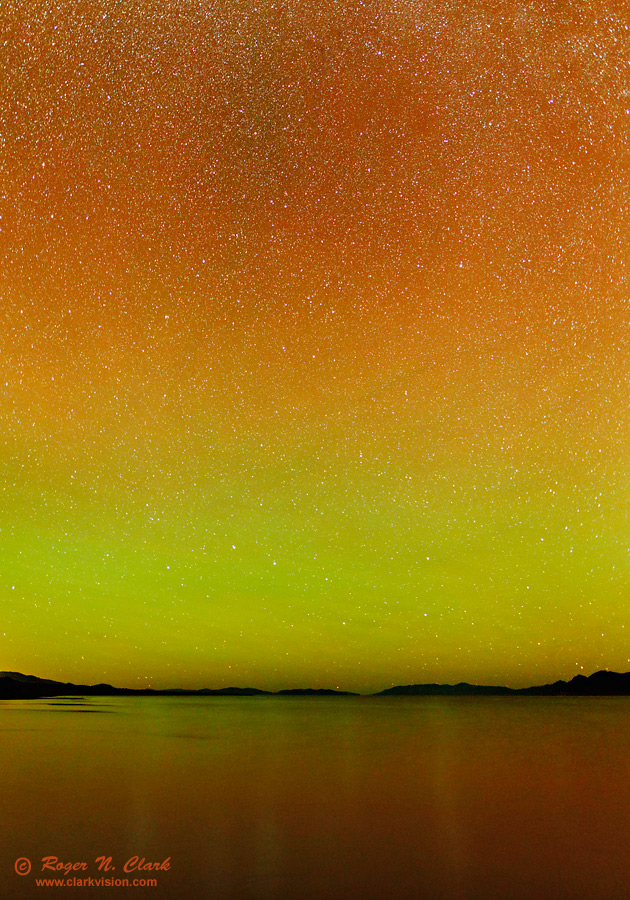
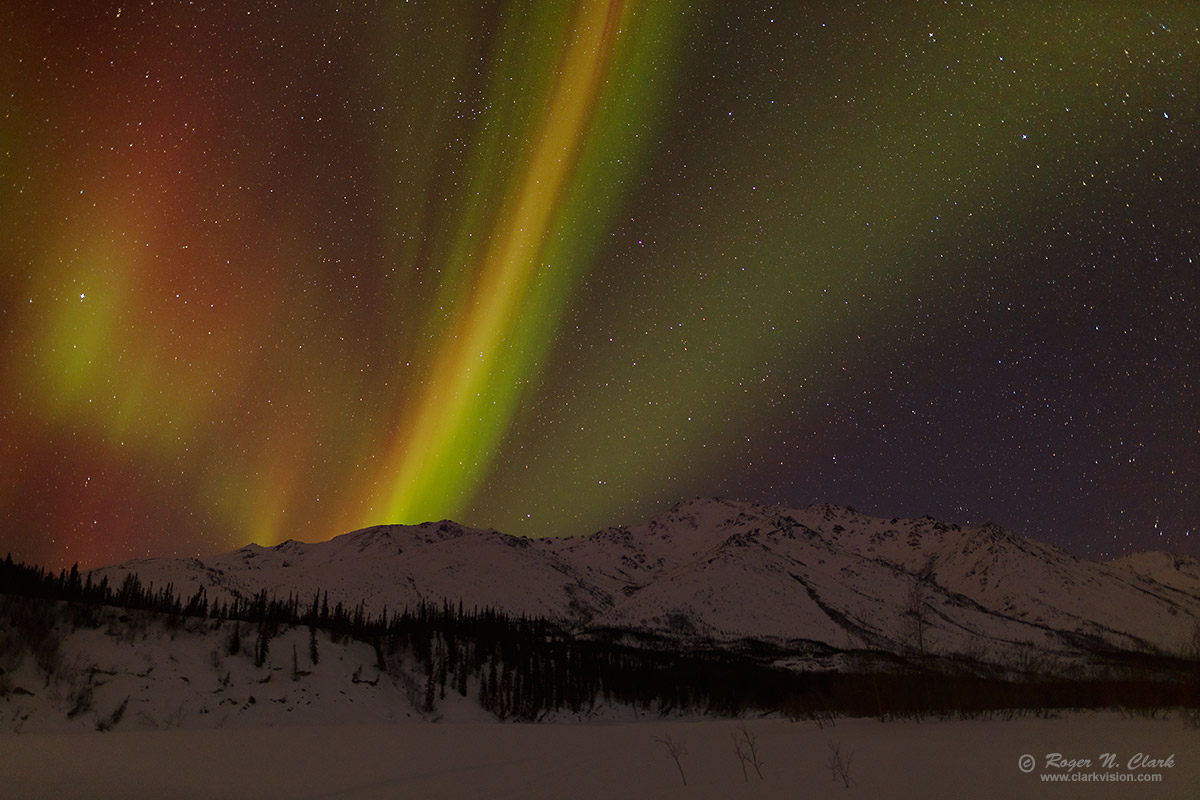
Aurora are created by charged particles entering the Earth's upper atmosphere funneled by the magnetic field of the Earth. I have observed aurora from the lower 48 United States bright enough to read a newspaper by. We are also in the internet age where internet resources enable us to monitor auroral activity and weather conditions in order to be alerted to the best time to head out to view and photograph aurora. Figures 1a, 1b, and 1c show aurora from eastern Washington State in 2015, and Figure 1d shows an aurora bright enough to see and photograph from within the Denver metro area with bright light pollution.
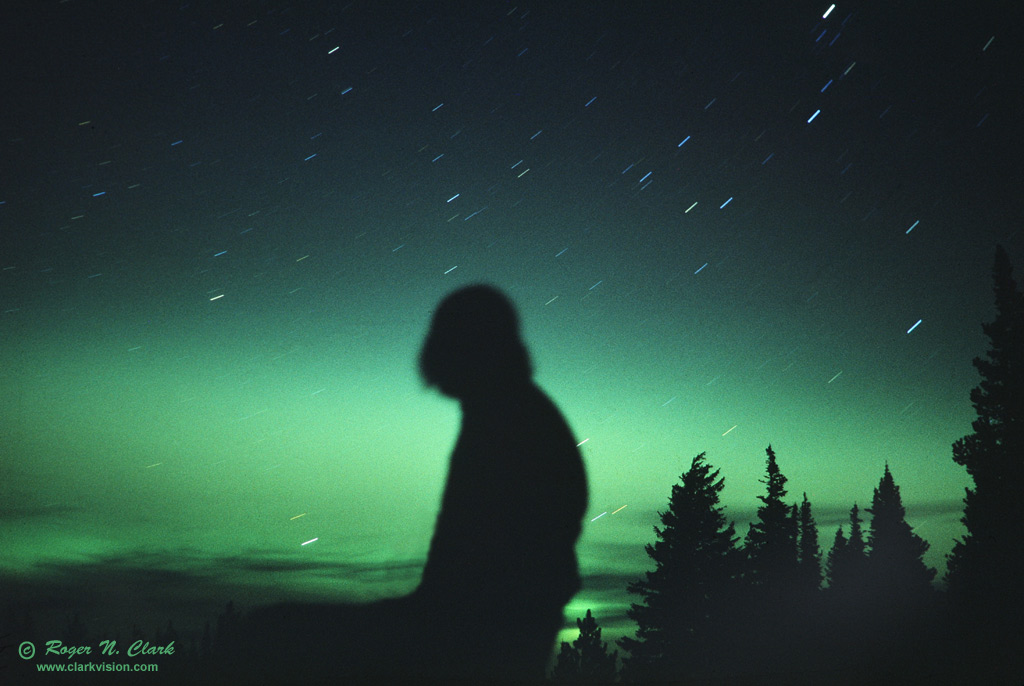
Aurora are variable in brightness and color. They can be fainter than can be seen with dark-adapted eyes, to bright enough to see color and read newspaper print by. Colors are due to atoms emitting at specific wavelengths of light, commonly red and green but also blue and with combinations of emissions many different colors, including orange, yellow, pink, purple and others. To best show these colors, use daylight white balance on your digital camera, or daylight film. Daylight color balance also shows the color of stars with the colors we see them, for example, red-orange Antares and Arcturus, solar type stars show as yellow-white, and hot blue stars show as blue-white See the Color of the Night Sky and Color of Stars articles in this series for more detail. When the aurora gets very bright, you can see colors and daylight white balance shows the closest colors (green emission show as green; red emissions show as red). I could see the red and green colors the night I made the photos in Figures 1a, 1b and 1c, though the color was pastel (the human eye does not see dim colors well). Use of other color balances, like tungsten, turns green aurora cyan for example. But the green emission is from oxygen at 557.7 nm, which is chartreuse green: a yellowish green.
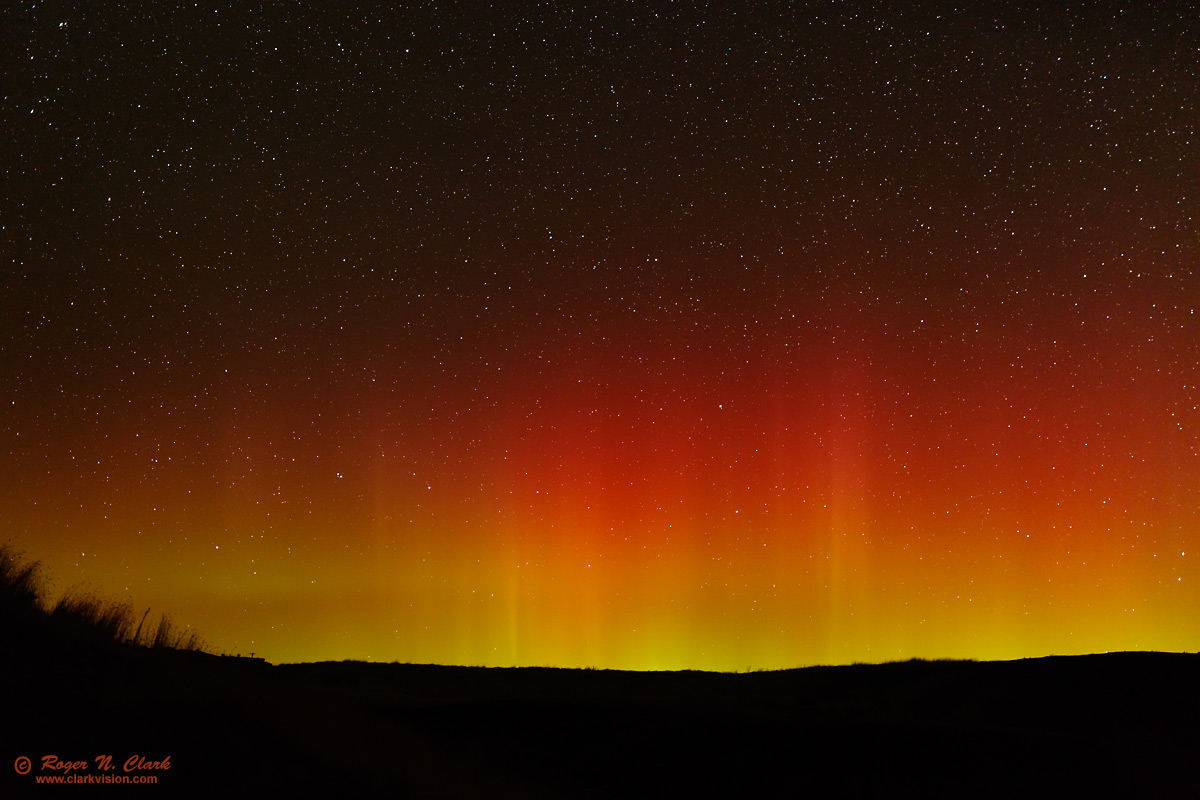
Aurora can move quite fast, sometimes faster than can be photographed. I have observed fire aurora where pulses of light go from horizon to zenith multiple times per second like a shimmering camp fire. The angular rate of such pulses can be several hundred degrees per second, requiring less than 1/500 second to record without much blur. More common are curtains moving and folding. Figure 1c shows curtains and rays. But even with a short 8-second exposure time, the curtains are blurred and shows less detail than I could see visually.
Digital cameras are much more sensitive than film, so armed with knowledge in the internet age with and a DSLR with a good lens, one can potentially make some interesting aurora pictures. There is, however, a lot of incorrect information on the internet.
So what do you need to capture images of faint things like aurora, the night sky and stars? The answer is simple: a digital camera with a big lens. On the internet one reads DSLRs are more sensitive than small point and shoot cameras. That is incorrect. All digital cameras have essentially the same sensitivity, at least those in a similar generation of manufacture. The main difference in light gathering ability is the lens.
Small P&S cameras tend to have small shorter focal length lenses than large cameras like DSLRs. It is not the f/ratio that determines the light gathering ability, rather it is the diameter of the lens, or more precisely the area of the lens. For example, a P&S camera may have a 35 mm f/2.8 equivalent field of view lens, but the small sensor may be 5 times smaller than a 35 mm full frame camera, so the real focal length is only 35 /5 = 7 mm. To find the diameter of the lens, divide the focal length by the f/ratio. Thus, the 7 mm f/2.8 P&S camera lens would have a diameter of only 7/2.8 = 2.5 mm. But a real 35 mm focal length f/2.8 lens would have an lens aperture diameter of 35/2.8 = 12.5 mm. The 35 mm f/2.8 lens then collects 25 times the light! To get that 25 factor, square the ratio of the diameters, (12.5*12.5)/(2.5*2.5) = 25.
So the first step in doing night sky photography is choosing your lens with the biggest aperture. You may say that is my 500 f/4 lens (aperture = 125 mm diameter). But one also needs to consider the field of view. A 500 mm f/4 lens will certainly collect a lot of light but shows only a small part of the sky. One needs a relatively wide angle lens to get good coverage. Example lenses are 50 mm f/1.8 (or faster), 35 mm f/2.8 (or faster), 28 mm f/2.8 (or faster), and so on to shorter focal lengths.
But as one moves to shorter focal lengths, the aperture is getting smaller. For example a 35 mm f/2.8 lens has an aperture of 12.5 mm, while a 20 mm f/2.8 has an aperture of only 7.1 mm. Better is to use larger apertures. For example, a 24 mm f/1.4 lens has an aperture diameter of 17 mm, but a 35 mm f/1.4 has an aperture diameter of 25 mm. Figures 1a, 1b and 1c were short exposure made with a 35 mm f/1.4 lens. Compare the number of stars in those images to those in Figure 1d, made with a 24 mm f/2.8 lens. Even though the exposure time with the 24 mm lens was longer than used for Figures 1b and 1c, the smaller aperture (8.57 mm diameter) collected 8.5 times less light per unit time. Collecting light fast when aurora are moving is critical to record detail in the aurora rather than just a blur.
It is the angular area of coverage that allows larger aurora to be recorded, but larger apertures are needed to gather light. So there is an optimum of available lenses in terms of angular coverage and light collecting that make for high efficiency for night and aurora photography. One can compute the area of sky coverage with a given focal length and the aperture diameter with a given lens. The area of coverage (for example in square degrees) times the aperture diameter is a metric for impressive night sky photography. I have computed many lens combinations and tabulated them in Table 1 at: http://clarkvision.com/articles/nightscapes/
As one might expect, the faster lenses stand out, e.g. 24 mm f/1.4, 35 mm f/1.4, 50 mm f/1.2. I have decided on using a 24 mm f/1.4 and 35 mm f/1.4 Sigma lenses as my choice for nightscape, meteor, and aurora photography.
The next myth on the internet is ISO. ISO does not change sensitivity. In normal daytime photography, when you increase ISO, the computer in the camera tells the camera to make a shorter exposure (shorter exposure time, or slower f/ratio, or both) and then tells the computer to boost the signal, and boosting along with that smaller signal, noise. So there is no need to boost to very high ISOs. But today's DSLRs have another problem: the electronics are not good enough to handle the dynamic range of the sensors in the cameras. The result is that low ISO images have noise limited by the electronics, while high ISO's do not, but high ISOs have more limited dynamic range. This means there is an optimum for low light work. That optimum is usually around ISO 1600 to 3200. More on this topic can be found in my nightscapes article at: http://clarkvision.com/articles/nightscapes/
Ok, so now you know to use your DSLR with your largest aperture wide angle lens at ISO 1600 to 3200. Now what? When will there be an aurora? First, we usually need to get away from city lights on clear nights. Second, there should be no Moon in the sky, unless it is a very bright aurora. Both city lights and moon light usually add too much light to the sky, which makes it more difficult to see and record fainter stars and aurora. A thin crescent moon might add enough light to nicely illuminate the landscape, but too much moonlight and the sky will be brightened making the aurora harder to see.
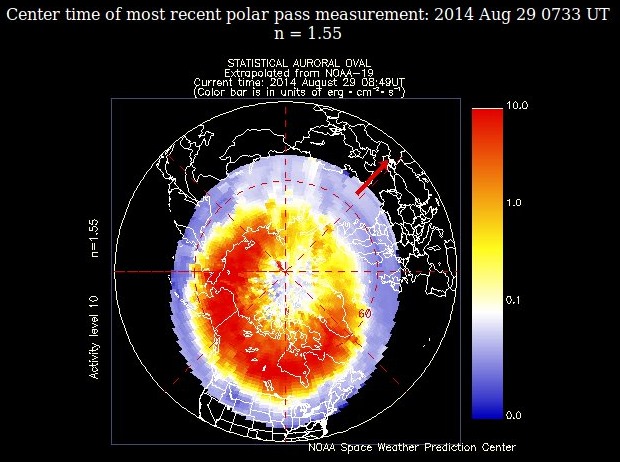
The Kp index does not always indicate strong aurora. For example, on the night of strong aurora and the intense POES satellite image in Figure 3c, the Kp only reached bout 4 at that time (Figure 3d). If the POES is high, aurora is occurring. If the Kp is high the potential for aurora is high. But there can still be aurora with lower Kp values. Kp is a predicted and observed measure of geomagnetic activity, whereas POES is a direct measure of auroral activity.

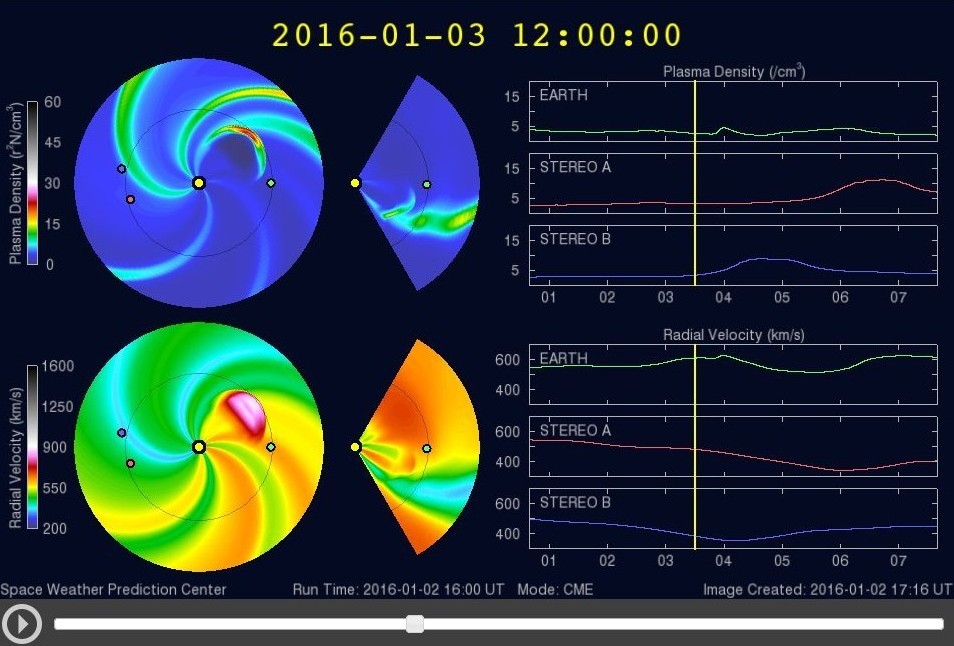
Another excellent tool for understanding what might happen is the NOAA Solar Wind Prediction web site. This site shows the solar wind velocity and plasma density as a function of time (play the movie, or just move the slider to a particular time). You must load the predict data before you can move the slider or play the movie. Note this uses a fair amount of data, in case you are using a smartphone watch your data usage.
Live aurora cameras: https://virmalised.ee/aurora-live-cameras/
Yellowknife, Canada live aurora camera, Canadian Space Agency: http://www.asc-csa.gc.ca/eng/astronomy/auroramax/hd-480.asp
So armed with solar flare CME alerts from spaceweather.com, Kp predicts and satellite views of the aurora, you can decide to make a long drive to a dark site outside the city. But what about the weather? Whether you want clear skies for aurora, or partly cloudy skies for sunrise and sunset, there is an amazing website that shows cloud predictions for North America at http://www.cleardarksky.com/csk/ for up to 48 hours ahead. It also gives predictions on wind. I use this site for astronomy, photography, in my professional work, and even planning a hike.
Once you reach your photography site and set up your camera on a tripod, focusing can be a big problem because small wide angle lenses have relatively small apertures so do not usually collect enough light for many DSLRs to accurately focus at night. The best method is to use live view if your camera has it. With live view, zoom in 10x and use a small magnifier on a bright star to focus manually. If your camera does not have live view use a flashlight to light something about 50 feet or more away and focus on that. Sometimes you may have to place the flashlight close to a distant tree or a rock to get enough light to achieve focus.
There are two types of night sky photography one can do. 1) Star trails. 2) Short exposures to keep stars round. With star trails, one can make long exposures, either as one long exposure or several shorter exposures that get combined.
Figures 1b, 1c, and 1d shows images taken with and 6, 8 and 20 seconds of exposure. The short exposure times limit the rotation of the Earth so that the stars remain round. In practice, with a 24 mm lens, about 8 seconds is the limit to keep stars round when pointed near the celestial equator, but in a presentation with small images, like for the web, 30 seconds will also work and show minimal trailing. Also, if the camera is pointed toward the celestial pole, one can expose longer without showing star trailing. To keep sharp star images with longer exposures, one needs to track the stars, as was done in Figure 1a. But that risks blurring of the aurora.
A 3 minute exposure of an auroral band and star trails is shown in Figure 5a. Auroral bands can sometimes remain relatively stationary, allowing such long exposures, while at other times, the auroral rays, and curtains can move quite quickly.

Some example aurora photos are shown in Figures 5a, 5b, 6, 7, 8 and 9. Note the big difference in the number of stars from Figure 1d, the film images in Figures 4, 5, and 6, with the images in Figures 7, 8 and 9. Digital cameras are much more sensitive than film, and the large aperture lenses used to make the image in Figures 7 and 8 (24 mm at f/2) collects a lot of light, recording fainter stars than in the other images. Even better for recording stars is the Sigma Art 35 f/1.4, which in only 8-second exposures records many stars in the star-poor region of the north celestial pole (Figures 1b, 1c).

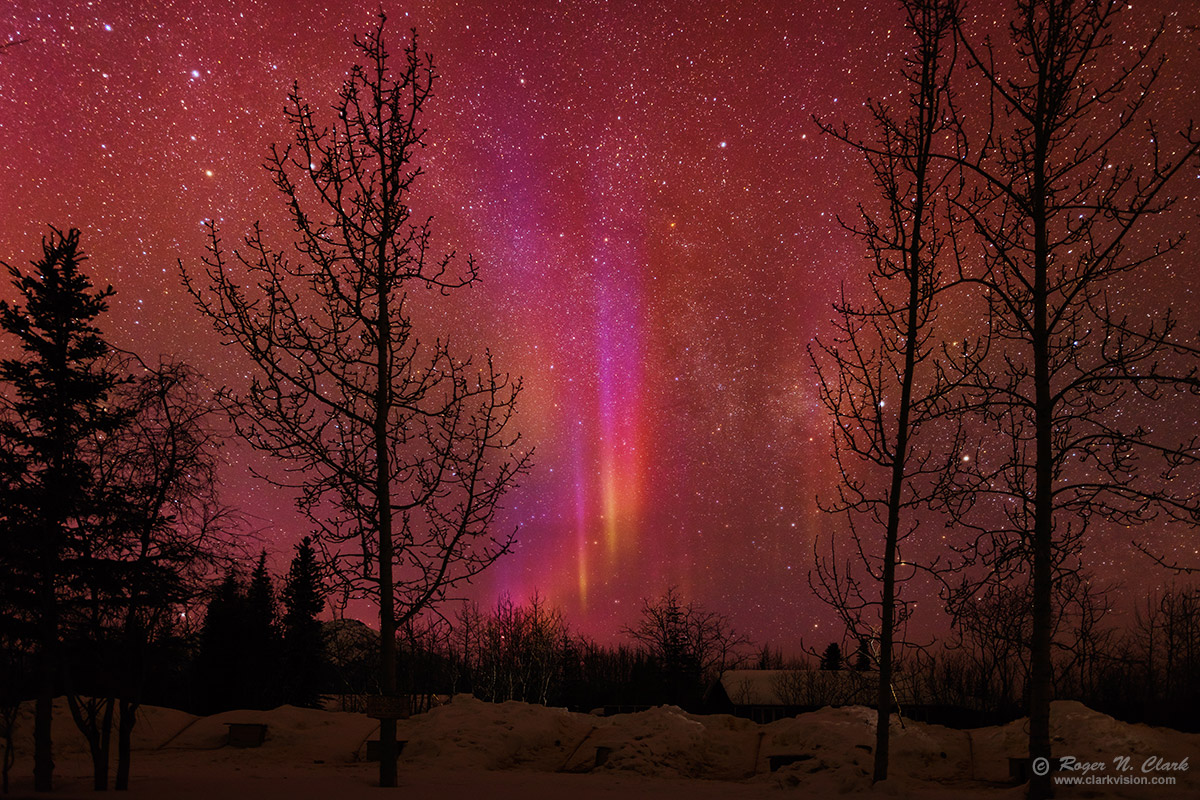
The two most prominent colors in aurora as often seen are green and red. The green is caused by oxygen emission, while red oxygen emission occurs at higher altitudes. The green oxygen emission is at 557.7 nanometers (nm), which is a chartreuse green. Oxygen also emits in the red beyond 620 nm but the process of emitting these wavelengths requires the molecules are not colliding very often, and that condition only occurs in the upper atmosphere. Thus green emission occurs at around 100 km altitude, while the red oxygen emission occurs around 150 to 300 km altitude. This results in the common green colors down low and red above, as shown in Figure 1a, 1b, 1c, 1d, 9a-d and 10a. Nitrogen molecules emit in the blue and deep red, with peak intensity at about 90 km. The blue in Figures 5, 9a, and 9d is caused by nitrogen emission. Orange and yellow are often combinations of red + green oxygen emission. Hydroxyl (OH) also emits in the red. Pink is a combination of red plus blue plus lesser amounts of green. The result is that many colors can be observed in aurora and airglow and the most consistent way to show the natural colors is with daylight white balance as discussed in the next section. But due to the processes, we generally see the more varied colors at the lower altitudes with red oxygen emission at higher altitudes, so commonly red is on top in aurora images.


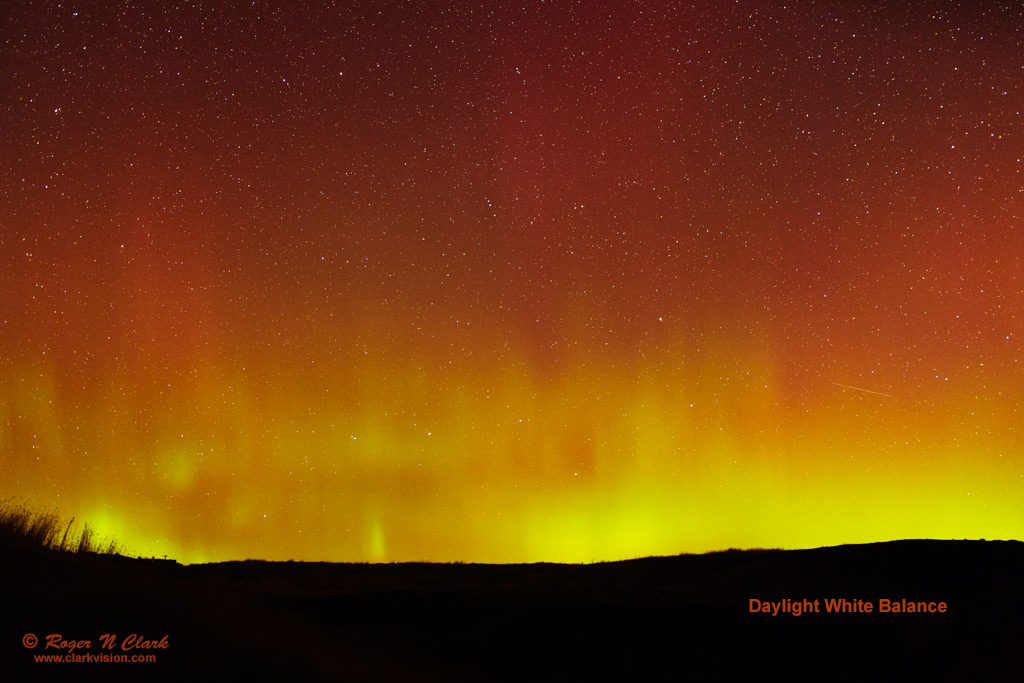
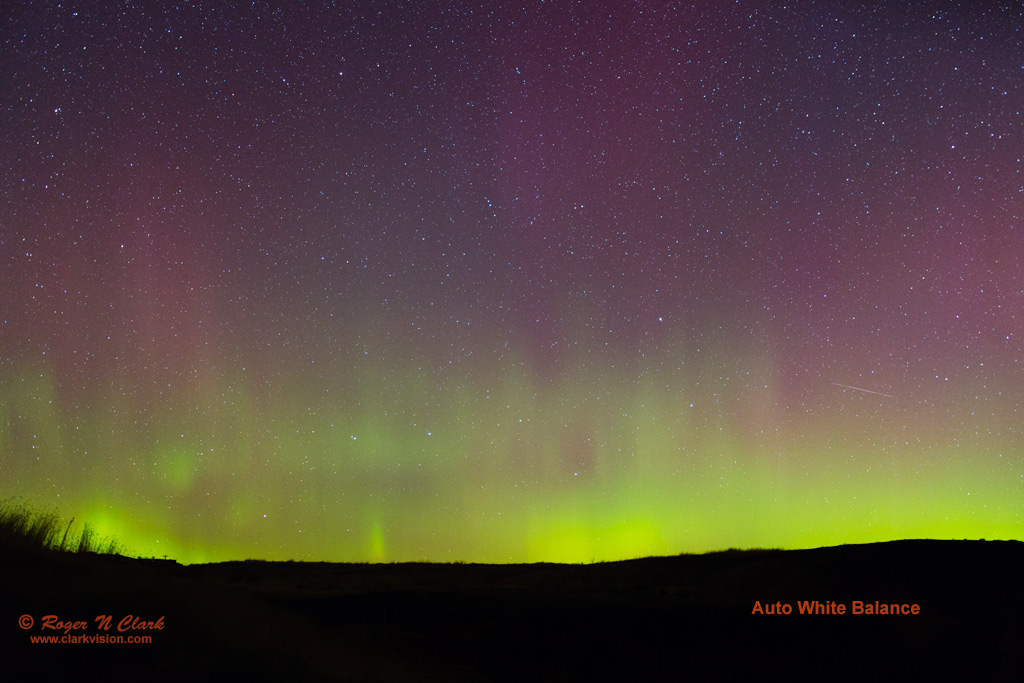
The color balance setting on your camera, or the color balance chosen in a digital camera raw converter makes a big difference on the resulting image. An example of this effect is shown in Figures 10a and 10b. On the web you can find people teaching to use auto white balance or choose whatever white balance you want to make whatever colors you want. Photographers are certainly free to choose however they want to color their images, but if you want natural colors, use daylight white balance. Daylight white balance is shown in Figure 10a. The wavelengths of auroral emission lines are well known, as discussed in the previous section.
Use of an auto white balance, as illustrated in Figure 10b, means that the colors in the resulting image depend on what colors are in the image. As the aurora changes the proportion of red and green oxygen emission, auto white balance will create a myriad of colors, many of which have little do do with reality. Figure 10b illustrates this. With significant red emission in the image (Figure 10a), the auto white balance forced the image to show more colors, suppressing red. The result is a greener green than real oxygen emission, changing the red emission to purple and blue. Use auto white balance to create surreal and unnatural colors. The common colors in many aurora images that I see on the web have unnatural colors with most reds suppressed by poor use of white balance.
Use daylight white balance for natural color.
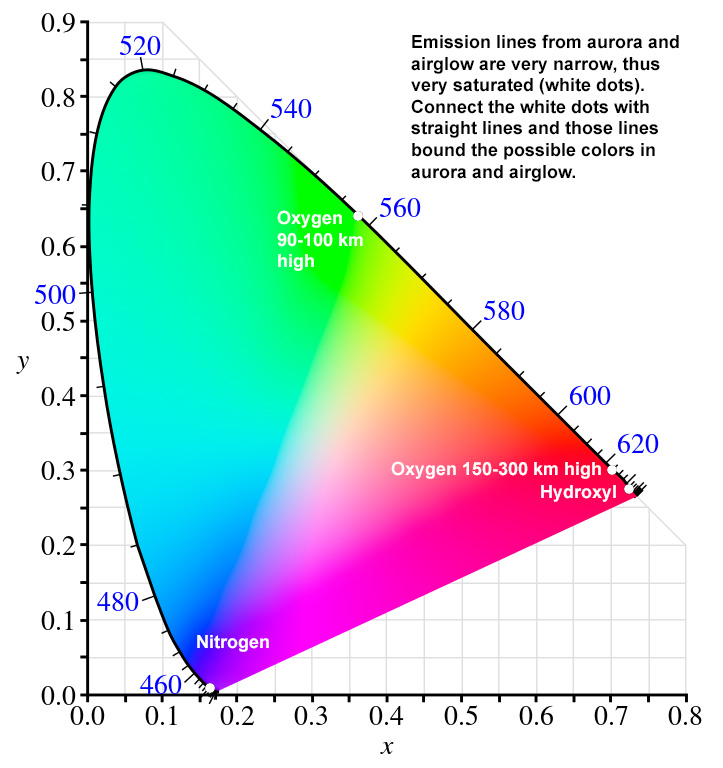
The colors of auroral emission lines are shown on the CIE color diagram in Figure 11. At different perspectives, we see combinations of both red (620 nm) and green (557.7 nm) oxygen emission, with a mixture line in between making saturated oranges and yellows. Those are the colors seen in Figure 10a, and not those seen in 9b. Note too the 557.7 nm line shows as yellowish-green on Figure 11, not the cyan-green we often see in aurora images online made with auto-color balance. Sometimes nitrogen emission contributes and when mixed with oxygen and hydroxyl red emission produces pink-magenta like those seen in Figures 8, 9d.
Armed with modern digital cameras, fast lenses, and web resources enable us to be prepared and ready for the next big auroral event. I have seen aurora from the lower 48 US states that pulsate from horizon to zenith 3 times a second (a fire aurora), curtains that dance and fold on each other, arcs, rays, and general glowing in the north. Sometimes the aurora will show color to our eyes and other times will be too faint for us to discern color, but our cameras will show wonderful and varied colors as the images here illustrate. If you are lucky enough to travel north or south closer to the poles, your chances of seeing aurora increase.
Use the optically fastest, larger aperture lenses you can afford and a modern DSLR for best results. I recommend f/2 and faster lenses, including Sigma Art 35 mm f/1.4 (full frame and crop DSLRs), Sigma Art 24 mm f/1.4, Sigma Art 20 mm f/1.4 (full frame and crop DSLRs), and Sigma 18-35 f/1.8 (crop camera only). Popular lenses in night sky and aurora photography include wider angle lenses like 15 mm f/2.8. I don't recommend these lenses in most situations because the apertures are too small. They can work well when the aurora is bright and covers larger parts of the sky, but usually when that occurs, there is also small regions of interesting activity that the larger aperture (e.g. 35 mm f/1.4) lenses can pick up in more detail. So it can be a matter of taste. Note too that with slow aperture very wide angle lenses you get fewer stars (compare images on the internet with such lenses to those here, like those in Figures 1a, 1b, 1c). I prefer more stars and shorter exposure times, to get more detail, or tracking of the stars. Use daylight white balance for natural color.
Observed and predicted geomagnetic activity (the Wing Kp index):
http://www.swpc.noaa.gov/products/wing-kp
To see alerts of solar flare eruptions: http://www.spaceweather.com/
Auroral activity satellite view (northern hemisphere): http://services.swpc.noaa.gov/images/aurora-forecast-northern-hemisphere.png
Auroral activity satellite view (southern hemisphere): http://services.swpc.noaa.gov/images/aurora-forecast-southern-hemisphere.png
Clear sky chart: prediction of clouds up to 48 hours in advance for North America http://www.cleardarksky.com/csk/
Nightscape Photography with Digital Cameras http://clarkvision.com/articles/nightscapes
Glowing Gases - Aurorae http://www.atoptics.co.uk/highsky/auror3.htm
The Night Photography Series:
| Home | Galleries | Articles | Reviews | Best Gear | Science | New | About | Contact |
http://clarkvision.com/articles/aurora.photography
First Published November 25, 2012
Last updated April 11, 2022