ClarkVision.com
| Home | Galleries | Articles | Reviews | Best Gear | Science | New | About | Contact |
Astrophotography Post Processing with RawTherapee
by Roger N. Clark
| Home | Galleries | Articles | Reviews | Best Gear | Science | New | About | Contact |
by Roger N. Clark
RawTherapee offers distinct advantages over other raw converters I have tested, producing images with smaller stars, color to the cores of stars, even saturated stars, finer detail in nebulae and galaxies, and lower apparent noise.
The Night Photography Series:
Contents
Introduction
RawTherapee
To produce a color image from a digital camera raw data file, software is needed. Most digital cameras are Bayer Sensors: each pixel has a red, green or blue filter over a pixel. Modern digital cameras usually have two green filters, each slightly different in their spectral response. The color filters in a Bayer sensor array are not precise matches to the spectral response of the human eye color response, so corrections are needed. The raw converter must interpolate color from surrounding pixels in order to construct the red, green and blue colors in the output color image, correct electrical offsets to the data, apply the color matrix correction and other corrections to try to produce as sharp an image as possible with accurate natural color, and minimal noise and artifacts. This is no small feat, and digital imaging scientists continue to develop better algorithms to make better images from such sensors. These are called demosaicing algorithms.
There are many demosaicing algorithms to choose from, but many raw converters do not give you a choice. Some have not implemented newer algorithms. Rawtherapee is an exception, implementing many algorithms from which to choose. In contrast, Adobe's Adobe Camera Raw in Photoshop (and lightroom) does not give the user a choice of demosaicing algorithm, at least the last time I investigated this possibility (circa 2018).
Examples of images produced by three methods are shown in Figure 1. On the right is the in-camera raw conversion to produce a jpeg image. Note the halo artifacts around many stars. The jpeg engine filters the noise, producing a pretty low noise result, but that also impacts fine details in the nebula. Color in the brightest parts of the nebula and brighter stars is washed out in the jpeg image.
In the middle panel of Figure 1 is the ACR Photoshop CS6 result. It shows better star color, smaller stars, and better color in the brighter parts of the nebula compared to the out-of-camera jpeg derived image. But noise is higher than the out of camera jpeg and the brightest stars still have halo artifacts. Note both the 8-bit/channel out-of-camera jpegs and the full raw data, which was processed with 16-bit raw converted tif files show about the same faint stars and nebulae, blowing the myth that one must use raw data to get faint details. Even so, the raw converted image is clearly superior.
The left panel of Figure 1 shows the rawtherapee result. The stars are smaller, the star and nebula color are similar in both the ACR and rawtherapee result. The rawtherapee image shows lower noise, finer detail, and better color in the bright portions of the nebula. But more important, rawtherapee recovered the saturated stars and interpolated the star color from the unsaturated data around the star. The jpeg and ACR results show white disks in the cores of saturated stars. The rawtherapee also shows the best star shapes, with color to the cores, and with little to no halos around bright stars.
The following section shows the rawtherapee settings I am using for my astrophotos. These same settings can also work with general photography (differences will be noted). If you are coming from Adobe raw converters (e.g. Photoshop, Lightroom), rawtherapee has a different interface. and can take some getting used to. Hopefully, with this article, it will help you to scale the learning curve faster.
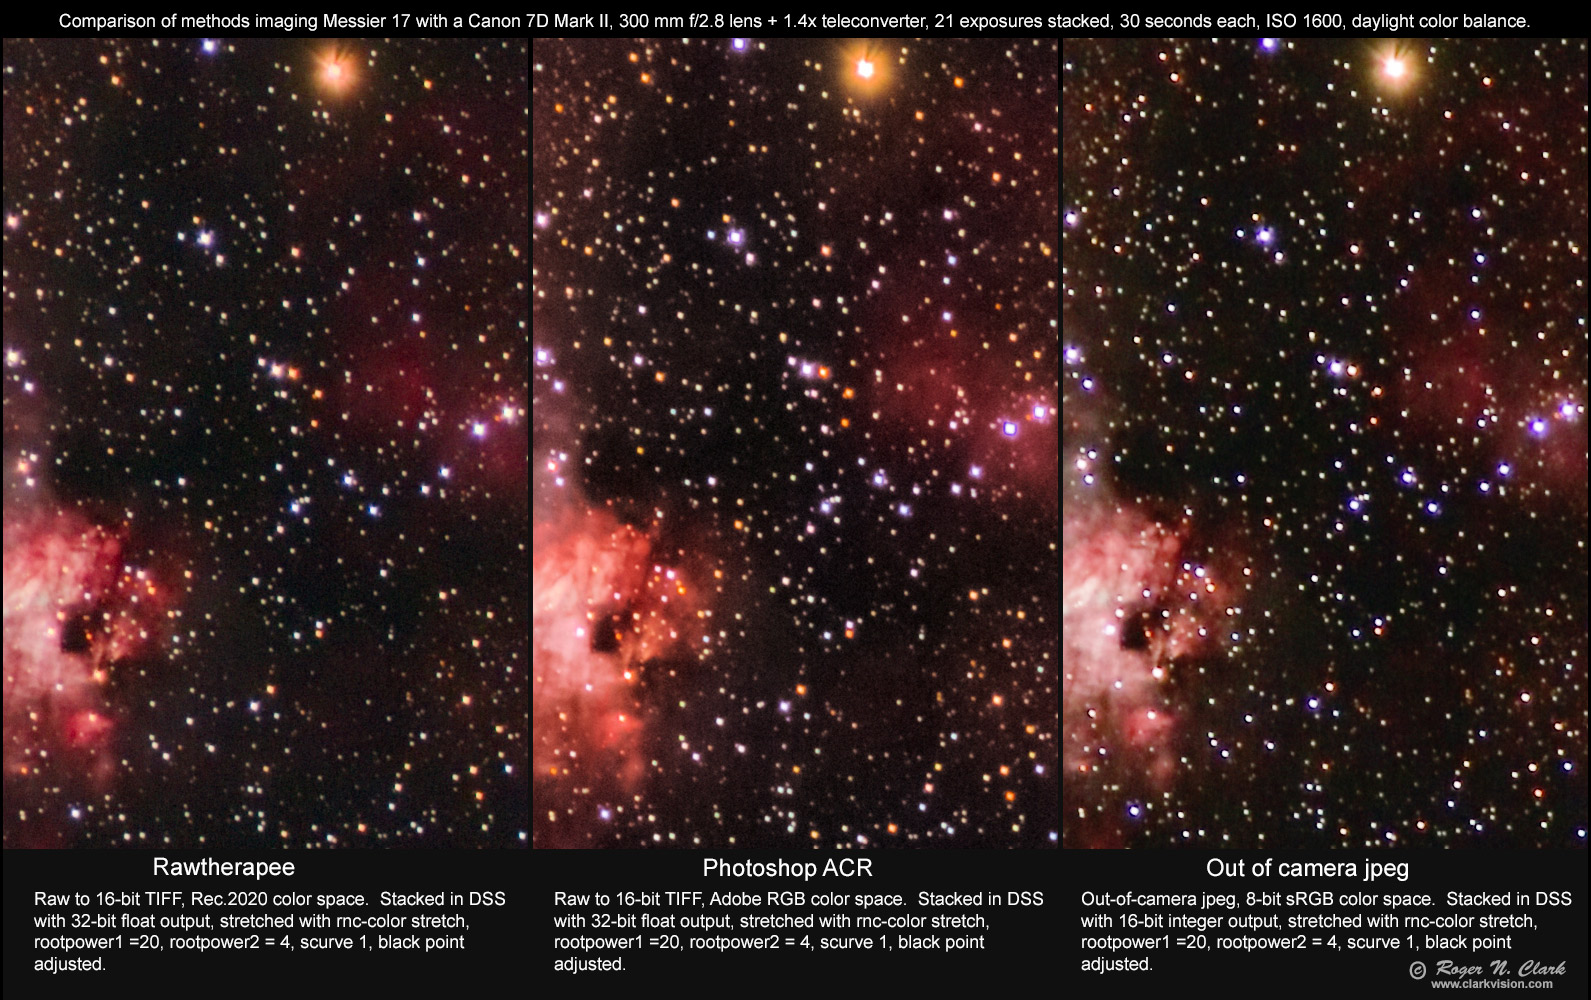
The images in Figure 1 were all post processed similarly. The twenty-one 30-second exposures were stacked in Deep Sky Stacker, DSS, then stretched in rnc-color-stretch with rootpower1 = 20, rootpower2 = 4, scurve1. Each image had a slightly different black point, so the blackpoint was adjusted so that the darkest parts of the images had close to the same brightness.
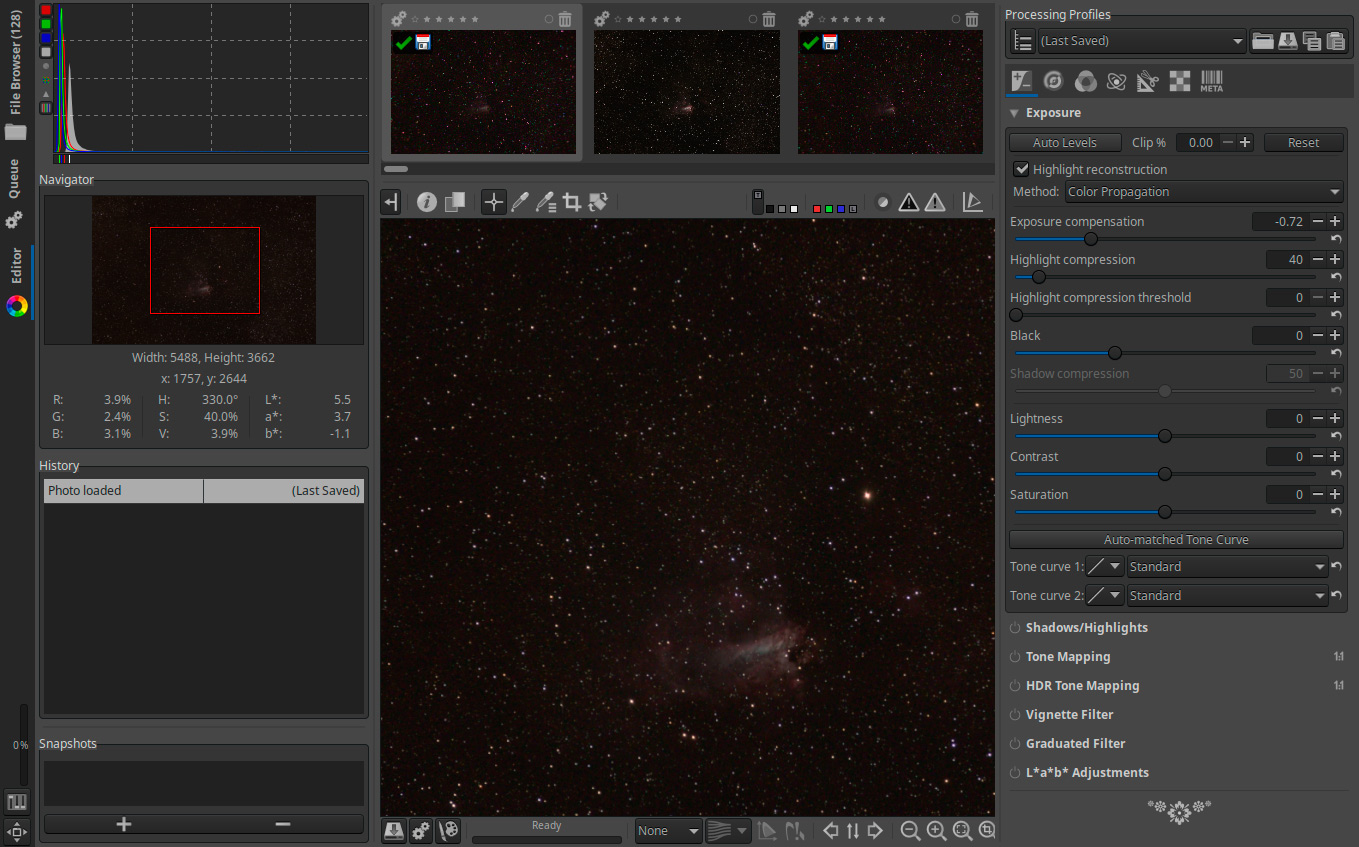
One starts by opening the file browser tab on the left, navigating to the directory where your images are located, and selecting images. Next double click on one of the images to get to this location in the program. On the right are the tabs for different settings of the raw converter. The program starts with the exposure settings, but I start on the right. There are 7 tabs, from left to right are:
Raw settings
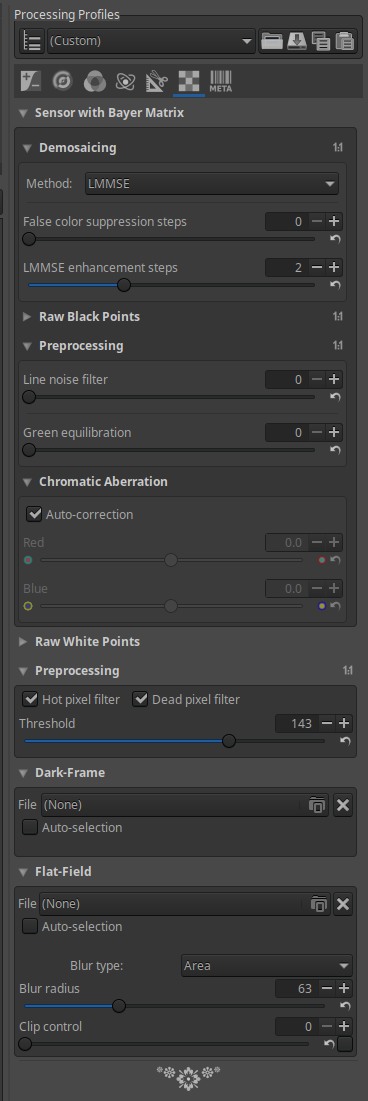
Raw settings are shown in Figure 3 For high ISO images, I have read that the LMMSE algorithm works best on high ISO images and it certainly does a good job as shown in Figure 1. You might also try the AMAZE algorithm, and I use that more often for regular daytime photography. I also turn on the hot pixels and dead pixel corrections. With the value of 143, I have found it works well on images from my cameras without removing stars.
Dark frame subtraction and flat field corrections are significant features that I have not seen in other raw converters. This means you can use flat fields with data obtained through telescopes. However, rawtherapee 5.4 only allows a single raw file to be used, not an average made from multiple exposures. This is a real limitation that needs to be corrected.
Transform settings
Transform settings include application of lens profiles (e.g. as seen in Figure 4a), or a manual vignetting corrections (e.g. as seen in Figure 4b).
Vignette correction when a lens profile correction does not exist. To derive the settings in Figure 4b, I measured a flat field, then loaded the raw file of the flat field into rawtherapee, and examined values from center to edges and corners. By adjusting the vignette correction sliders I minimized the intensity variation from center to edge and corners. Once the correction gets close, visually examining the brightness of the image makes it hard to tell the accuracy of the correction, so reading out values around the image is the only way. The Flat Field exposure must be of a very uniform scene. This is very difficult to do with wide angle lenses, and gets easier as focal length increases. For moderate to long focal lengths, 35 mm and longer I often use white foam core board used for mounting prints illuminated by the sun at about 60 degrees from normal. Keep the lens at infinity focus and move in close enough to fill the field of view with the white board. For longer focal lengths, 200 mm and higher, viewing the clear blue sky, about 90 degrees from the sun, pointing high in the sky (sun in the morning or afternoon) can work well. A white T-shirt over the front of the lens can work too, but not on wide angle lenses because the scattering of light through the T-shirt is not uniform in all directions. Make the exposure so that the histogram above mid level, but not to high as to saturate any part of the image.
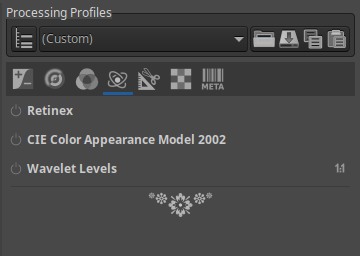
Advanced settings
No advanced settings are used here (Figure 5).
Color settings
Most important is to set the color balance. For natural color astrophotos, use daylight white balance. The color balance shown in Figure 6 shows a custom white balance determined by photographing a gray card in daytime sunlight.
Note that no vibrance, channel mixer, and settings down to color toning were used. Color management: for the input profile select auto matched camera profile.
Working Profile. As I write this (2018), a revolution is coming in digital still photography, driven by the video industry. Wide gamut and high dynamic range displays are becoming more common. In photoshop, I did raw conversion to Adobe RGB color space, but the video industry has standardized on Rec 2020 color space, which is larger than Adobe RGB. So to look to the future, I am processing images in the Rec 2020 color space. ProPhoto is a slightly larger gamut than Rec 2020, but ProPhoto includes colors outside the visible range. With the industry moving to Rec 2020, I do not believe ProPhoto will have a future. If you have 4K TV and watch 4K movies (3820 x 2160 pixels), the color space is Rec 2020. If you have a high dynamic range 4K TV, like an OLED TV, high dynamic range movies use Rec 2020 color space with Rec 2100 tone curve. So I select the working profile and output profile to be Rec 2020. If you still use photoshop in post processing, you'll need to add Rec 2020 color space to photoshop. Rec 2020 is available online.
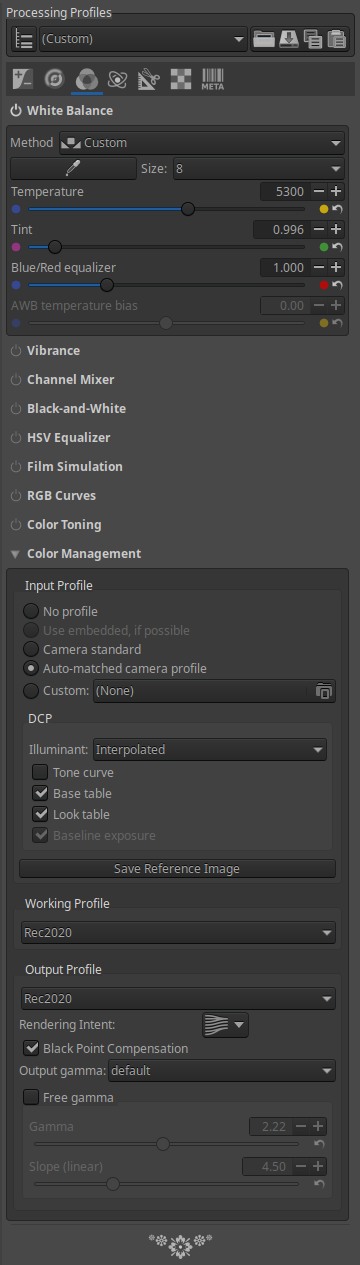
Other Color Profiles The RawTherapee man page on color describes the color spaces available:
The manual page also notes "RT_sRGB is a higher quality version of the standard sRGB profile, which surprisingly is inconsistent between implementations. RT_sRGB was custom-made for RawTherapee by Jacques Desmis and has 4096 LUT points, as opposed to the lower quality 1024 point sRGB profiles."
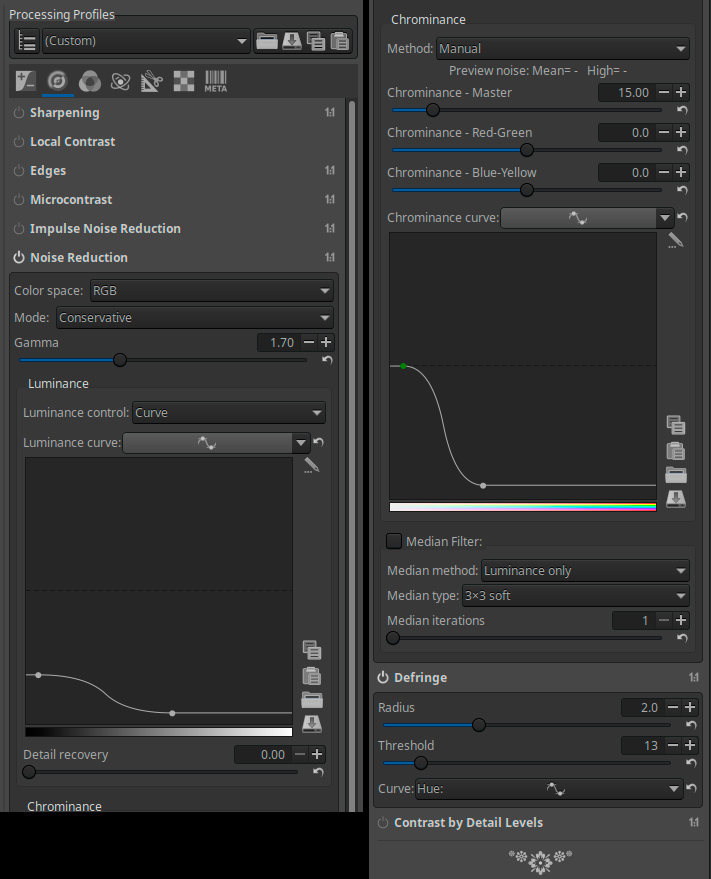
Detail and Noise Reduction settings
On the detail settings tab (Figure 7), I do not do sharpening; I only do noise reduction. I do both luminance and chrominance noise reduction using a curves method (which photoshop ACR does not have). The advantage of the curves method is that darker parts of the image receive more noise reduction than brighter parts. Where signal is high, the signal-to-noise ratio is better, so noise reduction is not needed. It is not critical on the shape of the curves in Figure 7. The values chosen worked well for my Canon 7D2, 6D2 and 6D images, so these should be good starting points for your images.
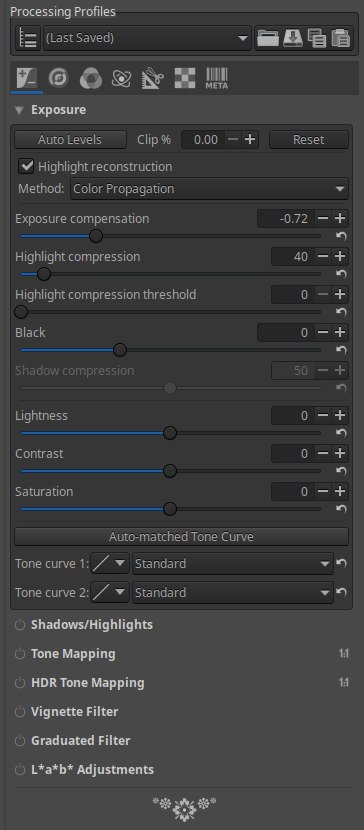
Exposure settings
On the exposure tab, a key setting for astrophotos is to check the highlight reconstruction box, and set the method to "Color Propagation." That fixes saturated stars, reconstructing color to the cores of the stars, and any other saturated parts of the image.
I set exposure compensation to about -3/4 to -2/3 (66 to 75 in Photoshop ACR). Some modest highlight compression also reduces saturation problems. This also helps reduce star saturation and maintains color. If your image is dark, increase the black point to be sure the data are not clipped. I keep lightness, contrast, and saturation sliders at zero.
Once you have your settings made on one image, the next thing to do is to save the settings. The the top right section in Figure 2 is where you can save or load a setting. Next copy the settings to your other images. To so this, switch to the file browser tab. The image you were working on is still highlighted. Type control-c (key press control and the letter c) to copy the settings. Select all the images you want to convert with these settings and type control-v (if on a mac use the equivalent key press: command instead of control, as in command-c, command-v). Now select the images you want to convert in the file browser, and right click and you will see a menu pop up, with includes send to queue. Select send to queue. (Personally, I find this very non-intuitive and inhibits a new user from understanding how to do these things. But once you have done it a few times, it is easy to remember. Still a couple of buttons, like synchronize and send to queue would help new users.) Next select the queue tab on the left and click the on button to start processing.
At this point you have rec 2020 16-bit tif files. Follow the guide in Part 3a1. If using 32-bit capable image editors, select 32-bit float (or rational) for output from your stacking software (for example in Deep Sky Stacker). The 32-bit rational (floating point) output of Deep Sky Stacker is read by rnc-color-stretch and was used for the examples in Figure 1 and the examples below.
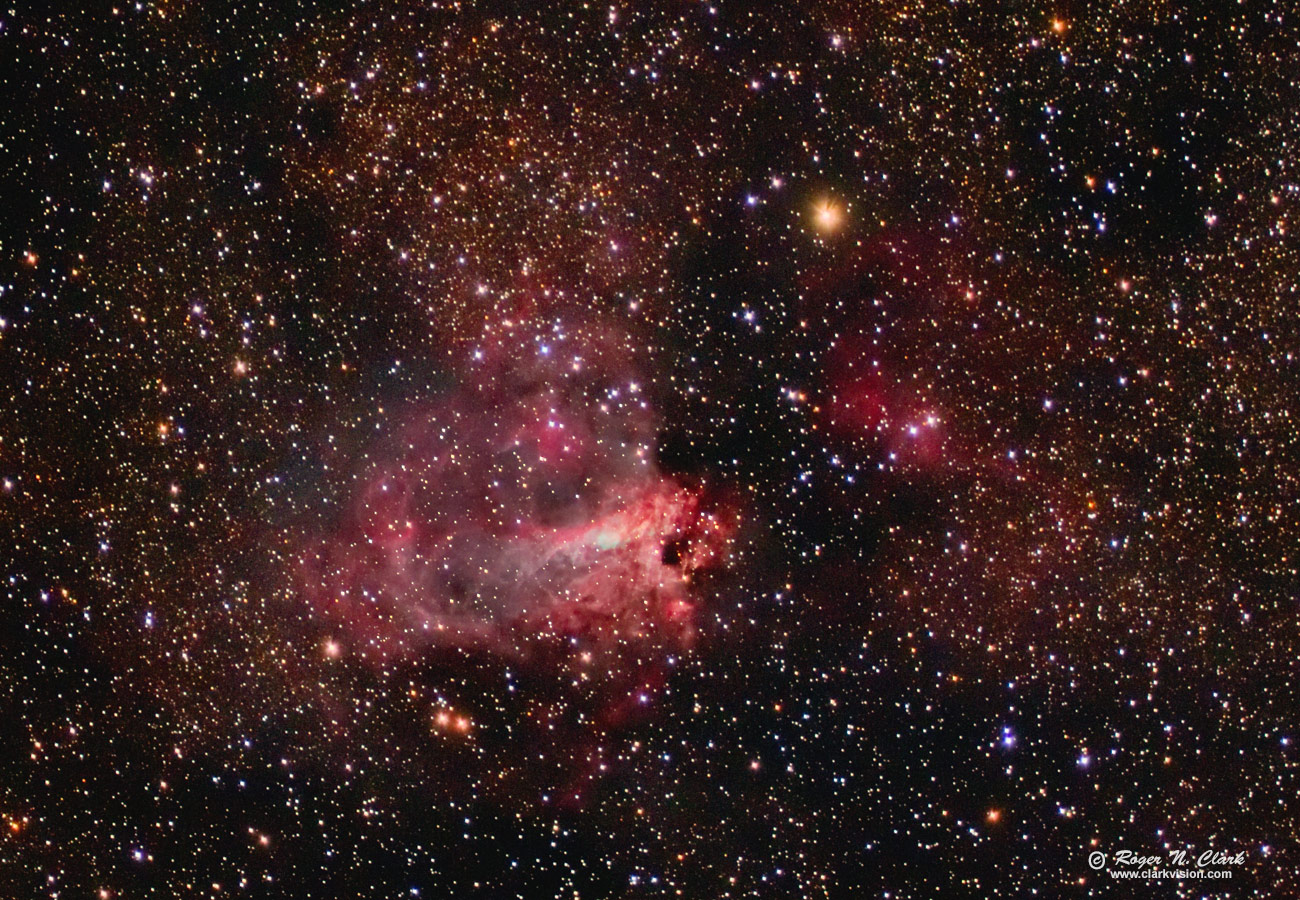
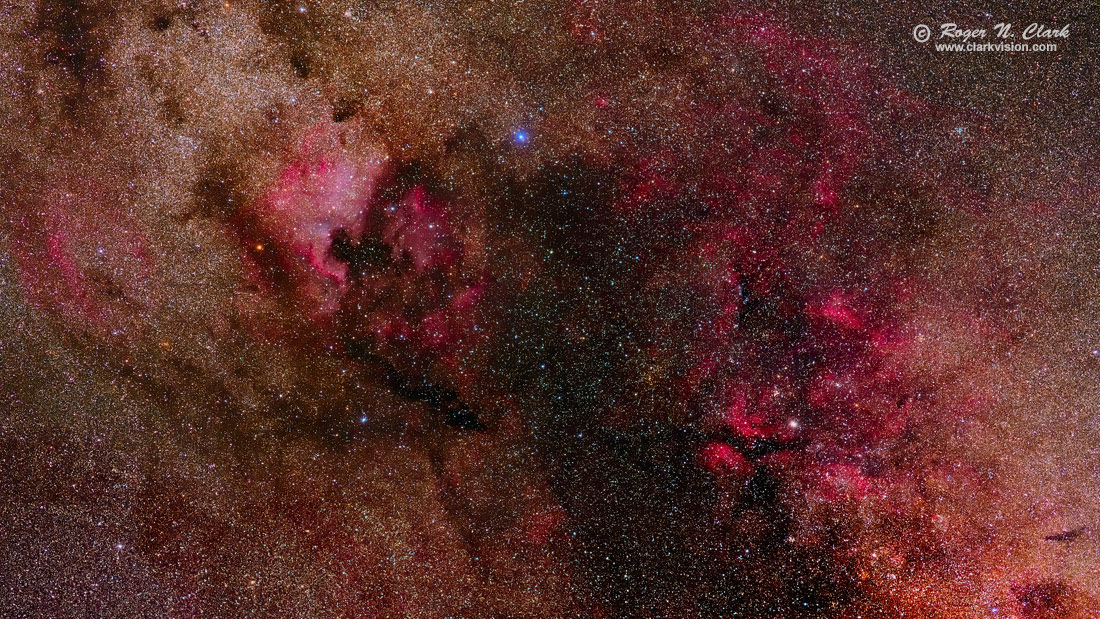
The image in Figure 1 is shown with a larger field in Figure 9. This image used the lens correction built in to rawtherapee shown in Figure 4a. The resulting flat field correction is excellent. The image in Figure 10 used the manual vignetting correction shown in Figure 4b.
Rawtherapee is a very advanced raw converter, and produces the best results I have seen from any raw converter. In this article, I have not explored all the options, which might produce and even better output. But the results from the settings I illustrated here are so good, I'll be using Rawtherapee for all my astrophoto processing.
The Night Photography Series:
| Home | Galleries | Articles | Reviews | Best Gear | Science | New | About | Contact |
http://clarkvision.com/articles/astrophotography-with-rawtherapee/
First Published September 26, 2018
Last updated May 16, 2019