ClarkVision.com
| Home | Galleries | Articles | Reviews | Best Gear | Science | New | About | Contact |
Nightscape and Astrophotography Image Processing
Basic Work Flow
by Roger N. Clark
| Home | Galleries | Articles | Reviews | Best Gear | Science | New | About | Contact |
by Roger N. Clark
Nightscape and Astrophotography post processing work flow is more complex than done with typical daytime photography. This article introduces the work flow and provides little known secrets for success.
The Night Photography Series:
Contents
Introduction
Basic Work Flow
PROCESSING FOR CONSISTENT COLOR
Raw Conversion
Image Alignment
Image Stacking
Image Stacking with DSS
Image Stacking with Pixinsight
Image Mosaicking
Sky Glow Removal and Image Stretching
Star Diameter Reduction
Image sharpening with Adaptive Richardson-Lucy Deconvolution
Downsize and Color Space for Web and Printing
Conclusions
References and Further Reading
Below I outline the general work flow for processing nightscape and deep sky astrophotography images. There are several key steps that can substantially improve the result. Other astrophotographers have often commented that they are amazed at the results I get with such short total exposure time. There are several factors for this. I want to be clear: I am not claiming this is the only way, or the best way. It is my way. I think it is very good, but hope to improve on it.
The work flow below is what I have developed over the last several years. It is different than even a year ago. Watch this article for updates as a major new breakthrough in stretching will be forthcoming and I will radically change my workflow producing even better results.
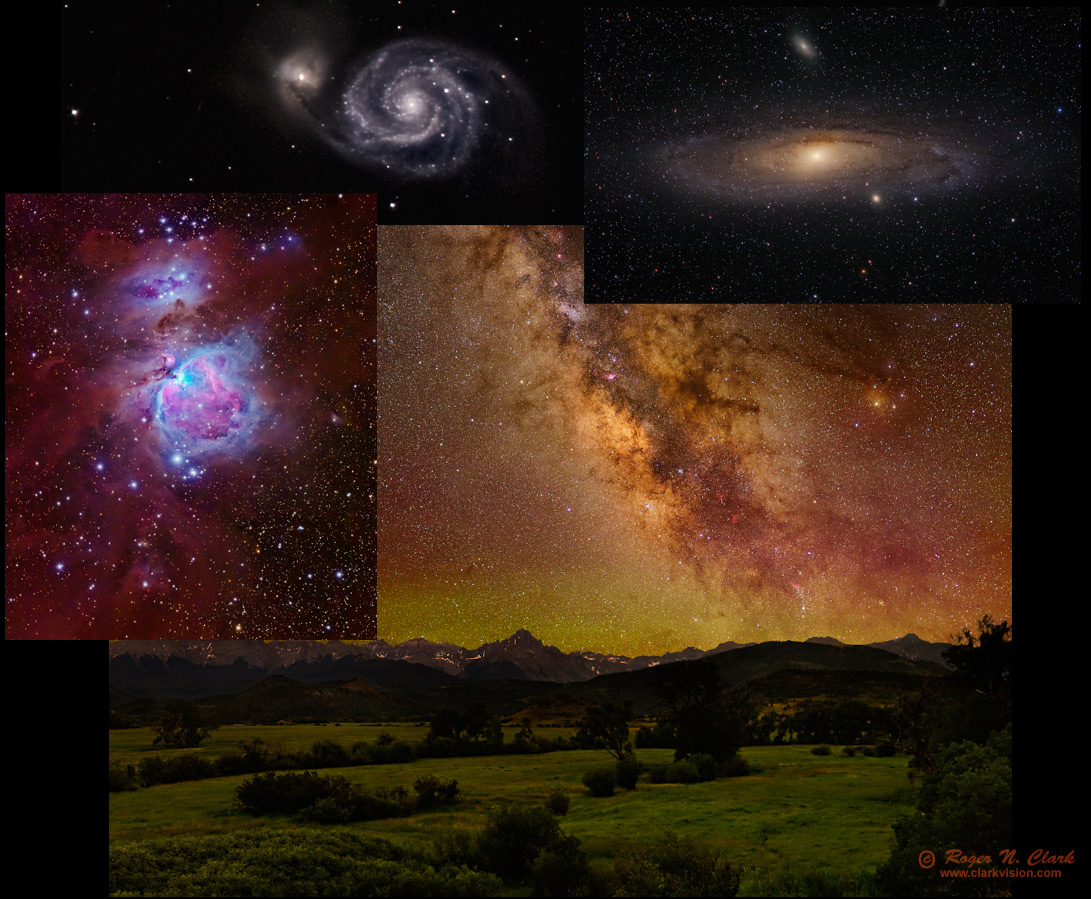
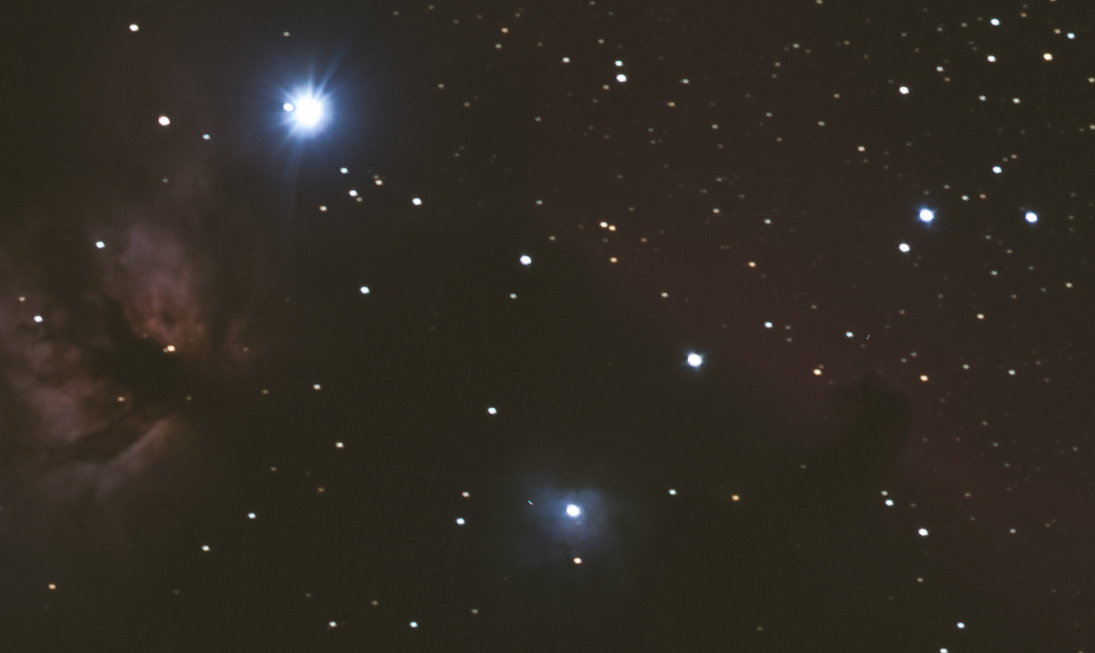
Figure 1 shows example images made with stock DSLRs and camera lenses.
Here is my current astrophotography workflow (2016)
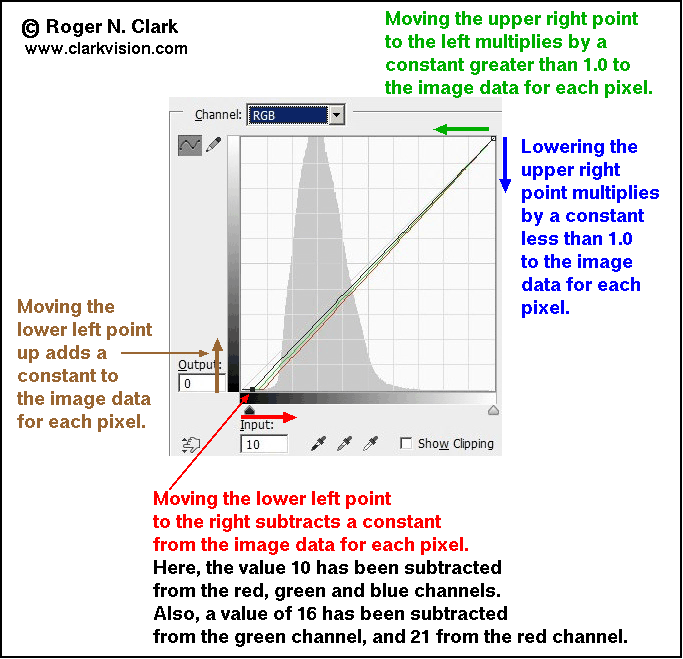
The basics of the effects of the curves tool are shown in Figure 1d. Light pollution should be subtracted, and you can do this by moving the lower left point in the curves too to the right, and moving it by different amounts in each color channel, thus subtracting different amounts of light pollution. Generally, the red channel has the most light pollution, followed by green then blue.
As I write this section in January 2017, it has become clear over the last year or so that it is common for the amateur astrophotography world to mangle colors in their astrophotos. By mangling, I mean that the color balance is not consistent with scene intensity. Just like the nightscape photographers create unreal colors in post processing by not subtracting light pollution properly, the deep-sky astrophotography world is doing something similar that mangles color by making an incorrect black point. They might not even know it because these are default settings in some astrophoto processing software!
Consistent color, regardless of color balance, natural or not, requires two important things: correct black point, and correct relative scaling of the RGB channels. This is true of narrow band images, UV, IR, or natural color imaging. For example, if you calibrate to white on a G2V (solar like) star, that establishes the correct scaling for daylight white balance, if the black point is not correct, that scaling is off as scene intensity drops. For example, if the dark end of an astrophoto, after subtraction of skyglow is declared to be RGB = 10, 10, 10 (on an 8-bit 0 - 255 scale), but the spot chosen for that black point is really red-orange interstellar dust that should have RGB = 30, 20, 10, then red gets suppressed relative to blue at the low end, and the low end of the scene turns blue. One can commonly see the bluing in many amateur astrophotos on the internet, due to improper black point. Often this shows as increasing numbers of blue stars as stars become fainter in the image. If you check the stellar photometry, most of those stars or not blue, but are most likely red. Improper black point is common in today's amateur astrophotography world due to the default histogram scaling that is done in programs like deep Sky Stacker (DSS) and pixinsight. That scaling needs to be turned off if you want consistent color balance with scene intensity. See the pixinsight. and DSS sections below for how to turn color mangling scaling off. See Astrophotography Image Processing: Messier 22 Image Stretching with the rnc-color-stretch Algorithm in a Region Filled with Interstellar Dust for an example of improper black point mangling colors.
DSLR Color Matrix Correction. There is a needed calculation with digital cameras if one wants natural color, or even some decent looking color! The Bayer filters in a digital camera are not perfect matches to the color response of the human eye. For example, the red filters may allow blue and green light through. When digital camera raw data are converted into a color image, e.g. the jpeg conversion in the camera, or the conversion in a modern raw converter, corrections are applied to compensate for the out-of-band response of the color filters. This is done by a color correction matrix and the process is described well in this Cloudy Nights Forum thread. The thread shows that before the color matrix application, the colors are muted. The typical astro software as of this writing does not apply the color matrix correction. Thus, after calibration and stretching, a saturation enhancement is typically done to recover some color. But that just amplifies existing color which includes the out-of-band response of the Bayer filters. The result is not necessarily natural color. The saturation enhancement will also amplify noise. The better method, in my opinion, is to apply the matrix correction. The raw converters that convert camera raw data to color images do this conversion, and they do it very well. Photoshop/Lightroom Adobe Camera Raw (ACR) does the correction, as does Rawtherapee and many other commercial raw converters.
I used the following GENERAL settings in Photoshop's Adobe Camera Raw (ACR) (settings in Figure 2): I used no dark frame subtraction because the cameras I use have on sensor dark current suppression, so none are needed. No flat fields were used because the raw converter removes the light fall-off using the lens profile. The 4 panels, from left to right in Figure 2 show the settings I use:

Regarding the raw settings. The large negative Black level subtracts the overall light pollution level from the linear camera data, moving the remaining light pollution into the linear region of the standard tone curve that ACR applies. This enables further light pollution removal without strange artifacts. Key to this step is to not clip the low end, as some deep space light is in the tail of the histogram, especially around the dark nebulae.
Next, synchronize all images of the night sky in the raw converter and save them image as 16-bit tiff files.
If you have multiple fields of view that are to be mosaicked, all the images of the sky must have the same raw converter settings. If a nightscape mosaic, all the land images for the land portion of the mosaic must have the same raw settings, but those settings can be different from the sky images. For example, the sky images can have a different black point in order to subtract light pollution. The land would likely need a different black point.
When you have multiple images to stack, the common case for deep sky astrophotography, alignment and stacking software can get confused, especially on tone stretched images containing an amazing number of stars. This means stacking might fail, and if the problem is not diagnosed, the results can be significantly impacted. Figure 3a shows an example impact. Poor alignment results in lower resolution, lower contrast, increased noise, and loss of color after stretching to try and recover lost image quality.
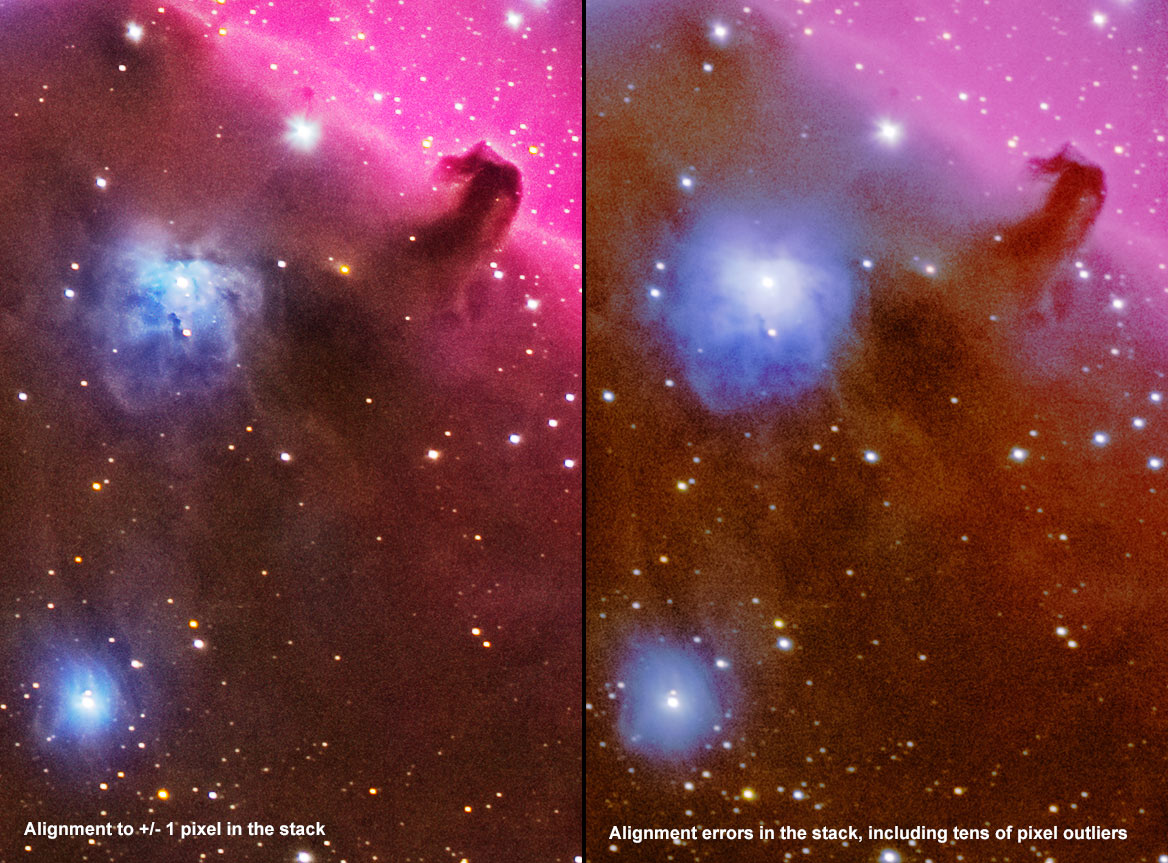
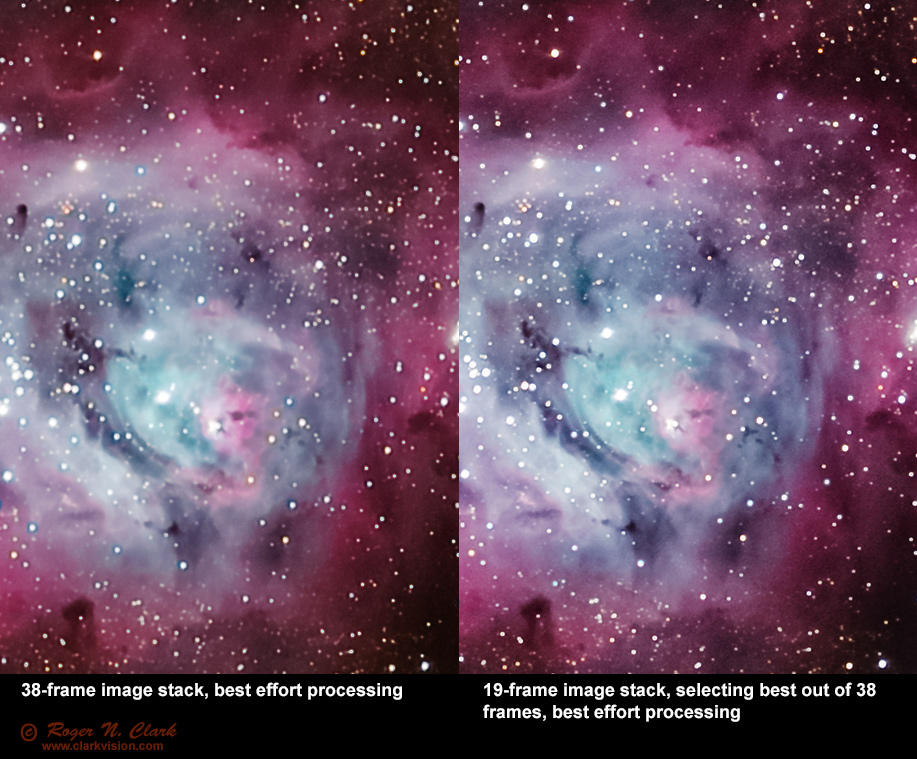
Before image alignment, examine each image you intend to use in the stack and reject any that have are blurred, e.g. shaken by wind, smeared by atmospheric turbulence, or poor tracking. All these effects can be as detrimental as alignment errors. Usually the loss in detail and contrast is worse than theoretical improvements in signal-to-noise ratio by stacking more images. See Figure 4 for a comparison.
Once you have a set of images supposedly aligned, check the alignment. To do this, you can 1) crop a small subscene, like 640 x 480 pixels and produce a movie of the aligned images. If the images stay perfectly aligned, then all is good.
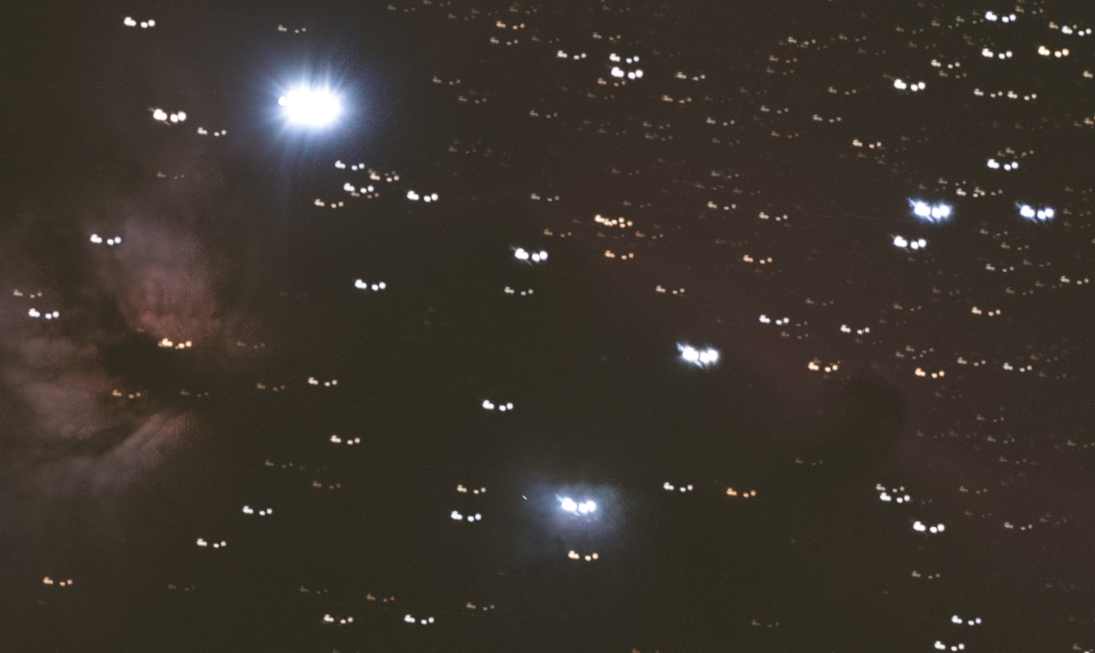
A second way to check, especially for outliers in alignment is to combine the images with maximum value (Figure 5a, 6b).
Many terms we have today in photography originated with darkroom techniques (like dodge and burn). Stacking is another such term. Stacking refers to physically stacking negatives, aligning them and then putting the stack in an enlarger to make a print. It is tedious and difficult. Stacking averages film grain. With digital photography stacking is aligning a group of images digitally and averaging them (or compute the median, but average is better). There are free tools to do that and it can even be done in photoshop.
Once you have verified that you have a set of quality images aligned well, stacking is simple: do sigma-clipped average. I usually set the clipping level to about 2. With ten or more images to be stacked, this clip level nicely rejects airplane and satellite tracks in my images. See Part 3e, Stacking Methods Compared as to why use sigma-clipped average over a median method.
You'll need software that can read the aligned images and do the stacking. I use ImagesPLus (commercial), or my sigma-clip average program from in Part 8 (free).
Some stacking software may lose the color space definition in the EXIF data for the stacked image. The first thing I do when bringing the stacked image into the photo editor is to reassign the color space.
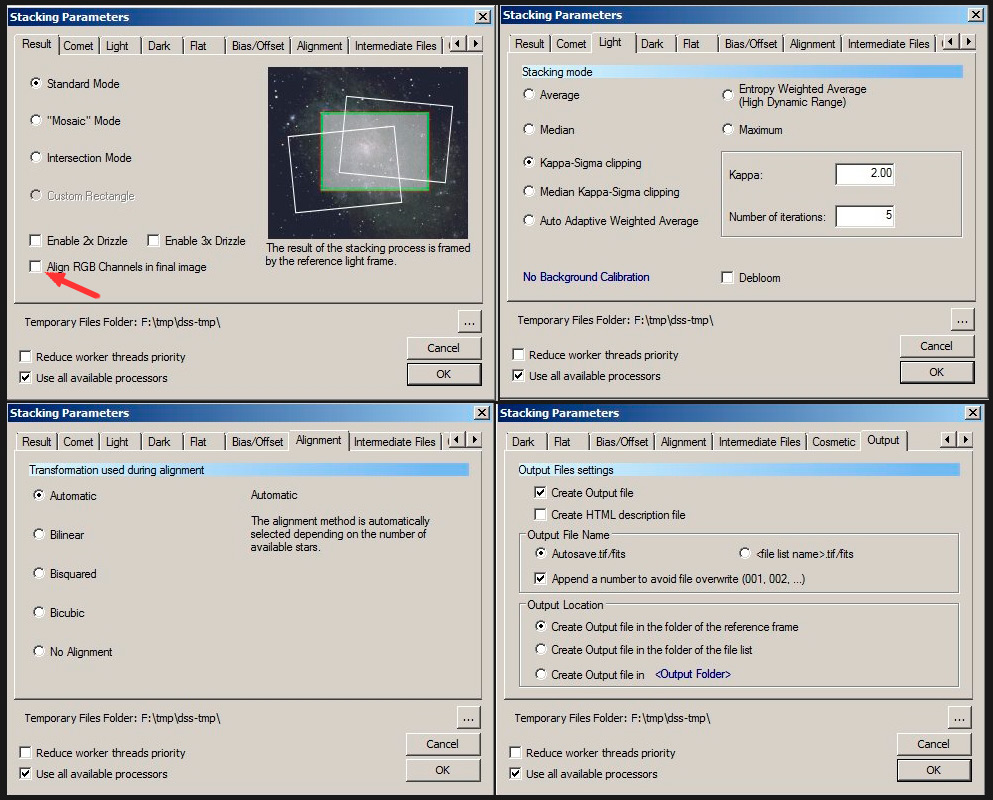
Deep Sky Stacker, DSS, is a free program that does an excellent job of aligning in most cases, and can stack with sigma-clipped average. The default settings do a histogram equalization and produce a gray image from which it is very difficult to regain color without enhancing noise. Use the settings in Figure 6a to maintain good color.
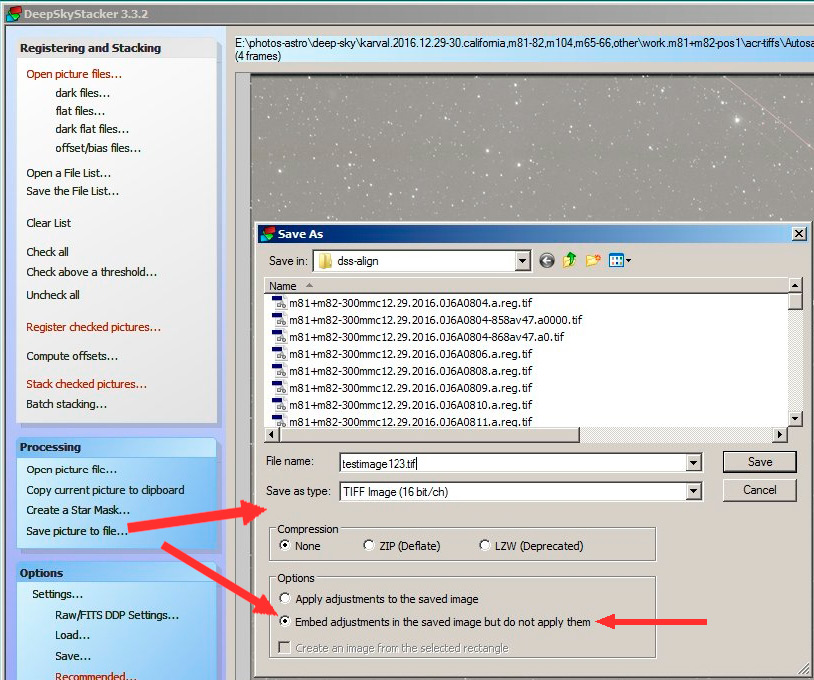
Once stacking is complete, do not use the autosave file. It is 32 bit with shifted colors: a mostly gray image. Use the "Save picture to file..." link to save the stacked image with no color shifts with settings in Figure 6b.
DSS is currently a 32-bit application. If you stack too many images, or select 2x drizzle to improve stacking precision, the program will likely run out of memory. If so, I select to save the individual aligned images, then do the final stack in a different program. Your final stacked image should look the same, with the same colors, as a single input frame, just with lower noise.
Pixinsight is another astro program that by default aligns channels, possibly mangling color. Some users have emailed me with color problems out of pixinsight stacking. I had them turn off the recommended normalization methods and their color problems went away. However, other pixinsight users have not seen any color problems with default normalization. See the table under "Recommended Normalization Methods" on this pixinsight technical page. The table shows input and output scaling on for light frames and that is what might be destroying color. If you have color changes from your input images when stacking in pixinsight, turn off rejection normalization and turn off output normalization. Basically, treat your light frames like they were bias or dark frames, with no normalization. Your final stacked image should look the same, with the same colors, as a single input frame, just with lower noise.
If you obtained multiple fields of view, whether or not you stacked a set of images at one field of view, image mosaicking should be done at this point before any stretching.
I use PTGui Pro for mosaicking. An important part of mosaicking is controlling which parts of individual image should go in or be on top in the assembled mosaic. PTGui Pro's masking tools make this easy. In a future article, I'll discuss the detail of stacking.
Now comes what is probably the hardest part of astro-post processing: subtracting sky glow (e.g. light pollution) and digging the faint signals from the night sky out of the sky glow. See Parts 3a2, and 3c for details of how to do this.
As one stretches an image to bring up the low end, the higher end gets brightened and scrunched, whether you use curves or some other adjustment. Some people select the brightest parts of the image, feather the selection, then invert the selection to create a mask before applying the curves stretch. There is no magic formula. Danger is halos will be created around the selection boundaries. You just need to practice on your own images, as well as try it with the raw data in Parts 3c and 2e.
The fundamentals of the curves tool is shown in Figure 7. More detail is in Part 3c.
New (2016) free open source stretching program to make it easier to get more out of your
astrophotos, see:
Advanced Image Stretching with the rnc-color-stretch Algorithm.
All stretching should be complete before any of the next steps are performed. Otherwise artifacts can be introduced.
One side effect to stretches of astrophotos needed to bring out faint detail is that lens flare is magnified making stars appear as small disks, both saturated and unsaturated stars. Astrophoto image processing software often includes star size reduction algorithms. I used the star size reduction tool in ImagesPlus to make stars smaller. This has an interesting side effect: because stars are smaller, nebula stand out more. This allows one to change what you want to emphasize, stars or nebulae. Another side effect of the star reduction algorithm seems to be sometimes it creates a dark halo around stars in front of bright nebulae, and that I do not like. This happens if you push the algorithm harder or apply it more than once.
I use ImagesPlus for Adaptive Richardson-Lucy deconvolution because it is an excellent implementation. I query the brightness of the sky background versus where the signal-to-noise ratio on nebula is good. In the Richardson-Lucy deconvolution window, I set the minimum to only work on the brighter parts of the image, guided by the brightness query. Then set Gaussian at 3x3 or 5x5 depending on how sharp the image is, and let it run for 6 to 10 iterations. You can always stop the process before it has completed all iterations. Watch the updated image after each iteration and cancel if the image starts to show excessive noise or artifacts. After cancelling, you can save the resulting image, or start over with a lower number of iterations. The algorithm is so effective, I use it on landscape and wildlife images too.
The the sharpening effect of the Adaptive Richardson-Lucy deconvolution shows too much after one or a couple of iterations, your Gaussian blur function is too large. Decrease the blur size and run again. You should typically have 5 or more iterations to get a good result. In high signal-to-noise areas, dozens of iterations can be beneficial. If I do multiple passes, with different size blur and different numbers of iterations, I load then images into photoshop in layers and let only the best areas for each deconvolution show. I save the layered file as a photoshop psd file, then flatten the image and write a 16-bit tif.
This should result in your final image.
Next is to downsize for web or print. I convert the color space to sRGB (web), or apply a custom profile for paper + printer, then downsize. You can downsize by binning (e.g. ImagesPlus) or cubic spline. I generally downsize by binning to the next higher resolution than my target (e.g. web) and then cubic spline downsize the binned image to the size I want. The cubic spline maintains round stars. If you only bin, the stars might come out square.
Astrophotography image processing using modern raw converters and simple image editors, primarily using the curves tool or rnc-color-stretch can extract a lot of information from images containing significant light pollution. Specialized software is still needed to align and combine the multiple exposures, and those tools need to have the results checked after each step before proceeding to the next step.
The new astro workflow described above produces better colors with less noise. Key to this process is the modern technology in digital cameras of the last few years, and developments in raw conversion software. The Bayer color filters in digital cameras are actually not very good representations of the human eye response. The filters let in a lot of other colors, so a color matrix correction is needed. Without the correction, and most astro image processing software packages, including stacking software like Deep Sky Stacker do not apply the correction, the colors out of raw conversion are quite bland. That combined with the auto-white balance typically done in traditional astro image processing work flow destroys color, then stretching destroys it more. The traditional astro solution is then to do enhancements to try and bring the color back, which also enhances noise. The modern work flow avoids those problems, producing a lower noise richer and more accurate color, and simpler methodology.
References and Further Reading
Clarkvision.com Astrophoto Gallery.
Clarkvision.com Nightscapes Gallery.
The Night Photography Series:
| Home | Galleries | Articles | Reviews | Best Gear | Science | New | About | Contact |
http://clarkvision.com/articles/astrophotography.image.processing.basics/
First Published October 7, 2016
Last updated March 4, 2022