ClarkVision.com
| Home | Galleries | Articles | Reviews | Best Gear | Science | New | About | Contact |
Night Sky Photography In The Field Setup
Best Settings and Tips
by Roger N. Clark
| Home | Galleries | Articles | Reviews | Best Gear | Science | New | About | Contact |
by Roger N. Clark
Night sky photography requires working in the dark or near darkness. This article describes basic practices for successful imaging of the night sky.
The Night Photography Series:
Contents
Introduction
Camera Setup
Polar Alignment for Tracking Devices
Focusing
Minimize Sensor Heat
Update the Bad Pixel List
How Much Exposure
Successful imaging of the night sky requires some simple planning and operation in the field. In part 1a I discussed the general concepts. In part 1b planning where and when to image, and in part 1c what kinds of lenses and cameras can work well. So I will assume you have your chosen gear and are going to your site or are on site ready to set up. The following is what you should have with you.
As soon as you are on site and set up, preferable well before the time you want to image, let the camera reach ambient temperature on the tripod you will be using. This assumes the sun is not shining on the camera. If the sun is up, do not put the camera where the sun shines on the camera to heat it above ambient temperature. If you are in a hot environment and your car/house is air conditioned, keep the camera in a plastic bag until the camera has warmed up to ambient temperature to prevent dew from condensing on the camera.
Set up the camera as follows:
If you are using a tracking device, like a barn door mount (e.g. as described in Part 5), iOptron Skytracker or other device, polar align as soon as it is dark enough that you can see Polaris (northern hemisphere) or other stars near the celestial pole.
More details on polar alignment are given below.
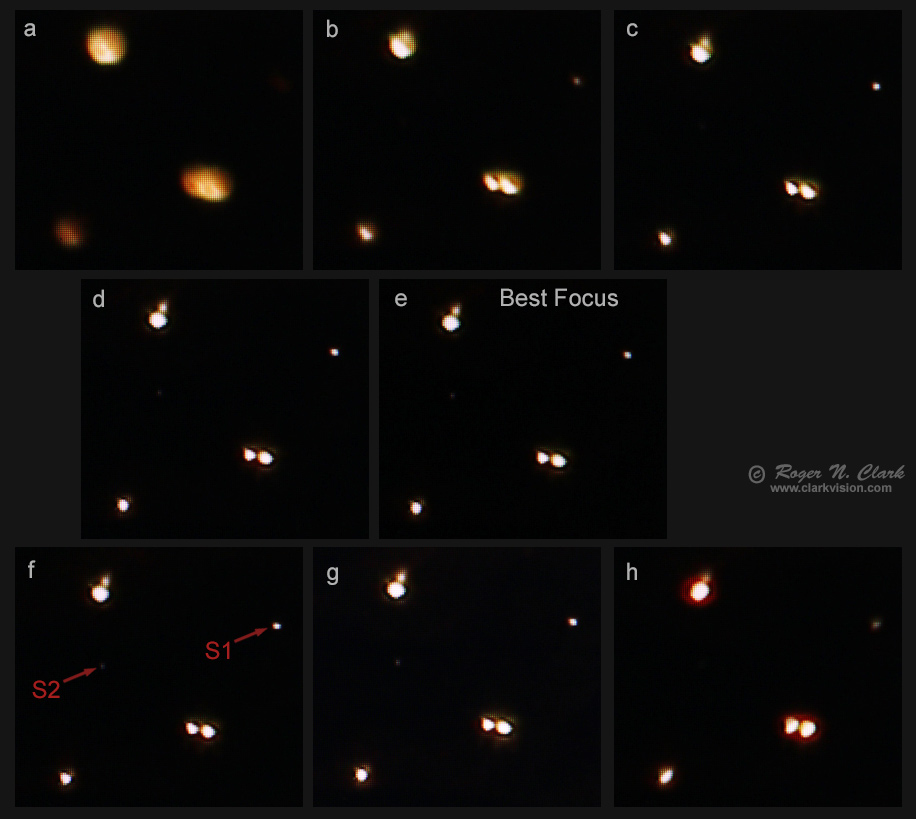
The main issue in making nightscape or astrophoto images is focusing in such low light conditions. I have found that focusing wide angle lenses with autofocus misses accurate focus most of the time using stars. Autofocusing with telephoto lenses usually works in my experience, but the actual focus achieved may not be optimal.
My method of focusing is to find a set of stars from bright to dim that are easily seen on the camera LCD in live view. Place the stars about half way from center to edge. Zoom in with live view to the maximum magnification you can get. Focus so that there are no color fringing around the bright star and the faint stars show well. Boost your ISO if your aperture is small in diameter. I sometimes use ISO 6400 to 12800. Don't forget it change the ISO back to a lower value, like ISO 1600.
To focus:
After focusing is complete, minimize the use of live view. Live view heats the sensor, adding thermal noise to long exposure low light images. So use live view to focus, then leave it off as much as possible.
The electronics in the camera heats the camera. The largest heat source is live view because it is a continuous readout of the sensor, processing electronics, and the LCD display, all of which generate heat. During a long exposure, most modern cameras turn off all electronics not needed during the exposure. So long exposures do not heat the sensor. Readout and writing the data to the memory card heats the camera and thus the sensor, increasing thermal noise.
Hotter sensors have higher dark current. Even cameras with on-sensor dark current suppression do not suppress the noise from dark current--only the signal level. The typical digital camera with a sensor at room temperature has 1 to 2 electrons/second dark current. Thus in a 10 second exposure, dark current is 10 to 20 electrons and noise is square root 10 to 20 or 3.2 to 4.5 electrons of noise. With typical read noise under 3 electrons, this means dark current would about double the noise floor. In longer exposures, thermal noise usually dominates over sensor read noise and ultimately is one of the main limitations to being ably to record fainter light. Colder nights certainly help and for every 5 to 6 degrees C drop in temperature, dark current drops in half so noise drops by 1/root 2 (0.707). A few newer cameras, like the 7D Mark 2 have more than 10x lower dark current.
The typical DSLR sensor runs about 10 degrees C hotter than ambient temperature if live view is not used. If live view is used much, the internal camera temperature will rise more, and it takes 30 minutes or more for the internal temperature to drop to ambient if the camera is off. The larger pro cameras build up heat more and take longer to dissipate it.
So minimize the use of live view. Use 2-second delay mirror lock up to avoid shake. Use the optical viewfinder for framing. Keep lights to a minimum to maintain your night vision so you can see dim objects in the viewfinder. Of course use lights as needed for safety.
The next step is an undocumented feature, not in camera manuals to my knowledge. A big issue with digital sensors, from consumer grade to the top scientific chips are stuck, dead, and hot pixels. A stuck pixel has the same value all the time, regardless of signal or exposure (usually saturated). A dead pixel always gives zero output. A hot pixel is a pixel with high dark current, and that is temperature sensitive. The traditional way to deal with hot/dead/stuck pixels is to do dark frame subtraction. This can be done in the camera (long exposure dark frame subtraction noted above), but that doubles the time to make an image, which means it is too long in many (most) cases because exposure times are already long and time is often critical as the stars are moving. The second way is to measure several dark frames (same exposure time as your night images, but with the lens cap on. Then average the dark frames into what is called a master dark, and subtract it from each night image. This procedure is cumbersome, can leave dark spots in your image, and it is very difficult to do in programs like photoshop; one needs special astronomical image processing software. There is a simpler way with modern cameras.
Dealing with hot/dead/stuck pixels and uneven backgrounds from dark current became much simpler for CMOS sensor cameras produced around circa 2008 and later. On these more modern cameras, besides improving the microlenses and RGB filters on the cameras, improving sensitivity, manufacturers implemented on-sensor dark current suppression (See Part 7B). Cameras that have this feature have no need for measuring dark frames when the technology is implemented well, and no need for turning on long exposure dark frame subtraction. For examples, see long exposure dark frames measured on various cameras here. Note how smooth the dark frame images look on the Canon 1D Mark IV, 7D, 6D, and 1DX, and then the very non-uniform image for the Canon 1D Mark II. You can test your camera by doing about a 5-minute dark frame, then use the curves tool to bring up the low end (you need a 16-bit/channel image file to do this) to examine how uniform it is.
So with modern cameras, post processing becomes simpler without the need for dark frame subtraction. The second problem besides dark current, is what was discussed earlier: hot/dead/stuck pixels. A modern raw converter can read the bad pixel map that gets stored in the raw file and ignore those pixels during raw conversion, effectively eliminated them from the converted raw data (Figure 3, right side). The in-camera generated jpegs do not use the bad pixel map, so in-camera jpegs will show all the bad pixels (Figure 3 left side). This is true for the Canon cameras I have tested, not sure about other models.
In the field at night, conditions are different than the originally developed bad pixel list. So you need to update the bad pixel list at the scene after the camera has equilibrated to the ambient temperature. On Canon cameras select the following menu function
Night photography is light starved, so more exposure is usually good. Collection more light means higher signal-to-noise ratio, which means lower apparent noise in your images. Often one is limited by time, for example, a fixed camera and you don't want the stars to trail, or a fast moving aurora. Assuming that is not your limit. and you want to make really beautiful night sky images, try to get exposure as follows. Lens aperture diameter is key, as discussed in Parts 1a and 1b.
The Simple Guide. Use fast f-ratio lenses in the 20 mm and longer focal length range (ideally quality f/1.4 lenses) and try for at least 30 seconds of exposure wide open. If on a fixed tripod, use the "200 rule" from Part 1a, to find your maximum exposure time. The 200 rule is 200 divided by focal length in mm.
For example, on a fixed tripod and a 24 mm f/1.4 lens, about 8 to 10 seconds is all that one can do before trailing becomes apparent when imaging near the celestial equator 200/24 = 8.3 seconds. So to get to 30 seconds total exposure, I would do three to four 10-second exposures in quick succession and average them in post processing.
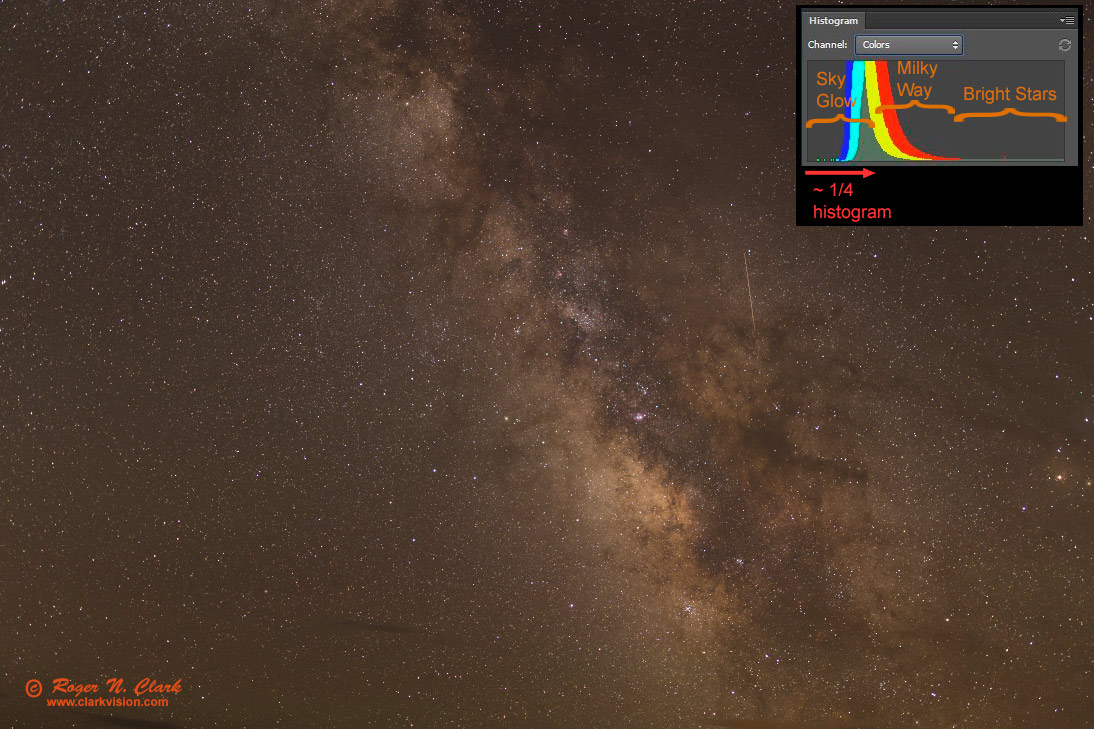
But exposure may be limited by sky glow (light pollution plus natural airglow). Keep exposure such that the histogram peak, which is dominated by sky glow is less than 1/2 of the way from left to right on the camera LCD. A level of 1/4 to 1/3 histogram peak left to right is ideal (Figure 4). More details below.
If you are using shorter focal length lenses, like 15 mm f/2.8, then you need even longer total exposure. For example, to reach the same faintness with 15 mm f/2.8 as 30 seconds with a 35 mm lens at f/1.4, you would need about 9 minutes total exposure. With a 200 rule, that would mean 200/15 = 13, or about 15 second exposures, needing 9*60/15 = 36 exposures.
However, doing many sub-frames over several minutes with a fixed tripod encounters another problem. The wide angle lens is projecting the spherical sky onto the flat sensor. And just like a Mercator projection of a map of the world has distortion, the projection of the spherical sky onto the flat sensor has projection distortion (even for a perfect lens). That means as the Earth rotates and the stars change position, the projection distortion changes and the stars will not line up when you try and align the frames before averaging them. In practice, do not try and combine frames spanning more than about a minute to minimize this problem. I know of no software that fixes this problem when aligning and averaging frames together.
Of course, if you are using a tracking device to track the stars, their position does not change and projection distortion is not a problem for aligning and averaging multiple exposures.
Night Photography and ETTR: DON'T Expose To The Right! Ignore anyone who talks about ETTR: Expose To The Right in night photography telling you to push that histogram further right than the 1/3 level. Stars with any decent exposure are already getting clipped (Figure 4), so you are already over exposing according to ETTR, and if you expose to make the sky histogram peak to the right, then too many stars will be saturated, losing color. Exposure in night photography is about 1) collecting enough light, and 2) digitizing that signal to distinguish tiny differences to separate faint signals from sky glow. That is achieved with ISO 1600 (digitizes fine details) and histogram at the ~1/4 to ~1/3 level which pushes the signal above downstream electronics noise.
More Details Regarding Exposure. Exposure, in terms of actual light gathered from the subject, e.g. stars and nebulae in the night sky, or even in daytime photography of a bird in a tree or any other subject is actually controlled by the following:
Sensor sensitivity is the quantum efficiency and the transmission of the filters and lenses over the sensor. To first order, all digital cameras are pretty close in this regard. The improvements in actual sensitivity in digital cameras have only about doubled from early 2000's to 2016. Thus, we will ignore #3 as it is a minor factor. The first two you can control in the field (choice of lens and its f-stop, and exposure time).
Lens aperture diameter = lens focal length divided by the f-ratio you are using.
For example, a 35 mm f/1.4 lens used at f/1.4 has an aperture diameter of 35/1.4 = 25.0 mm. If used at f/2, the aperture diameter would be 35 / 2 = 17.5 mm.
The lens aperture area = (pi / 4) * lens diameter2, pi = 3.14159265. I have pushed a standard of using lens diameters in centimeters so astrophotographers have reasonable units for small lenses to large telescopes, and exposure time in minutes. See 4b1) Astrophotography and Exposure for more details.
Thus, exposure in terms of light from the subject is lens aperture area in square cm times exposure time in minutes.
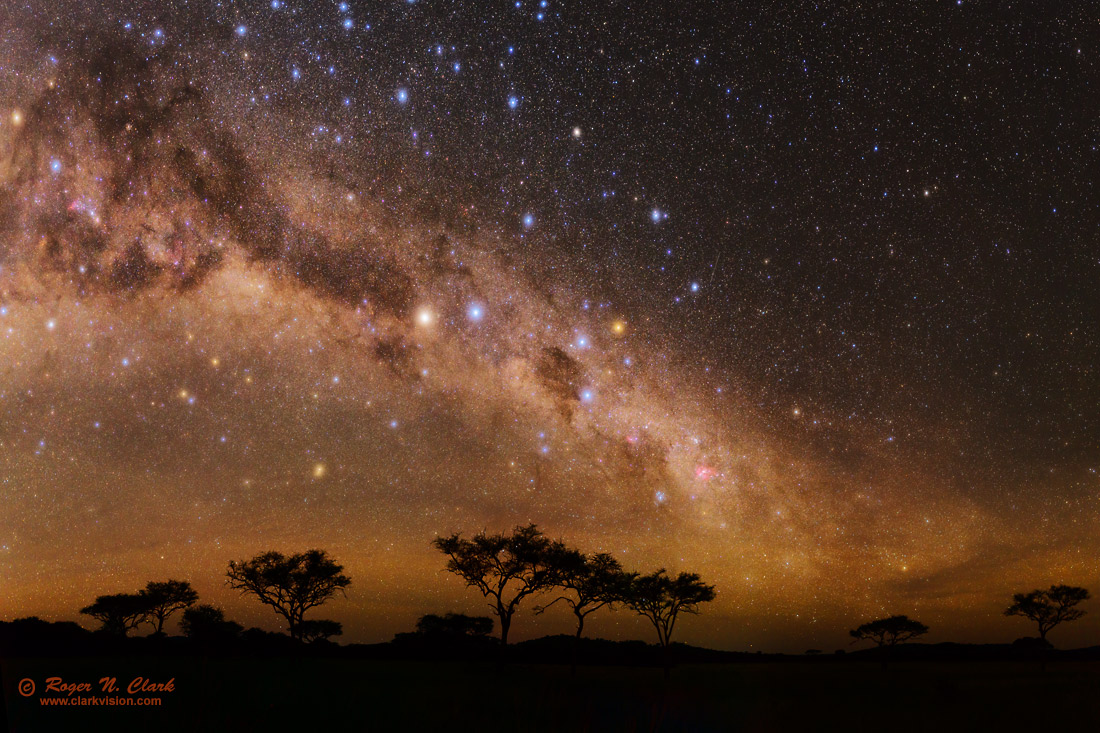
The image in Figure 1 used 30 second exposures with a 35 mm f/1.4 lens. Therefore, the lens has an aperture area times exposure time of (pi/4) * 2.5cm2 * 0.5 minute = 2.45 cm2-minutes.
Table 1 shows the advantage of large aperture lenses for night photography. Of course one can still make nice night sky images with less exposure, but as exposure falls below 1 cm2-minute, the loss of stars and detail reduces image quality and photographers push the image further in post processing and noise becomes more objectionable.
                Table 1  Exposure with various lenses

Lens   f-ratio   aperture   exposure    Exposure     Number of exposures        Total
focal            diameter    time     (cm2-minutes)   needed to               Exposure time
length             mm      (seconds)                 reach 2 cm2-minutes
(mm)                                                 at 30 seconds/frame        (minutes)
===========================================================================================
 35     1.4       25.0        30          2.45        1                         0.5
 24     1.4       17.1        30          1.15        2                         1
 20     2.8        7.1        30          0.20        10                        5
 15     2.8        5.36       30          0.11        18                        9

A camera phone:
  4.15  2.2        1.89       30          0.014      143                       71.5
===========================================================================================
Exposure times to get a good signal on a digital camera sensor, where noise from sensor electronics is not contributing much to the signal, requires camera exposure so that the sky background (this is the peak in the histogram on the back of your camera) is at about the 1/4 to 1/3 from left to right on the camera LCD (Figure 4). See Part 4b: Exposure for more information. Table 2 below shows approximate maximum exposure times for one frame.
                                Table 2
                     Approximate Camera Exposure Times
                to Reach the ~30% Histogram Level on the Sky
--------------------------------------------------------------------------------
                             Approximate Exposure Time in Seconds
                ----------------------------------------------------------------
                  Dark Site      Blue Zone      Green Zone       Red Zone
                ----------------------------------------------------------------
F-ratio   ISO      NH    OH       NH    OH       NH     OH       NH    OH
--------------------------------------------------------------------------------
1.4      1600      30    40       24    32       20     27        2     2.5
2        1600      60    80       50    60       40     54        4     5
2.8      1600     120   160      100   120       80    110        8    10
4        1600     240   320      200   240      160    210       16    20
5.6      1600     480   640      400   480      320    430       32    40
8        1600     960  1280      800   960      640    860       64    80
--------------------------------------------------------------------------------
Exposure times to make read noise an insignificant contributor to final image noise.

NH  = Near Horizon.  Use these values as a rough guide for nightscapes
OH  = Near Overhead
So with the single frame exposure time from Table 2 and the total exposure times indicated in able 1, last column, divide the single frame times by the total time to see how many frames you need. Then average those frames together in post processing. For example, a simple single 30 second exposure with a 35 mm f/1.4 lens at a dark site turns more difficult in a city center (red zone on the light pollution maps): 2 second exposures needs 15 exposures in a city with 35 mm f/1.4. If you had a 20 mm f/2.8 lens, 5 minutes total exposure (300 seconds) at 10 seconds each, or 30 frames required to start to get into the ballpark of the same exposure. In practice you would need several times more exposure to overcome the noise from the bright light pollution. But this gives you an idea of what is required to get really nice images. Experiment with your own equipment and decide what is acceptable to you.
For exposure of deep-sky astrophotograpgy of galaxies and nebulae, see 4b1) Astrophotography and Exposure.
It really isn't too hard to get polar alignment for using wide angle lenses. The maximum tracking error in 12 hours is twice the alignment error.
For example, assume you point the center of the polar scope directly at Polaris, so you are close to 1 degree error in alignment. 1 degree = 3600 arc-seconds, so the error in 12 hours could be 7200 arc-seconds.
Now say you are using a 50 mm focal length lens on a camera with 5-micron (0.005 mm) pixels. pixel size =
206265 * 0.005 / 50 = 20.6 arc-seconds per pixel. (the 206265 value is the number of arc-seconds in one radian).
We want drift over one exposure to be no more than half a pixel, so 10 arc-seconds.
With 7200 arc-sec drift max in 12 hours, that is 7200/12 = 600 arc-seconds /hour = 10 arc-seconds per minute.
So you could do a 1 minute exposure with a 50 mm lens and 2 minutes with a 24 mm lens and still have sharp stars.
For polar alignment with wide angle lenses, just get Polaris in the inner circle anywhere (e.g. in the ioptron polar scope) and you should be fine. With f/2.8 and faster lenses, 1 to 2 minutes is all that is needed before the sky gets too bright.
As focal lengths and exposure times lengthen, polar alignment will need to be more rigorous.
For example, at 200 mm focal lengths, scale is about 4 to 5 arc-seconds per pixel. Thus we want drift to be no more than 2 to 2.5 arc-seconds. If your polar alignment were accurate to 10 arc-minutes, the 12-hour error could be 20 arc-minutes, or 20* 60 = 1200 arc-seconds. We could then go 12 hours (720 minutes) * 2 / 1200 = 1.2 minutes. Halving the polar alignment error to 5 arc-minutes would increase the time to 2.4 minutes.
But when you get to the few arc-second range, usually periodic error in the gears of the tracking mount can be limiting. For example, the Astrotrac TT320X-AG is rated with a tracking error of around 5 arc-seconds peak-to-peak or better over a 5 minute period. The Astrotrac is a long tangent arm design which helps lower periodic error. Typical periodic errors in commercial mounts are 10 to 20 arc-seconds, though many have what is called periodic error correction--by training the system while guiding on a star the periodic error can be measured and used to to reduce the error by several times. The website, An astrophotography mount performance overview shows typical examples. The bottom line is that to consistently get to the couple of arc-second tracking accuracy over many minute exposures, an autoguider is usually used. Keeping exposures to a minute or two mitigates this problem, then stack many exposures to build total exposure time.
In the field setup for successful night photography is simple, but requires some detail.
References and Further Reading
Clarkvision.com Nightscapes Gallery.
The Night Photography Series:
| Home | Galleries | Articles | Reviews | Best Gear | Science | New | About | Contact |
http://clarkvision.com/articles/night-photography-in-the-field-setup
First Published September 29, 2016
Last updated March 10, 2019