
Beginning Astrophotography:
Star Trails to Nightscape Photography
by Roger N. Clark
Astrophotography is the photography of the night sky, or detailed images of the Sun.
This article is to get you started in night sky photography
using simple methods, lenses and cameras.
Start here if you are new to this type of astrophotography.
The Night Photography Series:
Contents
Introduction
Different Types of Astrophotography
Basic Settings and Choices
- ISO.
- White Balance.
- Light Collection is Key.
- Focal Length.
- F-ratio.
- Exposure Time.
Focus
White Balance
Star Trails
Exposure Times to Keep Star Images Round (The 200 Rule NOT the 500 Rule)
Light Collection
Star Fields from a Fixed Tripod
Stacking, Tracking and Mosaics
Exposures at Night on Land versus Sky
Safety
Discussion and Conclusions
References and Further Reading
All images, text and data on this site are copyrighted.
They may not be used except by written permission from Roger N. Clark.
All rights reserved.
If you find the information on this site useful,
please support Clarkvision and make a donation (link below).
Introduction
Using any camera, film or digital, you can make simple exposures of the night sky to
produce pretty images. It is really very simple, but a lot of online guides
have misinformation and misconceptions. In this article, I'll try and clarify
the misconceptions and get you started to help you become more advanced.
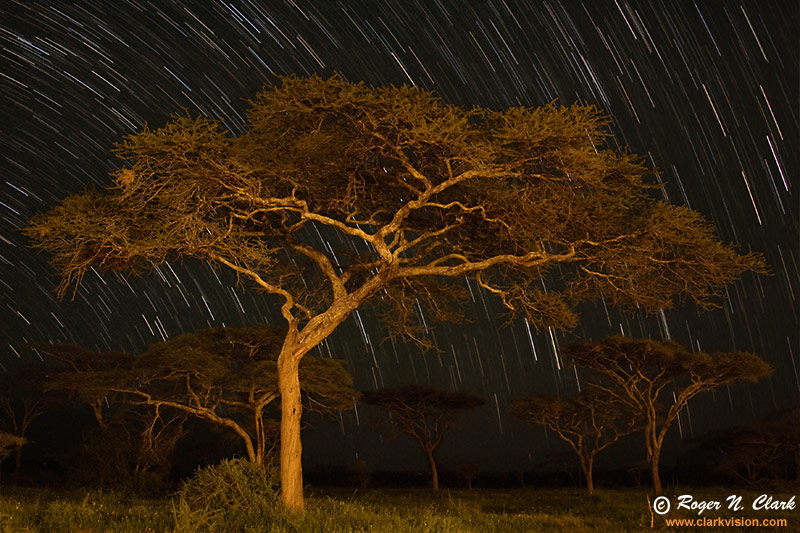
Figure 1. Star trails and beautiful acacia trees, Tanzania, Africa,
on the edge of the Serengeti. The trees were illuminated by low-wattage
incandescent lights from nearby cabins. The north celestial pole is off
the left frame edge, in this view looking northeast. A stock 8-megapixel
camera 1.3x crop digital camera from 2007 was used, with sensitivity well below
more modern entry levels DSLRs and Mirrorless cameras of today. On the camera was a
consumer zoom lens, a Canon 28-135 mm IS lens at 28 mm, f/3.5.
ISO 800. Fourteen 1-minute exposures were added
together to show the star trails over 1/4 hour.
Different Types of Astrophotography
There are many different kinds of astrophotography. Here is a partial
list in order of simple to advanced. This beginner's article will
cover star trails and nightscapes. Constellations make up the star
fields in a nightscape. The moon is covered by examples in my
Moon Gallery, the sun and deep sky photography are covered in detail
in this series.
Photographing the sun requires special filters. See
How to Photograph the Sun. Sections 3 and 4 cover deep sky
astrophotography.
Photographing planets will be a future article.
- Star Trails. Equipment needed: Camera and tripod or a way
to keep the camera steady.
Lenses: any lens can work. Normal to wide angle
lenses are commonly used.
Start with star
trails and make images like that in Figure 1.
- Constellations. Equipment needed: Camera and tripod or a
way to keep the camera steady.
Lenses: any lens can work. Normal to wide angle
lenses are commonly used. To record fainter stars,
larger aperture lenses are desirable. You can record
fainter details with a simple tracker and longer
exposure times.
- The Moon. There are many possible focal lengths and settings
that can work.
See
My Moon Gallery for examples with settings used,
including during eclipses. When the Moon is not in
eclipse. it is illuminated by the sun, so exposures are
similar to terrestrial daytime landscape photography.
A first order guide is the exposure time is 1/ISO at
f/11, so 1/100 second at f/11, or 1/200 second at f/8.
When the Moon is a thin crescent, a longer exposure
is needed.
- Nightscapes/Landscape Astro. Equipment needed: Camera
and tripod. Lenses:
any focal length can work but easier to start with
wide angle. A faster f-ratio (low f-number) for a
chosen focal length generally works better.
- The Sun. There are many possible focal lengths and settings
that can work
but if the sun is not very near the horizon,
strong filtering is needed to avoid dangerous
solar intensity levels that can damage your
eyes and equipment. See:
How to Photograph the Sun: Sunrise, Sunset,
Eclipses.
- Deep Sky Large nebulae. Equipment needed: Camera and simple
tracker (35 to 135 mm).
Exposure times can run many minutes to hours.
- Deep Sky Star clusters, nebulae, large galaxies. Equipment
needed: Camera and good tracking
mount. Lenses 200 - 400 mm. Larger aperture (fast
f-ratios) high quality lenses are desirable. Exposure
times can run many minutes to hours.
- Deep Sky Small galaxies and nebulae. Equipment needed:
Camera and good tracking
mount. Lenses 400 - 1000+ mm, high quality optics.
Exposure times can run many minutes to hours.
- Planets. Equipment needed: planets are small, so a telescope
with good optics and focal lengths in the
2000 - 4000 mm range are needed. While any camera can
work, people often use low cost web cameras to record a
short video clip up to a few minutes, then use software
that analyzes each frame of the video looking for moments
of clear atmospheric conditions, then assembles the image
from multiple frames. This is also done for close-ups
of the Sun and Moon.
Basic Settings and Choices
Night sky photography of constellations, stars, or the Milky Way, is a
low light situation that requires specific methods for best results.
Film versus digital. Digital cameras are typically 20 to 50 times
more sensitive than film cameras, even high speed film. Film works great
for star trails, but is more challenging to record faint details in the
night sky. The discussion below is mainly for digital cameras but film will
be included in the star trails section.
- ISO. Contrary to popular internet belief, increasing ISO
does not increase noise; it actually decreases noise.
ISO is not sensitivity--the amount of light the sensor
collects does not change with ISO.
For more detail, see
What is ISO on a digital camera?
There are two considerations in setting ISO for detecting
faint things and maintaining reasonable dynamic range and
a different one for star trails.
Faint things: 1) ISO is best set where banding problems
with camera electronics are minimized. 2) ISO is set to digitize
tiny signals. In a typical APS-C or full-frame camera,
ISO 800 to 1600 works well and fits the requirements.
If your lens is slow, like f/4, ISO 3200 may be used, but
going higher just reduces dynamic range clipping more stars
losing star color. Brightness can be adjusted in post processing
with no loss of quality. More detail on ISO are given in
Part 1a1) Nightscape Photography with Digital Cameras.
- White Balance. If you want natural color, keep white balance at daylight,
and do not change it in post processing. This keeps solar type stars
white to yellow-white, like our Sun, and keeps other stars the
colors we can see with our eyes (unaided eyes, through binoculars
and through telescopes). We can also see colors of the Milky Way
and through telescopes, color in some nebulae, and daylight white balance
keeps the colors natural. See section 2 for colors of the night sky,
Part 6b) Color Vision at Night for what we can see.
If you adjust white balance to something other than daylight,
as is common on the internet teaching night sky photography,
the colors will be fake. For more information on destructive
color processing, see
Verifying Natural Color in Night Sky Images
and Understanding Good Versus Bad Post Processing
- Light Collection is Key. Common on the internet discussions
about night sky photography is the idea that one
wants long exposure times. This is incomplete concept.
Light collection from an object in the scene, for example
a star, a Milky Way cloud, a galaxy, a nebula, a mountain,
or a bird in a distant tree, is lens aperture area times
exposure time, not simply exposure time.
- Focal Length. Focal length determines field of view with
a given sensor size. Just like in daytime photography,
choose the focal length to frame your intended subject.
A shorter focal length is not always the best choice,
and longer focal lengths can isolate interesting
aspects of a larger subject. For example, if you
only have a 50 mm lens, by all means use it. In my
opinion, one can make more interesting images with a
longer focal length lens than with an ultra wide angle
lens. You can get some ideas in
Part 4a) Astrophotography and Focal Length: What Can You
Image with Various Lenses?
- F-ratio. For a given focal length, use the widest aperture you can to collect the most light.
Star images are the most difficult test of a lens, and imaging wide open
shows the aberrations more. If you stop down to get better stars, the camera
collects less light which means more apparent noise. So you will need to
decide which settings are best for you. You can increase exposure time
compensate. If you have the funds for a new lens, get one of the new
high quality fast lenses. See:
Part 1d) Recommended Digital Cameras and Lenses for Nightscape and Astro Photography.
The larger the lens aperture diameter, the more light the camera will collect
from an object in the scene. For example, a 35 mm f/2.8 lens will
record fainter stars and nebulae than will a 15 mm f/2.8 lens with the same exposure time
just that the 35 mm lens will have a smaller field of view.
This is discussed in detail in
Part 1c) Characteristics of Best Digital Cameras and Lenses
for Nightscape, Astro, and Low Light Photography.
- Exposure Time. The Earth rotates at a rate of (approximately)
360 degrees/24 hours = 15 degrees per hour.
(Technically one Sidereal day is 23 hours 56 minutes
4.1 seconds, for a rotation rate of 15.04 degrees per
hour.) In order to keep stars round, the Earth's
rotation limits the length of exposures if you are
using the camera on a fixed tripod. The solution to get
longer exposure times to collect more light is to 1) take
multiple short exposures, align the frames and average the
images together, or 2) get a tracking device to compensate
for the Earth's rotation. More on this below.
You will need:
- A camera, film or digital. The types of lenses you have will determine what kind of
images you can make.
- A way to hold the camera pointed in one direction for many seconds and longer.
This could be a tripod or simply put the camera on the ground propped up by a rock.
Obviously, pointing will be easier with a tripod. More advanced would be to put
the camera on a tracker to compensate for the Earth's rotation.
- Flashlights. Many photographers use a red flashlight that is too bright.
You need a dim flashlight
for working details around the camera and not impacting your night vision,
and a brighter flashlight for walking around safely. I use an LED flashlight
covered in brown paper or plastic--that reduces blue light so night vision
is less impacted. Red flashlights warp color perception.
- Spare batteries fully charged. On some cameras, I have seen banding issues
when battery voltage drops. I now change batteries when battery capacity
drops below about half.
Given the above, here are simple settings to start making some night sky images.
We will start with star trails, which are the easiest images to make.
Focus
My method of focusing is to find a set of stars from bright to dim that are easily
seen on the camera LCD in live view. Place the stars about half way from center to edge.
Zoom in with live view to the maximum magnification you can get. Focus so that
there are no color fringing around the bright star and the faint stars show well.
Boost your ISO if your aperture is small in diameter. I sometimes use ISO 6400 to 12800.
Don't forget to change the ISO back to a lower value, like ISO 1600.
To focus:
- Set the camera ISO to 3200 or higher (I often use 6400 with 24 mm f/1.4 lenses and shorter focal lengths).
- Use live view, increase magnification on the LCD screen to 10x,
and use a 3 to 5x magnifier to examine the image of both bright and dimmer stars.
Bright stars will show chromatic aberration problems and faint stars will only
be seen at optimum focus. Strive for minimum chromatic aberration and
faint stars are as bright as possible. See Figure 2.
- Focus manually by turning the focus ring. Better is to get DSLRcontroller for a smartphone.
The focus can be fine tuned one step at a time.
- On some lenses, the inside focus blur will be one color (e.g. red) while outside
focus blur will be a different color (e.g. blue). If there is any
hint of red halos, the images will generally be less pleasing,
so if anything, bias to having a blue halo IF you can't get rid of colored halos.
- During the imaging session, check focus whenever you feel the temperature
change (e.g. get colder). Temperature changes can shift focus, especially on
fast lenses and longer focal lengths.
- Once you have achieved focus, don't forget to change the ISO back to your
chosen ISO. For example, I usually focus with ISO 3200 to 6400 and
image at ISO 1600.
- Once focused, check the focus on stars in other parts of the field to be sure it
is consistent across the field.
- Make a test frame to see if you have the framing you want. You can do this at high
ISO to reduce exposure time. But remember to lower the ISO back to your
chosen ISO for night sky imaging.
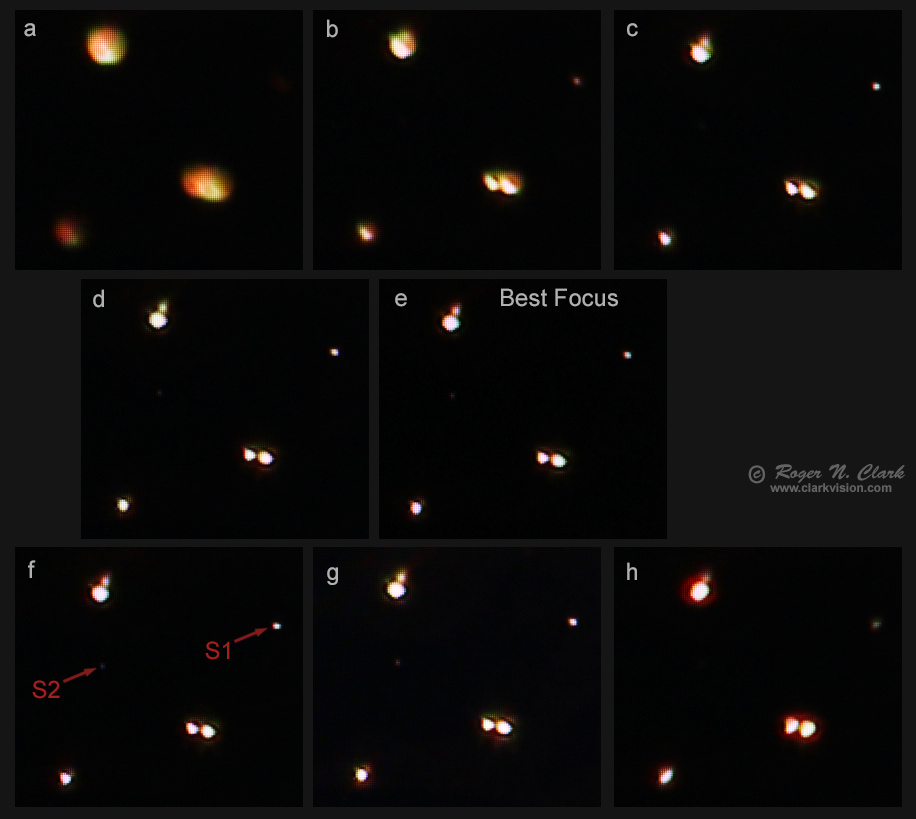
Figure 2. Images of a star field on the back of a camera LCD screen
(Canon 6D Mark II) with a Sigma Art 35 mm f/1.4 lens at f/1.4. The stars
were placed about half way from center to left edge. Avoid focusing
on objects in the center, The live view image was magnified 10x and I
examined the image with a 3x magnifier. Note the fainter stars marked
S1 and S2 as focus changes they show brightness changes better than the
brighter stars. Move focus on each side of optimum to understand the
aberrations better. Avoid color halos like that in panel h. The sequence
a-h moves from one side of focus to the other, with d, e, and f in good
focus. Panel e shows very slightly better focus than d and f.
White Balance
Daylight White Balance. Why daylight? After all, it is night.
First, we evolved with the sun as our light source, so daylight white balance is natural.
When we view other planets in the Solar System, as well as our Moon,
they are illuminated by sunlight. The colors we see on these bright objects
are the same ones recorded by a digital camera with daylight white balance.
So too are stars: solar type stars come out white to yellow-white, hotter stars
are bluish, just like we see them, and cooler stars than our sun show yellow,
orange and red colors just like we see them with unaided eyes, through binoculars,
and through telescopes. Brighter nebulae also show colors in good sized
telescopes: pink/magenta from hydrogen emission, to green from oxygen emission, to
blue from scattered light (like our daytime skies are blue from scattered sunlight).
The night sky is full of wonderful colors. See the series on color starting here:
Part 2a2) The Color of the Night Sky.
Light pollution and airglow needs to be subtracted. Sites that teach
changing white balance are not describing how to remove Light pollution
and airglow--it only change the color. The when contrast is boosted,
the result is fake colors produced in post processing and variable white
balance with scene intensity. See Parts 2d, 2e and 3 for more details
on post processing to maintain natural color. Any image you see with
a blue Milky Way or blue fringes to the Milky Way are not real colors.
If you like such colors, that is OK, just realize they are not natural.
Star trails
- Best to find a dark sky site outside of cities.
- Use a "normal" to wide angle lens, for example, 50 mm and wider (35 mm full frame equivalent).
- If you want more than just arcs, include some interesting foreground objects, like the trees in Figures 1,
and 3, or the rock formations in Figure 5.
- Select exposure for the conditions. Starting point examples for a dark site for digital cameras:
- 20 seconds f/2.8, ISO 1600
- 60 seconds f/2.8, ISO 400 to 800
- 2 to 4 minutes f/2.8 to f/4, ISO 200 to 800
- 10 minutes f/5.6, ISO 100
- 20 minutes f/8, ISO 100
- For brighter skies, use slower f-ratio (larger f-number).
Figures 1, 3, 4 and 5 illustrate the huge flexibility in exposure strategies
for making star trail images. The film based image in Figure 3 was a
single 3.6 hour exposure at ISO 100. Such long exposures may not work
with digital cameras, and are not necessary. Multiple shorter exposure
enables one to choose the frames that go into the total. That enables
you to exclude one or more frames in case of a problem, like someone
shined a light on the camera, so only one frame is lost not the entire
multiple hour exposure. The star trail image in Figure 4 was made with short
exposures of 20 seconds each, and the images added in an image editor
by choosing the maximum value from each frame. The advantage of this
strategy is also that each frame had minimal star movement so the star
field could be shown in one image or a stack.
Noise in star trail images. Multiple short exposure star trails are
noisier than fewer longer exposures. Star trail imaging is not like
stacking where multiple images are averaged to reduce noise as in deep sky
astrophotography. Combining multiple images for star trails selects the
maximum value from each image, thus maximizes noise. Plus noise in long
exposure images includes noise from dark current, and the total noise
is the square root of the total dark current from the total exposure,
so noise from dark current, as well as noise from airglow and light
pollution is the same whether one long exposure or many shorter exposures.
Even so beautiful images can be made either with fewer longer exposures or
many short exposures (Figures 1, 3, 4, and 5).
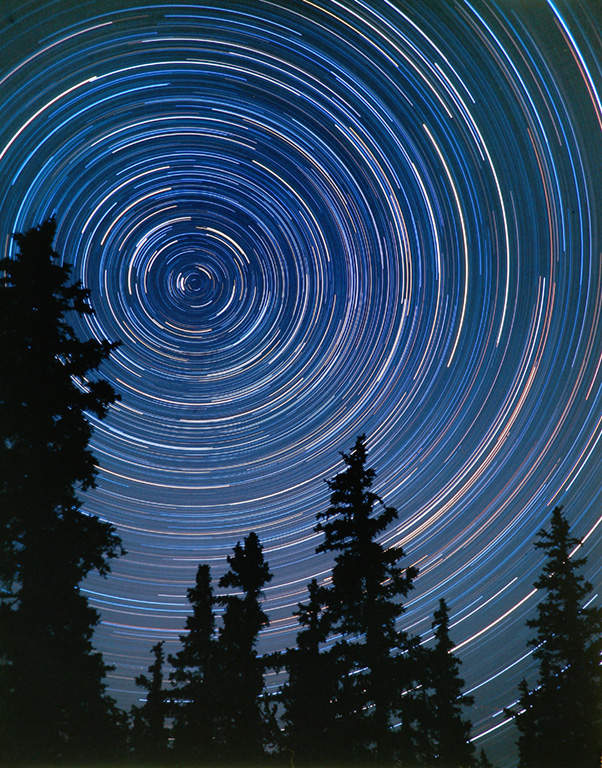
Figure 3. A star trail image made with ISO 100 (Fujichrome Velvia)
film with a 24 mm (35 mm full frame equivalent lens). Exposure was 3.6
hours at f/4.5 (a single exposure). (The camera was a 4x5 view camera with a 90 mm lens
and while this is an old film camera and lens that can be bought today
for a couple of hundred dollars, a modern consumer digital camera can
make similar or better images with consumer lenses in the f/4 range.)
This image was made near solar minimum when airglow was very low. The sky
shows as blue and green. The blue is from starting the exposure in deep
twilight. The green may be due to airglow or film reciprocity failure.
Fujichrome Velvia is daylight white balance and saturated colors.
Note the different colors of the star trails.
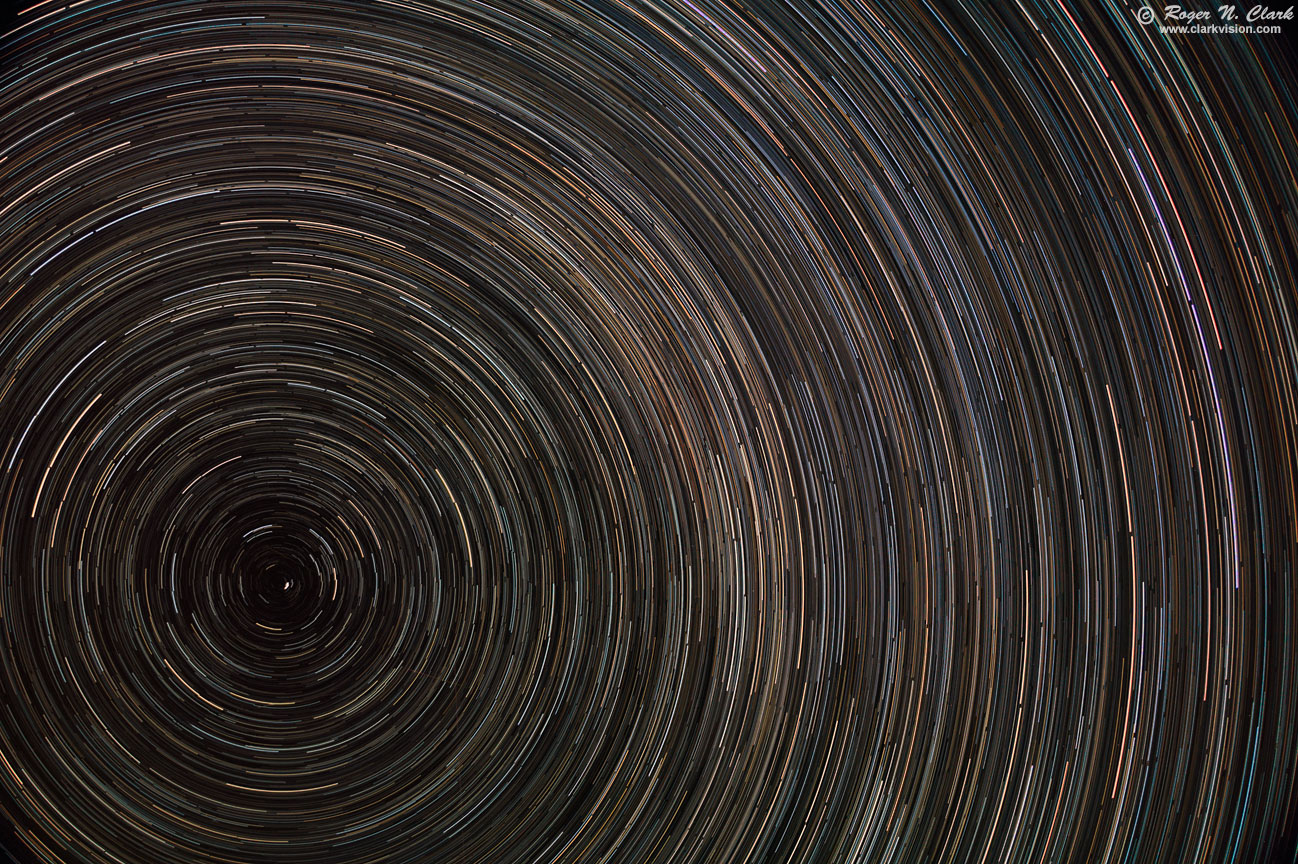
Figure 4. Star trail image made with a Canon 7D DSLR, a 1.6x crop camera,
with a Sigma 15 mm f/2.8 lens on a fixed tripod during the August 12,
2018 meteor shower. A total of 306 frames, each 20 seconds long were
made at ISO 3200, f/2.8, over a 2.1-hour period.
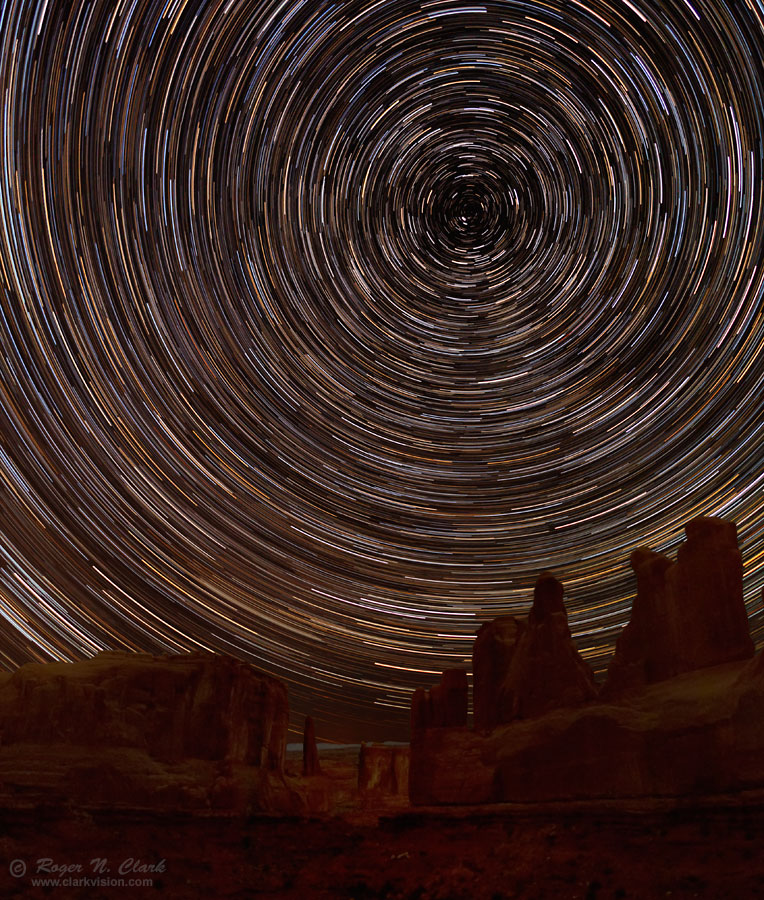
Figure 5. Star trails from the Park Avenue viewpoint, Arches National Park, Utah.
The image was made with a
Canon 7D Mark II 20-megapixel digital camera,
a 1.6x crop camera,
with a Sigma 15 mm f/2.8 lens on a fixed tripod. Thirty three 2-minute exposures
made at ISO 800, f/3.5, over about 68 minutes and combined for this image. Note the varied star colors.
This is a natural color image. There was no added light on the landscape, only that from the night
sky. Frames that had some light on the landscape from passing cars were rejected.
Larger gallery image with more details.
Exposure Times to Keep Star Images Round (The 200 Rule NOT the 500 Rule)
The challenge in night sky photography from a fixed tripod when you
want sharp stars is the keep exposures short enough to keep stars round.
You will read online about the "500 rule" which states that the exposure
time = 500 / focal length in mm. For example, for a 50 mm lens, that
would be 500 /50 = 10 seconds. But the 500 rule was made in the area of
high speed grainy low resolution film. It works fine if you only want
web sized images, but not if you want larger sharp images. Examine the
images in Figure 6 which shows various exposure times. The so-called 500
rule results in short star trails, which also blurs image detail. Note the pinkish
nebula next to the brightest star--it is blurred with little detail with
400, 500 and greater "rules." For crisp round stars, a "200" rule
is needed. This rule is not affected by format size; rather the detail
is affected more by lens sharpness and pixel size than format size. (Smaller
format cameras sometimes but not always have smaller pixels.)
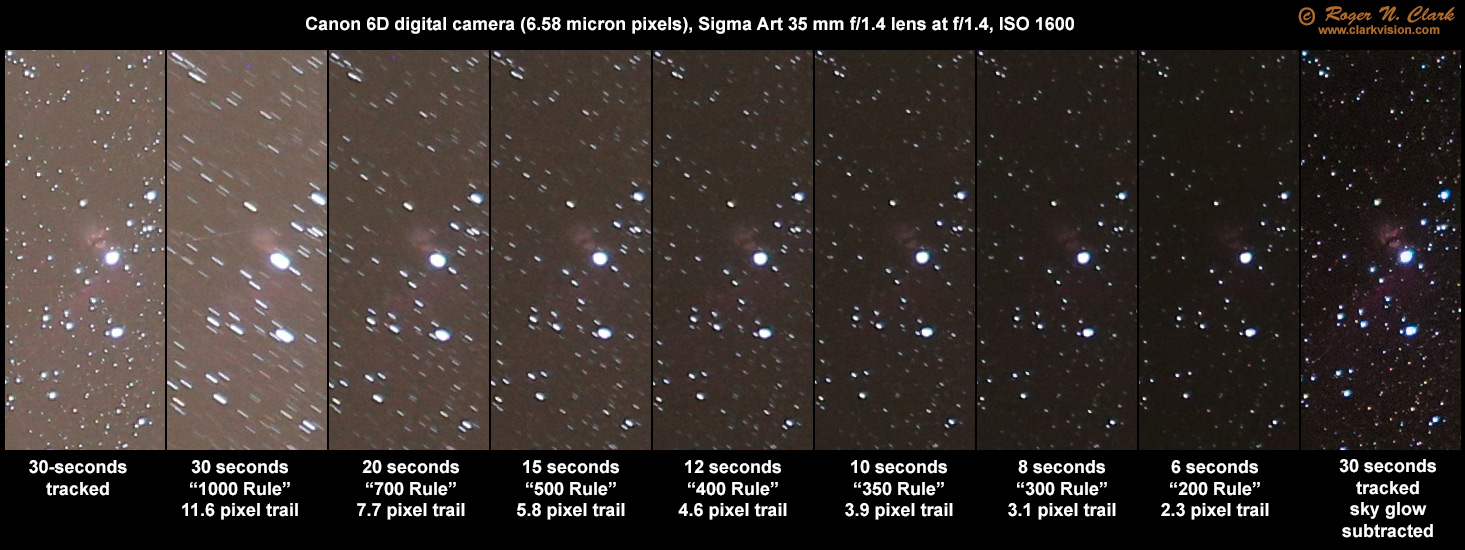
Figure 6. Demonstration of how long an exposure time can be when it shows
trailing for a star field near the celestial equator. These are
out of camera jpegs with no sharpening, except the last panel,
which was produced from a raw file. For a camera with 4 micron
pixels, times would have to be about (6.6/4 micron pixels=)
1.6 times shorter for the same length trails in pixels.
Note, it is pixel size and lens focal length that determines
trailing, not sensor size.
Light Collection
You may read online to use a short focal length lens to maximize exposure time
from a fixed tripod. But exposure time is only part of the equation of light
collection. The other and more significant part of the equation is lens aperture area.
Light collection from an object in the scene, e.g. a star, a galaxy, a Milky Way star cloud,
a distant mountain, a tree, or any other object is the product of exposure time times
lens aperture area. Not f-ratio. The f-ratio tells light density, like photons per square
mm per second, but not total light received from an object. See
Part 1c) Characteristics of Best Digital Cameras and Lenses for Nightscape and Astro Photography
for more detail. The bottom line is choose the focal length that best
frames your intended subject for a good composition, just like you would in a daytime
landscape scene. Then for that focal length, use the largest aperture you have that
will give acceptable image quality.
Keys to lens selections in low light photography:
- Lens focal length and sensor size determines field of view.
Choose the focal length for the best composition.
- Lens aperture diameter (lens area) determines light collection per unit time for an object in the scene.
Star Fields from a Fixed Tripod
Figure 7 illustrates that a single short exposure can record many
stars and a lot of detail in the Milky Way. Such simple methods can
make excellent web-sized images. But with so little light collection,
large prints or presentation on a large monitor (like a 4K or 8K monitor)
will show a lot of noise. To reduce noise, one must collect more light.
The can be done with existing lenses by tracking the stars, or taking
multiple short exposures from a fixed tripod as discussed in the next
section.
Choice of lens field of view is a personal compositional choice.
The advantage of a shorter focal length lens is that more of the Milky
Way may be in view, but the disadvantage is that those elements, from
Milky Way star clouds to foreground landscape objects will be smaller
in the frame. Follow the above settings summarized below.
Summary setting for fixed tripod night sky photography.
- ISO 1600 (3200 for cameras with banding problems, or slower f-ratios, like f/4, f/5.6).
- Daylight white balance.
- Any lens, e.g. 15 mm f/2.8, 24 mm f/2, 50 mm f/1.8 all can make nice images.
- Exposure time: 200 to 300 divided by focal length in mm.
For example, 35 mm: 200/35 = 6 seconds to 300/35 = 9 seconds.
- Sturdy tripod.
- Cable release.
- Mirror lock-up if using a DSLR.
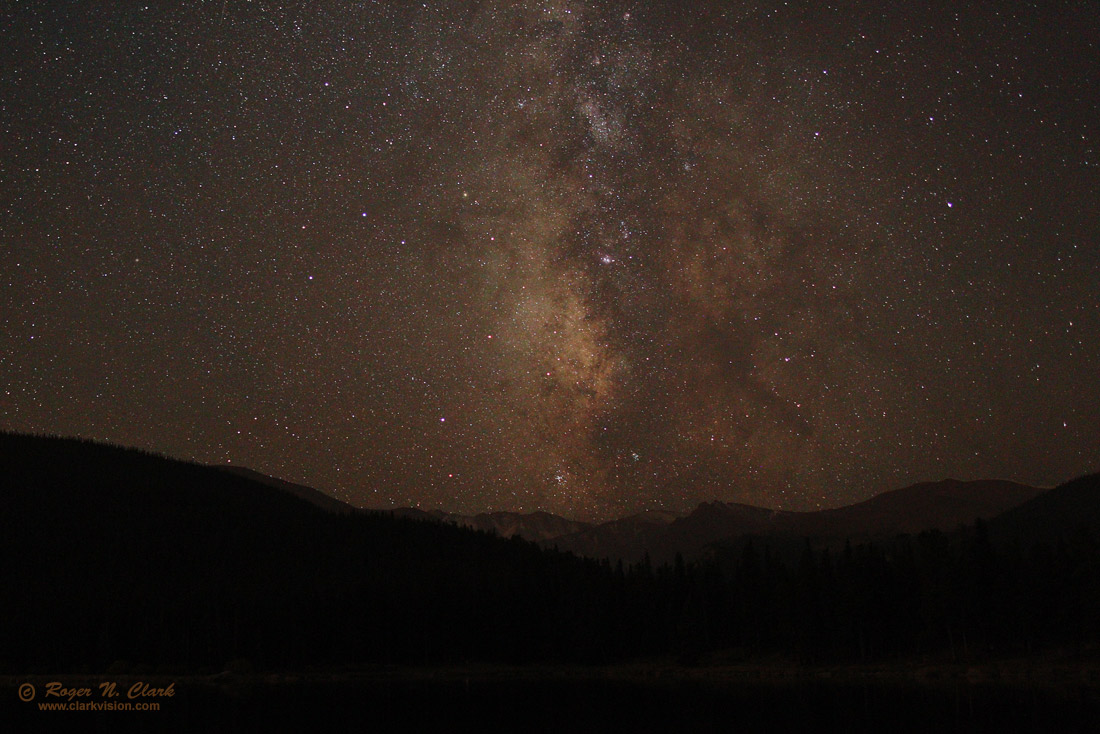
Figure 7. A single 10-second exposure at ISO 1600, with a 24 mm f/1.4 lens at
f/2, 1.6x crop field of view. The image is from an out-of-camera jpeg with a small
contrast boost with the curves tool in a photo editor.
The white balance is daylight for natural color.
A 10-second exposure with this lens is a "240" rule.
Stacking, Tracking and Mosaics
Stacking refers to adding two or more exposures together to reduce noise.
Noise will be reduced as the square root of the number of frames averaged.
Tracking allows one to make longer exposures with no star trailing.
There is little difference between the two methods given the same total
exposure time. For example, two 10-second exposures will show almost the
same amount of noise as one 20-second exposure.
An advanced solution for keeping stars round using a fixed tripod is to
take 4 or so images with a "200" rule, align the images and average them.
That will produce essentially the same lower noise result as a long
exposure but without the blur from the Earth's rotation. Note that
with wide angle lenses, alignment is difficult after a minute or so of
exposures because the distortion changes over time--distortions from
mapping the spherical sky onto the flat sensor plane. That is called
projection distortion and is not fixed by lens corrections.
The solution to the above projection distortion problem is to use
a tracker. A simple hand-cranked tracker can be made for a few
dollars that works for 50 mm and wider focal lengths and is described
in
Part 5) Nightscape Photography with a Barn Door Tracking Mount.
A low cost motorized mount like the iOptron Skytracker Pro is used by
many nightscape photographers and works well with lenses up to about
135 mm. More sophisticated mounts are described in Part 1f) A Very
Portable Astrophotography, Landscape and Wildlife Photography Setup.
Mosaics or stitching. Another way to collect more light is
to use a longer focal length lens with a larger physical aperture.
For example, a 15 mm f/2.8 lens has a 5.36 mm diameter aperture. A 35
mm f/2 lens has a 15.5 mm diameter aperture. The 35 mm lens collects
(17.5 / 5.36)2 = 10.6 times more light. From a fixed tripod,
the exposure time with the 35 mm lens would have to be shorter, (15/35)
= 0.43 times as long, thus the net gain in light collection would be
10.6 * 0.43 = 4.5 times. That is very significant. One would need to
do about a 3x3 frame mosaic to cover the same field of view. The result
would be an image with many more pixels and for the same sized print,
smaller stars, finer detail, and less apparent noise. (This improved
image quality works for daytime photography too.) The disadvantage is
more post processing, including learning mosaicking software.
The disadvantage of stacking, tracking, mosaics or all three combined for nightscapes
is that while the stars move, the land stays fixed from our perspective.
Thus, one needs to separate land and sky and treat them separately in a
photo editor. This is advanced image processing, and is not for a beginner
unless you are an expert with your photo editor (e.g. photoshop or gimp).
The advantage of tracking, stacking and mosaics is better image quality. Compare the
first and last panels (tracked) in Figure 6 to the other panels (no tracking).
Another advantage is that by combining with a clipping method for outliers,
passing airplanes and satellites can be automatically rejected.
See
Stacking Methods Compared for more information.
Figure 8 is a mosaic and shows pinpoint stars in the center as well as
in the corners.
Exposures at Night on Land versus Sky
The night sky is brighter than the landscape illuminated by the sky.
An example is Figure 7, which shows distant mountains very dark
compared to the sky. One alternative is the illuminate the landscape,
called light painting. Figure 1 is an example, though the light was
from a nearby lodge so I did not add any light myself.
Note the distant trees in Figure 1 are dark--a telltale sign of
a local artificial light is illuminating the scene.
To record the landscape in natural light requires an exposure typically
4 to 6 times longer than exposures than for the sky (Example in Figure 8).
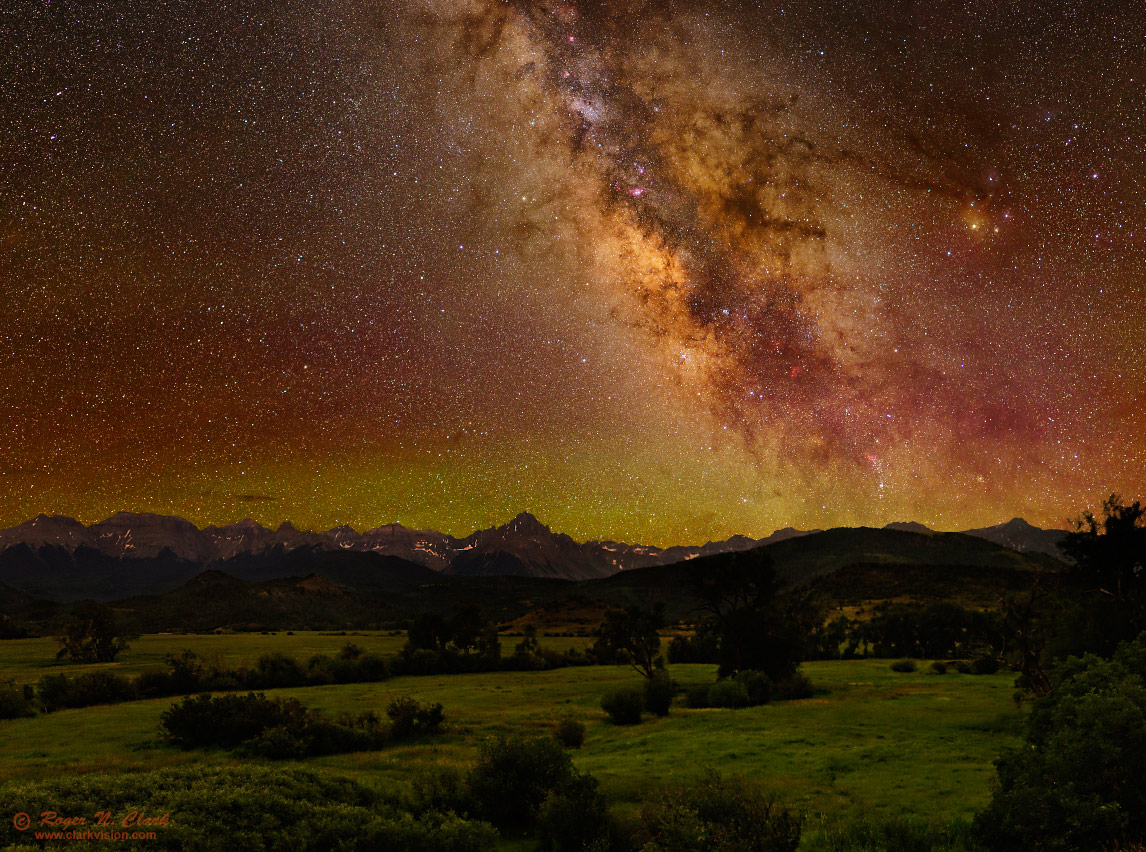
Figure 8. Summer Milky Way Nightscape with the San Juan Mountains
of Colorado in natural color. A mosaic of 30-second tracked
exposures on the sky and 2-minute exposures on the land were
combined. The red and green sky is from airglow: oxygen molecules
emitting light in the upper atmosphere.
See
gallery image for more detail.
Safety
AFRICA WARNING!
The image in Figure 1 was taken in east Africa
in 2007. In February 2013 I was photographing at the same location.
We got a lesson in how dangerous such imaging can be. One morning a
colleague in the next room went out at 5:15 am to do some nightscapes,
and I was going to follow a minute later. As I was about to open the door,
when I heard a fast scramble and someone banging into a door. It was my
colleague running to get back in. I went out to see what the problem was,
and he yelled at me get back in, leopard! A leopard started stalking
and then was in the process of charging at him and he then ran back to
the room. If he had been a few more steps from his room, he might not
have made it to safety.
The lesson is whenever you are in a region that is potentially
unsafe, including bears, lions, or other wild animals, hire guides to
watch and protect you and pay them well. A photo is not worth your
life. A photo is also not worth the life of an animal.
Discussion and Conclusions
Night sky photography can be relatively simple, for example, star trails
or a single short exposure. A single short exposure can make interesting
web sized images. Light levels of the night sky away from cities are so
low that noise from collecting little light usually dominates the image.
The light signal itself has noise, even with perfect cameras, and such
noise is called photon noise or shot noise. The only way to reduce this
apparent noise is to collect more light. To collect more light requires
tracking, stacking, mosaics, larger lenses, or combinations of all
of these. The resulting sets of images requires post processing to put
them all together. It is best in my opinion to work up to this slowly.
Begin simple, and work up in complexity to get better quality as your
experience and skill grows.
Start with star trails and simple single frame images with the foreground in
silhouette. Try light painting, but see the section
Part 001) ETHICS in Night Photography first.
For more details on ISO, collecting light, effect of pixel size and aperture,
see
Part 1a1) Nightscape Photography with Digital Cameras and
Part 1c) Characteristics of Best Digital Cameras and Lenses for Nightscape and Astro Photography.
For information on planning, see:
Part 1b) Planning Nightscape Photography.
Once you have collected your images see
Part 3a1) Nightscape and Astrophotography Image Processing
Basic Work Flow for details on processing.
For help removing light pollution, see
Part 3c) Astrophotography Image Processing
with Images Made in Moderate Light Pollution.
If you find the information on this site useful, please support
Clarkvision and make a donation (link below).
References and Further Reading
Clarkvision.com Nightscapes Gallery.
The Night Photography Series:
http://clarkvision.com/articles/beginning-astrophotography/
First Published May 31, 2019
Last updated January 10, 2020