
Astrophotography Image Processing:
Advanced Image Stretching
with High Light Pollution and Gradients with the
rnc-color-stretch Algorithm
by Roger N. Clark
Complex astrophotography image processing
with high light pollution is made simpler with
the rnc-color-stretch algorithm
The Night Photography Series:
Contents
Introduction
M31 High Light Pollution
Download
Conclusions
All images, text and data on this site are copyrighted.
They may not be used except by written permission from Roger N. Clark.
All rights reserved.
If you find the information on this site useful,
please support Clarkvision and make a donation (link below).
Introduction
Astrophotography in a high light pollution environment poses several challenges.
While it is easy to subtract the light pollution level, one can't subtract the photon noise
in the sky signal. An additional problem with high light pollution
when imaging with digital cameras is small variations from noise or faint stars
cause small variations in signal levels. These small variations get magnified
when faint signals typical in astrophotos are stretched, creating splotchy colors
at low signal levels. Rnc-color-stretch determines plausible light pollution
levels and subtracts that level before stretching and can mitigate a splotchy
sky background.
Another common problem in high light pollution photos is a gradient in the
light pollution.
Rnc-color-stretch does not yet handle gradients, but approximate
gradients can be subtracted in an image processor well enough that
rnc-color-stretch can do a quality stretch. Remaining gradients can then
be subtracted in an image editor. This article illustrates using
rnc-color-stretch on a high light pollution astrophoto with a gradient.
M31 High Light Pollution
The example used here was an image obtained in a red zone on the light pollution
map, from the Denver, Colorado metro area using a 300 mm f/2.8 lens
on a Canon 7D mark 1 camera using an IDAS LPS-P2 light pollution filter.
The light pollution, even with the filter was very high (Figure 1).
A large part of the light pollution was subtracted in the raw converter, and the
stacked image is shown in Figure 2. Settings were similar to those in the
basic work flow (Part 3A1), except the filter changes the color balance.
By examining the RGB response of solar-type stars a color temperature of 9000
Kelvin was found to make those stars white. Stellarium was used to find solar-type
stars in the image. Note, one needs to subtract the sky level in each color channel
to find the correct RGB intensity to a star. The resulting stacked image
is shown in Figure 2.
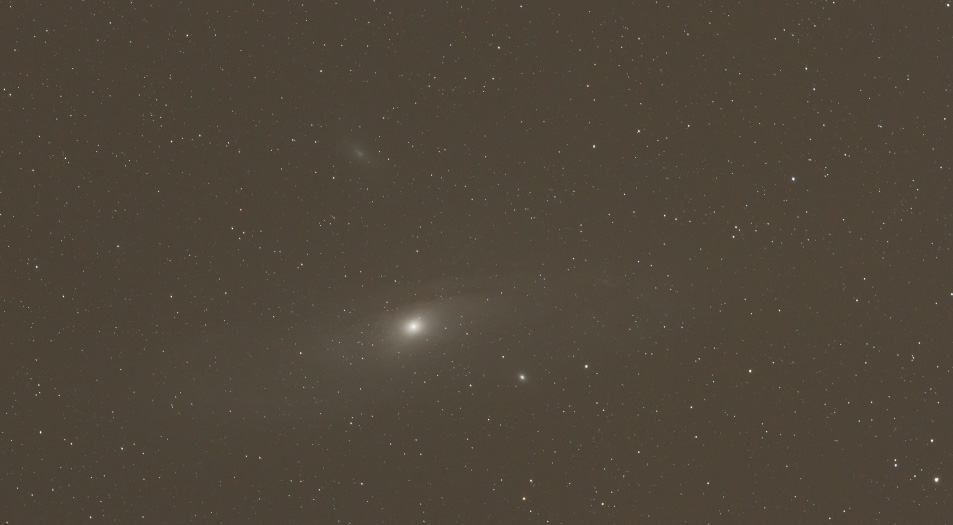
Figure 1. Image of M31 made in a high light pollution area (Denver, Colorado, USA)
with a 300 mm f/2.8 lens and a Canon 7D (mark 1) stock digital camera and an IDAS LP2
light pollution filter. This is a single frame after raw conversion with
no light pollution subtraction to show the full extent of the light
pollution. White balance was done using solar-type stars. The IDAS
filter changes the color balance and 9000 Kelvin was needed to make solar-type
stars white. Even so, the color will not be quite natural and some stars
come out cyan. This is unavoidable when using light pollution filters,
but might be improved with a different Bayer color matrix correction.
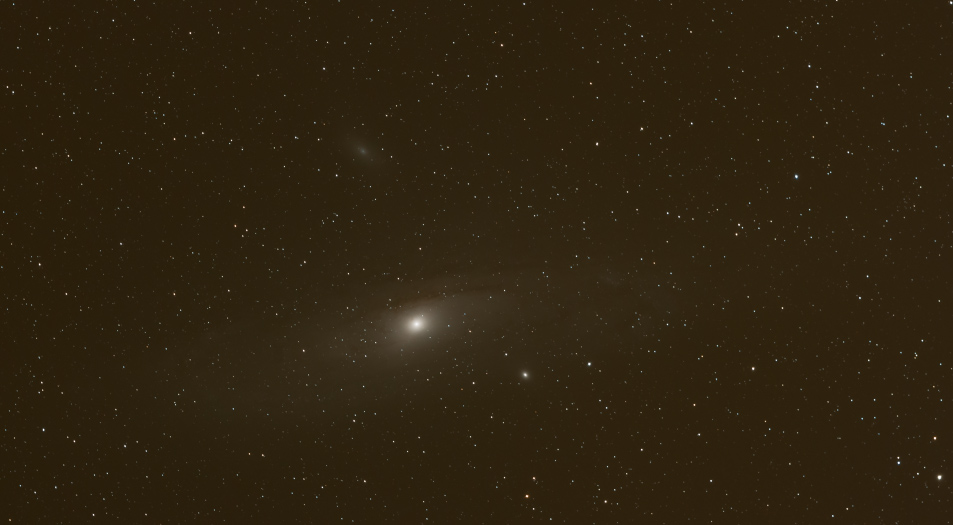
Figure 2. Image of M31 made in a high light pollution area (Denver, Colorado, USA)
with a 300 mm f/2.8 lens and a Canon 7D (mark 1) stock digital camera and a .
This is 31 one-minute frames stacked. The sky background is lower than in Figure 1 because
some light pollution was subtracted in the raw converter.
The next step after stacking and cropping off the edge
was to run rnc-color-stretch (Figure 3). The result shows a strong intensity
and color gradient. This gradient is too large, so the image was brought into
photoshop (CS6) and the right half of the image selected, feathered by 999 (the
max in CS6) and the curves tool used to subtract the increases light pollution.
I use the pixel readout on the left and right sides of the image to check
if sky levels were close to the same. The result is shown in Figure 4.
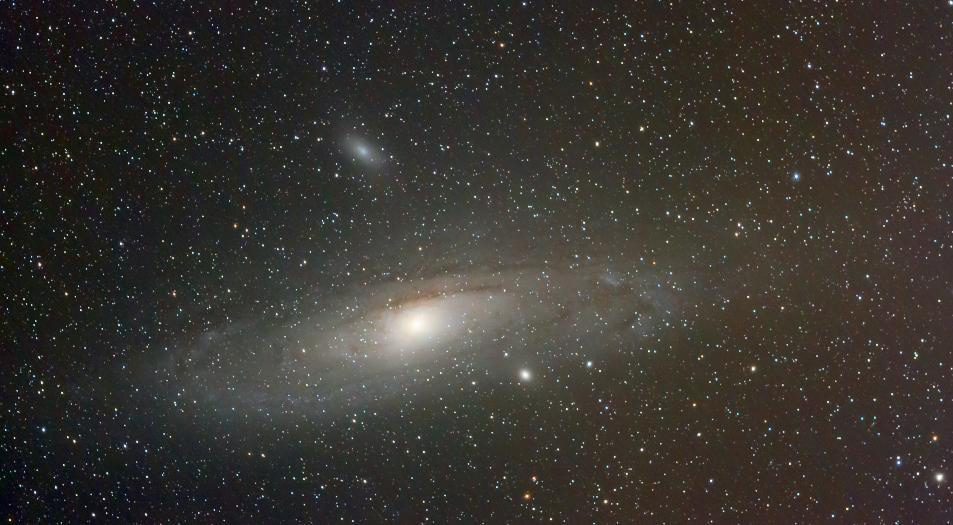
Figure 3. The output of rnc-color-stretch with the image in Figure 2 shows a strong sky glow and color gradient.
The rnc-color-stretch options were: -rootpower 30 -rootpower2 2 -scurve1.
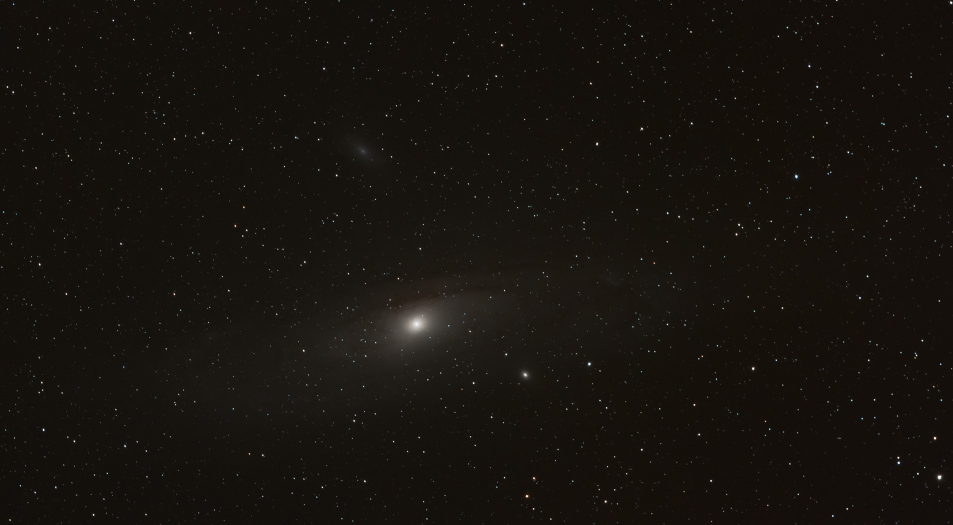
Figure 4. The 16-bit stacked tif image from Figure 2 was brought into photoshop
and the right approximately 40% of the images selected and feathered 999. Then the
light pollution gradient reduced by subtraction with the curves tool.
Then the entire image was selected and the light pollution reduced,
again using the curves too to subtract,
to bring the sky background to a more neutral and lower level.
The next step was to run rnc-color-stretch again on the new image, using the same
parameters as in the first try. The result is shown in Figure 5, which is significantly better.
The next step is to check for artifacts. This is best done by looking at the
individual color channels in black and white. For example, the red channel is shown in Figure 6.
Here we see the splotchy background: the dark holes in the sky background. The other channels
show similar "holes" but in different positions. Again, this is a function of small variations
in the sky background, including noise and faint stars that modulate the intensity at a small level.
This is not a dark frame issue.
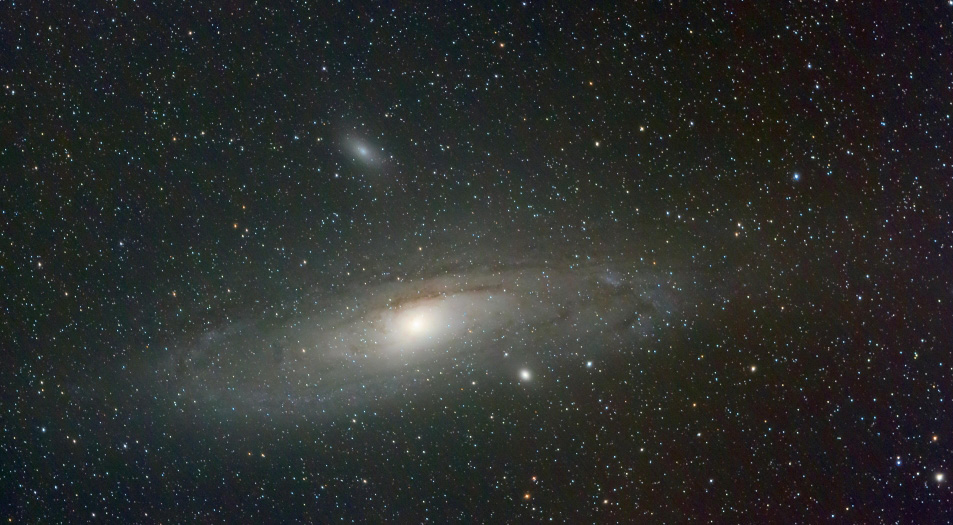
Figure 5. The output of rnc-color-stretch with the image in Figure 4. The gradient has
been reduced to a level that can be more easily dealt with in an image editor.
The rnc-color-stretch options were: -rootpower 30 -rootpower2 2 -scurve1.
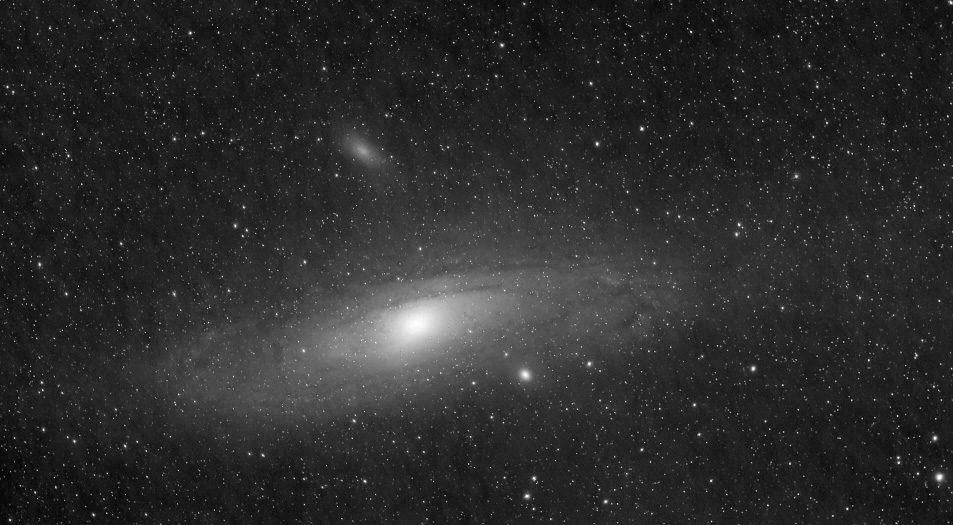
Figure 6. The red channel from Figure 5 shows a common problem with Bayer filter digital
cameras: the low signal areas have what appear to be dark holes. The green and blue channels
show similar "hole" but not in the same location. This creates a color splotchy appearance.
This is not a dark frame problem!
Rnc-color-stretch can mitigate this problem.
The "dark hole" or color splotchiness is an artifact of the algorithms in raw converters
in interpolating the Bayer color matrix intensities to construct a color image.
The algorithm was fooled by low level noise and faint stars. Again, this is not a dark frame problem,
or a camera sensor problem
There are multiple ways to
mitigate this problem:
- 1) More exposures with different exposures offset so that the "holes" get averaged out.
This is called dithering. Often one or two positions can greatly mitigate the problem.
The example here had only one position, which maximizes the problem.
- 2) Change settings in the raw converter to reduce color noise. In photoshop/lightroom
Adobe Camera Raw (ACR) on the the detail tab increase the "color"
noise reduction and decrease slightly the "color detail." You might also increase the luminance
noise reduction slider to above 30. This will likely reduce some detail, but will
decrease pattern noise. You will need to decide on where the noise versus detail
trade is best for your taste.
- 3) Use rnc-color-stretch with the setmin flag to fill in holes. This requires a uniform background.
In practice, #1 above is the preferred method to mitigate this problem. But failing
that, and often one can't get all the exposure time needed because of time limits,
weather changing like incoming clouds, oncoming twilight, or the object is setting.
Then a combination of #2 and #3 can improve the result.
Rnc-color-stretch can mitigate the "dark hole" problem by setting a minimum threshold.
The -setmin option looks for pixels below the threshold value for each color channel and
raises the signal to above the threshold. Faint stars and image structure will be
maintained but the signal level raised. For this image, I found that after a couple of
test runs that a minimum 8000 (on a 0 to 65535 scale) did a good job of
solving the problem. I also redid the raw conversion with increases luminance and color noise
reduction. The result is shown in Figure 7.
The image from Figure 7 is the output of rnc-color-stretch and that image was brought into photoshop
and the curves tool use to adjust levels and color to produce the final image in Figure 8.
There splotchiness has been minimized for this data. To reduce this
problem further, more exposure time is needed, or dark skies.
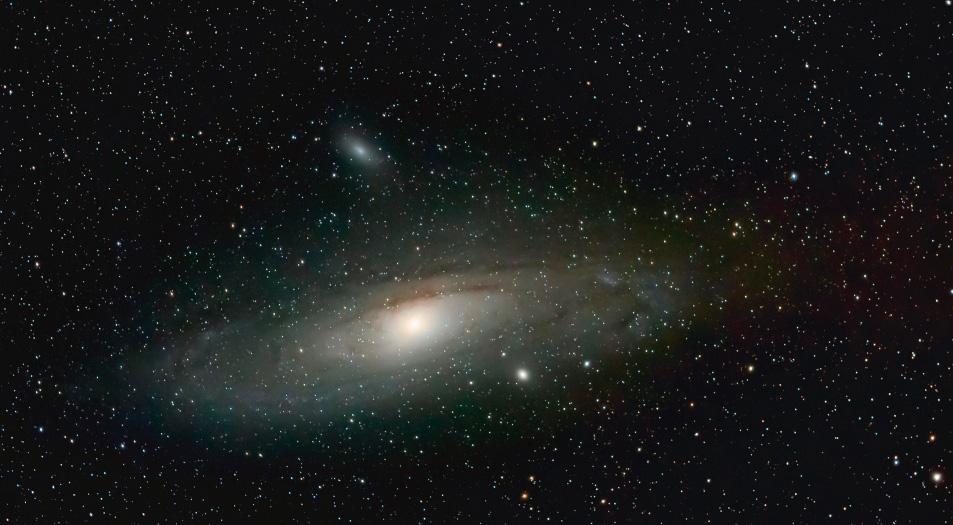
Figure 7. The output of rnc-color-stretch with the revised raw conversion with low level signal
correction. The rnc-color-stretch options were: -rootpower 30 -rootpower2 2 -setmin 8000 8000 8000 -scurve1.
The image in Figure 7, has some low level gradients remaining, so the 16-bit image was
brought into photoshop and the gradient reduced using curves (See Part 3c for examples how to do this).
The color balance was improved also using curves. The color balance is close to but not
exactly natural color because the light pollution filter modifies the color
response too much. For a high light pollution sky and relatively short exposure time, this
is a credible image.
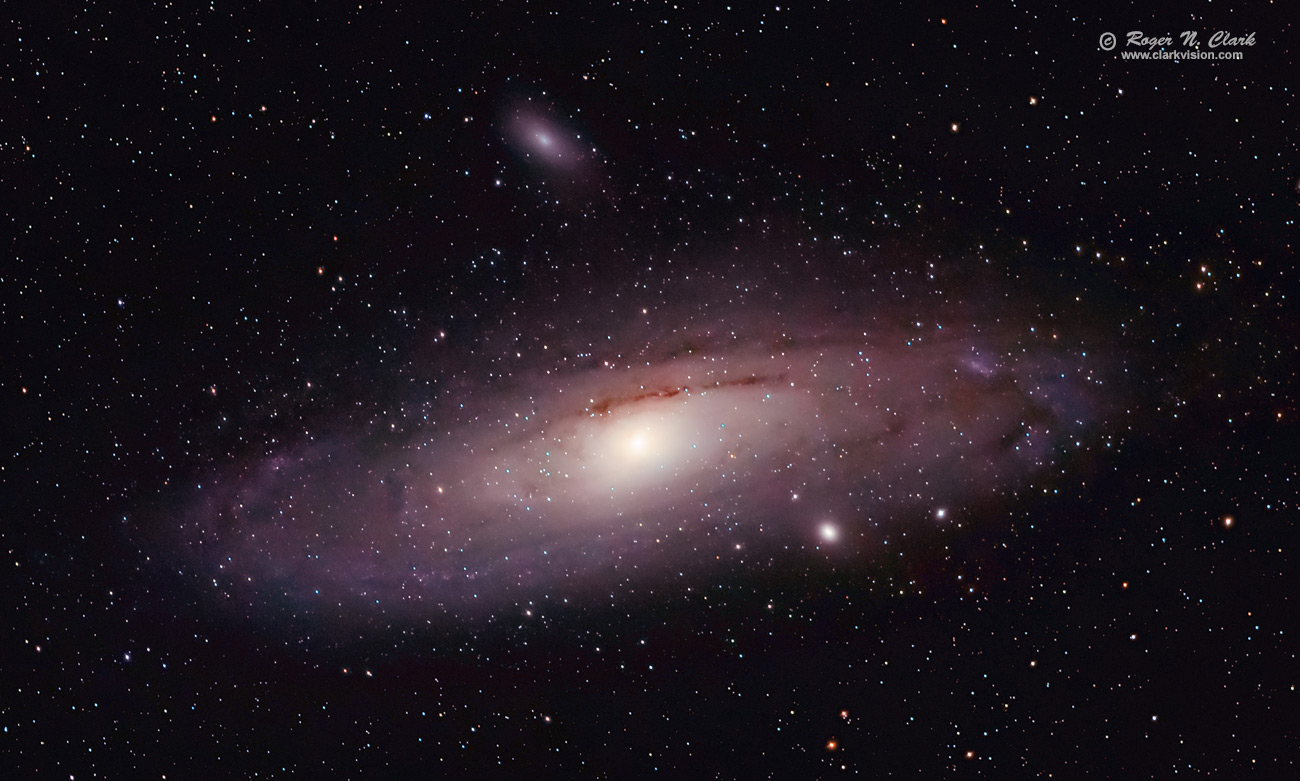
Figure 8. Final image after working with the image in Figure 7 in photoshop using curves.
Download
The rnc-color-stretch software is free and open source. You can download it from
8a) Software for nightscape and astrophotographers
in this series.
Conclusions
High light pollution skies pose severe challenges to astrophotography. Rnc-color-stretch
can help to bring out color and stretch images made in such environments, but additional
work is needed to produce a good result. Rnc-color-stretch makes the task easier.
If you find the information on this site useful,
please support Clarkvision and make a donation (link below).
References and Further Reading
Clarkvision.com Astrophoto Gallery.
Clarkvision.com Nightscapes Gallery.
The Night Photography Series:
http://clarkvision.com/articles/astrophotography-rnc-color-stretch-high-light-pollution/
First Published November 28, 2016
Last updated November 28, 2016