ClarkVision.com
| Home | Galleries | Articles | Reviews | Best Gear | Science | New | About | Contact |
Tracking Mounts for Deep-Sky Astrophotography
by Roger N. Clark
| Home | Galleries | Articles | Reviews | Best Gear | Science | New | About | Contact |
by Roger N. Clark
Tracking Mounts for Deep Sky Astrophotography (nebula, galaxies, star clusters) are undergoing a revolution. This article describes some of the new technology and how it might benefit you by making astrophotography simpler. Key in this revolution is how the classical mounts, which have periodic tracking errors due to the gear systems used, is being changed with different types of tracking mechanisms, and the use of high resolution encoders to correct tracking errors real time without autoguiders.
The Night Photography Series:
Contents
Introduction
Resolution and Tracking Accuracy for Deep Sky Astrophotography
Tracking Designs
The Strain-Wave Revolution
Measuring Periodic Tracking Errors
Attaching Multiple Lenses / Telescopes
Tracking and Wind
Conclusions
References and Further Reading
Whether I'm going to my backyard, or a dark sky site by car, or traveling thousands of miles (kilometers) by air, I want a tracking system that can be used to make interesting deep-sky astrophotos with minimal effort. Going to my backyard or a location by car means I can move more equipment, but even then the more massive, setup complexity, and bulky the equipment, and less the incentive to do it often. When traveling far, for example, by air, the bulk and weight must be minimized.
The ideal system would be very
Astrophotography includes many aspects. People commonly start with a camera and tripod, making wide field images of the Milky Way, constellations, and landscape with the stars in the sky (nightscapes). Then with a simple tracker costing a few hundred dollars, or a "Barn Door" Tracking Mount make longer exposures to get more detail. Then next progression is commonly moderate focal lengths (~70 to ~200 mm) with a camera on a low cost German equatorial tracking mount, like a Star Adventurer.
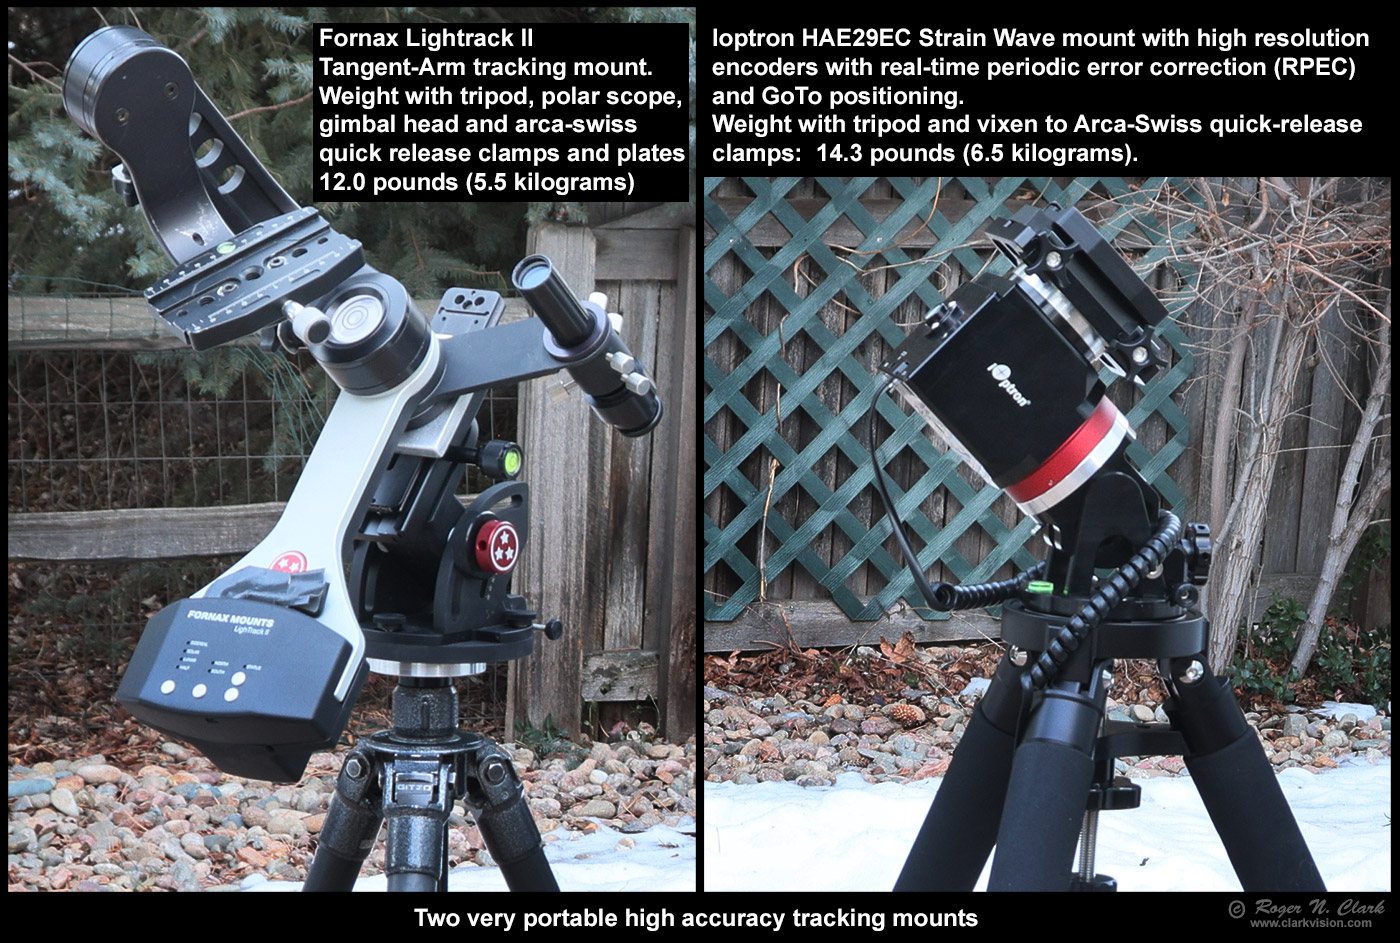
The most common tracking mount is the German equatorial tracking mount. One axis is made parallel to the rotation axis of the Earth, and the axis turned using motors and gears to compensate for the Earth's rotation. A capable German equatorial mount is shown in Figure 1a, left panel. The problem with this common design is tracking accuracy due to imperfections in the manufacture of the gears. This makes tracking during long exposures very challenging.
To get into longer focal lengths to get more detail on objects in the night sky, the tracking accuracy to compensate for the Earth's rotation increases. But the gears limit tracking accuracy, typically showing what is called periodic error, which are approximately repeatable changes in position from the ideal as the gears rotate. For example, with a 4-inch (102 mm) diameter gear, a deviation of only 0.00001 inch (0.00022 mm) from the ideal position will cause a tracking error that will blur fine detail in a galaxy, nebula or star cluster.
To compensate for errors in the gear trains, previous to modern sensors and autoguiders, people used to hand guide telescopes. As a professional astronomer, I have hand guided many telescopes in the 1970s and 1980s, including many nights in the cold guiding the U. Hawaii 88-inch (2.2-meter) telescope, as well as larger and smaller telescopes. In the 1980s, CCDs were added, and hand guiding was still done but remotely in a warm room watching a TV screen. Next software was written to do the guiding by computer, and today relatively low cost autoguiders (a small telescope with a digital sensor) and computer software does the job extremely well. Figure 1, left panel shows a German equatorial mount with a small autoguider (the round red thing) and laptop to analyze the data from the autoguider and feed corrections to the motors of the tracking mount. The setup described above and shown in Figure 1a, left panel, is massive and complex. Certainly when it is setup, and the autoguider calibrated, it guides very well and one can take beautiful images with it. It is not something one could take on an airplane easily. Such a system would need to go via air cargo.
One way to get around the errors in small gears is to use larger gears. Larger gears become more bulky, so one way to keep the bulk down is use gear segments, and even not use gears and instead use a roller bearing. Thus a variation on a "barn door" mount: the tangent arm tracker like the Fornax Lightrack II equatorial mount shown in Figure 1a, right panel, and Figure 1b, left panel. Designs like the Lightrack II have very high tracking accuracy. The Lightrack is rated +/- 1 arc-second over 8 minutes. Such light weight trackers are very portable, very accurate tracking, easy setup, so satisfy 3 of the 4 criteria above. But being so light weight, it is susceptible to wind shake when using larger telephoto lenses or comparable telescope, so only works well when there is no wind or shielded from wind. Many of the images in Astrophoto Gallery were made the the Fornax and similar design (now out of production) Astrotrac. To be clear, the tangent arm tracker could be made more massive and still be light and portable compared to German equatorial mounts.
But the technology keeps evolving. The latest new development in trackers is the strain-wave mount. Strain wave is not new technology but is new (circa 2022) to amateur astrophotography mounts. Strain wave gearing has a disadvantage, however: very high periodic error, and the error is not clean, meaning the error can be jagged, not a simple sine wave. This type and magnitude error is challenging for autoguiders. Manufacturers have now responded by adding high resolution encoders that do real-time error correction without the need for autoguiders. Plus the strain wave technology is rigid in a small lightweight mount (Figure 1b) that satisfies all 4 requirements listed above. This is game changing in tracking mounts.

First some info on resolution (detail) needed for deep sky imaging, especially if you want to image smaller targets like most galaxies. The Moon is 1/2 degree in diameter, or 30 arc-minutes, 1800 arc-seconds. The are a fair number of objects, mostly nebulae that are larger than the Moon, and there are objects smaller than the moon--much smaller. So having a range of focal lengths is good, from wide angle to telephoto. But with modern digital cameras, up to about 300 to 400 mm gets you literally tens of thousands of objects where you can make interesting images with a simple and portable system. For smaller targets we generally want to resolve 2 to 3 arc-seconds. At 2 arc-seconds, the Moon would be about 900 pixels in diameter. The largest galaxy in apparent angular size beyond the Milky Way is Andromeda, M31, which is about 3 x 1 degrees in size (10,500 x 3600 arc-seconds), fainter parts larger. At 2 arc-seconds per pixel, that would be 5200 x 1800 pixels. Many other galaxies are small, and you may only get a couple hundred pixels in diameter or less.
The angular pixel size is called plate scale (originates from glass photographic plates used 50+ years ago) and is calculated for a digital camera with the equation:
plate scale = 206265 * pixels size in mm / focal length in mm
A pixel size of 4 microns is 0.004 mm and with a 300 mm lens gives a
plate scale = 206265 * 0.004 / 300 = 2.75 arc-seconds / pixel.
A 400 mm focal length would be 2.1 arc-seconds/pixel.
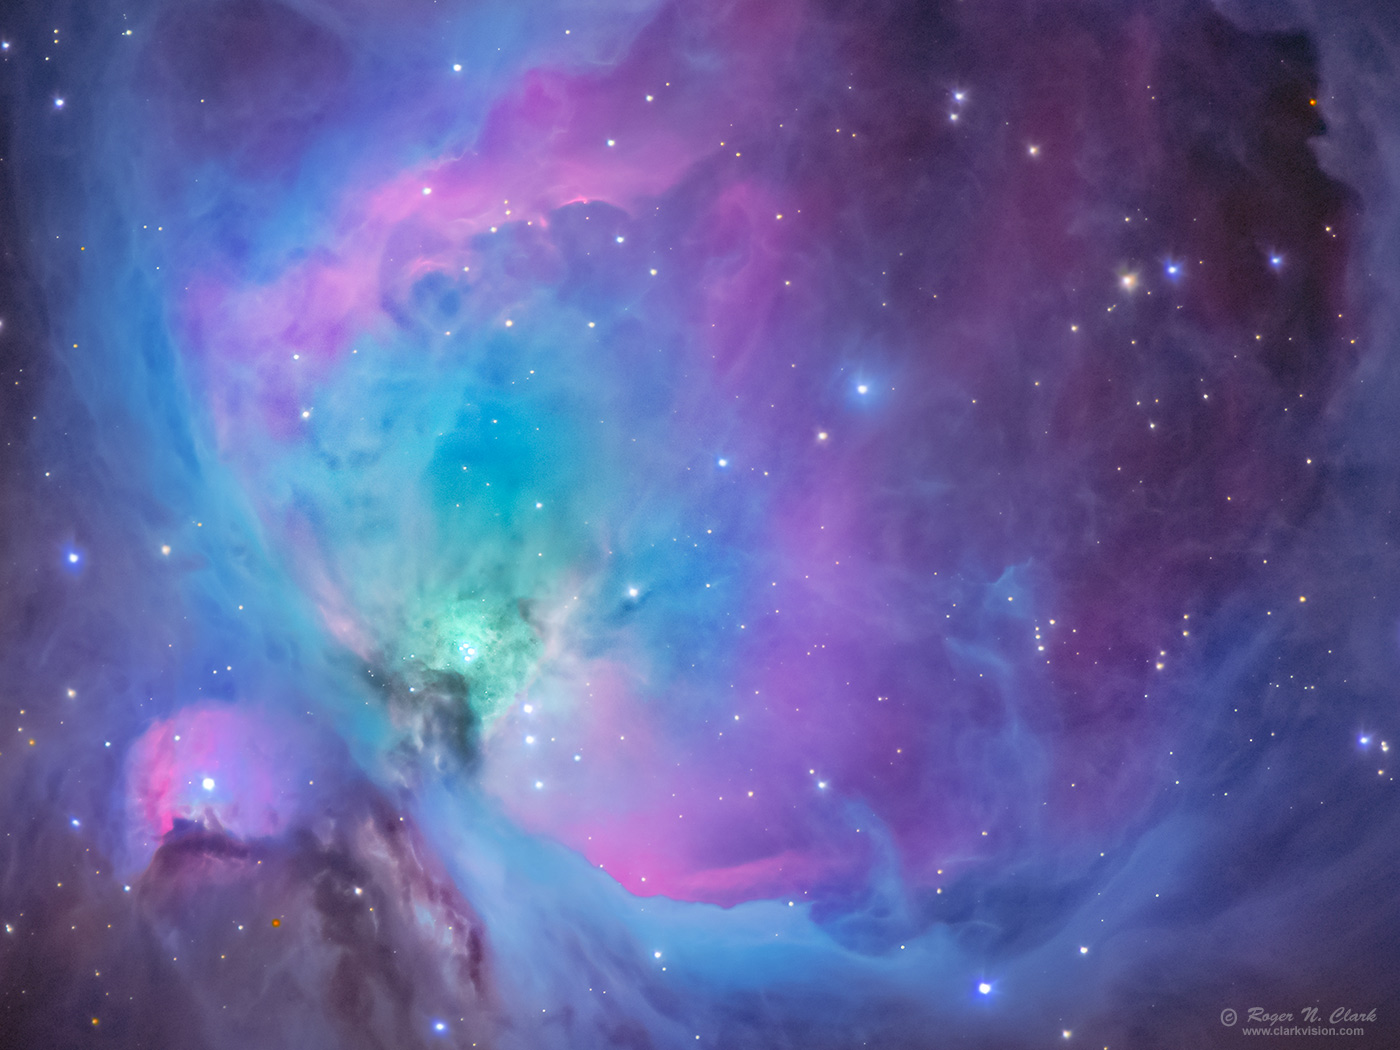
I'm currently using a consumer digital camera with 3.2 micron pixels and a 300 mm telephoto lens plus a 1.4x teleconverter giving 420 mm. That gives me plate scale of 2.2 (at 300 mm) and 1.57 arc-seconds / pixel at 420 mm. And, of course shorter focal lengths. For small targets I may use a 2x teleconverter giving 600 mm and 1.1 arc-seconds/pixel (example in Figure 2).
The 206265 constant is the number of arc-seconds in one radian. So you see, one does not need a telescope because consumer telephoto lenses and modern consumer digital cameras can get the resolution to resolve very small objects. But the problem with these plate scales is accurate tracking, whether telescope or telephoto lens. If your plate scale is 2 arc-seconds, tracking accuracy should be better than 2-arc-seconds over the duration of the exposure, and ideally tracking accuracy of half the plate scale (or better).
The low cost mounts commonly recommended have small, low precision gears that result in large periodic error, typically in the tens of arc-seconds over just a few minutes. That then typically leads to needing an autoguider, and that means more weight, a laptop or other control computer, more power and reduced portability.
But there are other options in trackers than the classical German equatorial mount with small gears.
First, if you just want to do wide field nightscapes, and Constellations (and that is a good starting point for astrophotography) an iOptron skytracker pro or (iOptron SkyTracker Pro Camera Mount at B&H) can track up to about 50 mm focal lengths in short (minute or less) exposures. This unit is under $300 and fits easily in a backpack. I have two of them. Or make what is called a "Barn Door" Tracking Mount for a few dollars.
But for deep sky, precision tracking at better than 3 arc-seconds / pixel in a portable system, there are two general options (Figures 1b, 3).
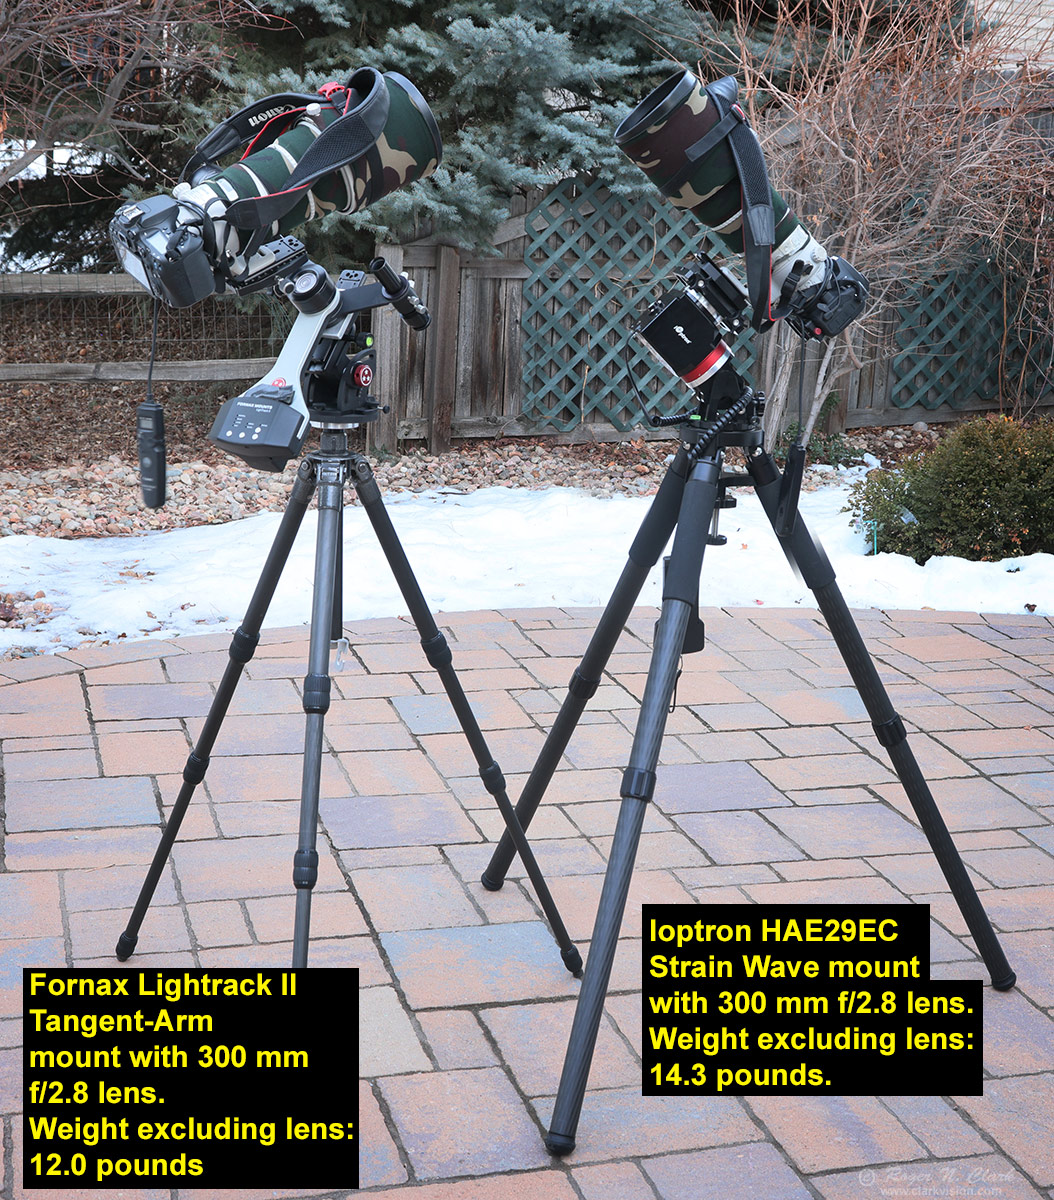
1) Tangent arm tracker. For decades, people have been building tangent arm trackers and they are called "barn door" trackers. You can google barn door tracker and see many designs. But, again, reducing periodic error needs some careful and precision engineering. The commercial market responded with 2 units: 1) Astrotrac (now out of production but can be found used) and 2) the Fornax Lightrack II equatorial mount (Figure 1b, left panel and Figure 3, left) which boasts +/- 1 arc-second tracking accuracy over 8 minutes. I have 2 of both systems and have used them extensively (I also have German equatorial mounts with autoguiding capability). The Fornax stands up better against wind compared to the astrotrac and weights only 1.3 Kgs (2.9 pounds). It can be powered by a small set of 8 AA batteries.
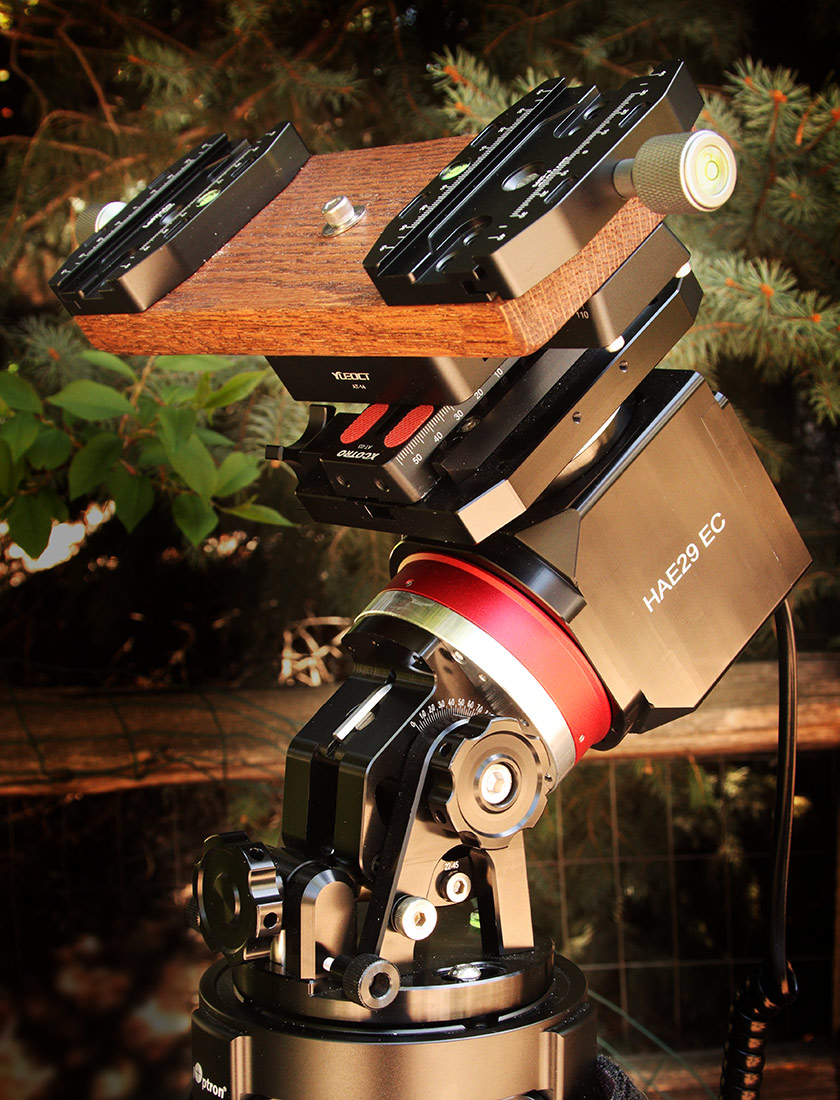
2) Strain-Wave tracker. A new technology that just came on the market is Strain-Wave tracking mounts, also known as Harmonic drives. The problem with the Strain-Wave design is very high periodic error, but now some mounts include high precision encoders to correct the periodic error automatically without the need for autoguiding. However, precision encoders are expensive, adding $1000+ to the base price. These mounts go for $3000 to $6000+, but are very light, 3.4 Kgs (7.49 pounds), can carry larger telescopes than the Fornax Lightrack II, and are more stable in light to moderate wind. The iOptron HAE29EC strain-wave mount with high resolution encoders (Figure 1b, left panel, and Figure 3, right), does Real-time Periodic Error Correction (RPEC). RPEC operates faster than autoguiders and produce accurate tracking with no autoguiding as illustrated in Figures 2 and 4.
The fact is, like digital cameras, technology has advanced a lot in the last few years, and now a revolution is happening in tracking mounts. The AM5 was a first generation but strain wave has large tracking errors, and the manufacturing companies have responded with high resolution encoders added to their strain wave systems. This technology will also make its way to classical German equatorial mounts. And now that the tech has been developed, we are starting to see prices fall. The encoders enable real time error correction without autoguiding. Autoguiding has delays, from the exposure time to acquire the image, then analyze the image, then send commands to correct the mount, which means delays of a few seconds. Real-time correction with encoders can be in a fraction of a second time scale. The traditional equatorial mounts have payload capacities smaller than the weight of the mount. The new strain wave mounts have payload capacities 3 to 4 times the weight of the mount without counterweights, and higher payloads with counterweights. Here is one example, see the video down the page.
I do not recommend buying a strain-wave mount without high resolution encoders unless you intend to always use an autoguider. The periodic errors are too large to get a reasonable exposure time at long focal lengths without autoguiding.
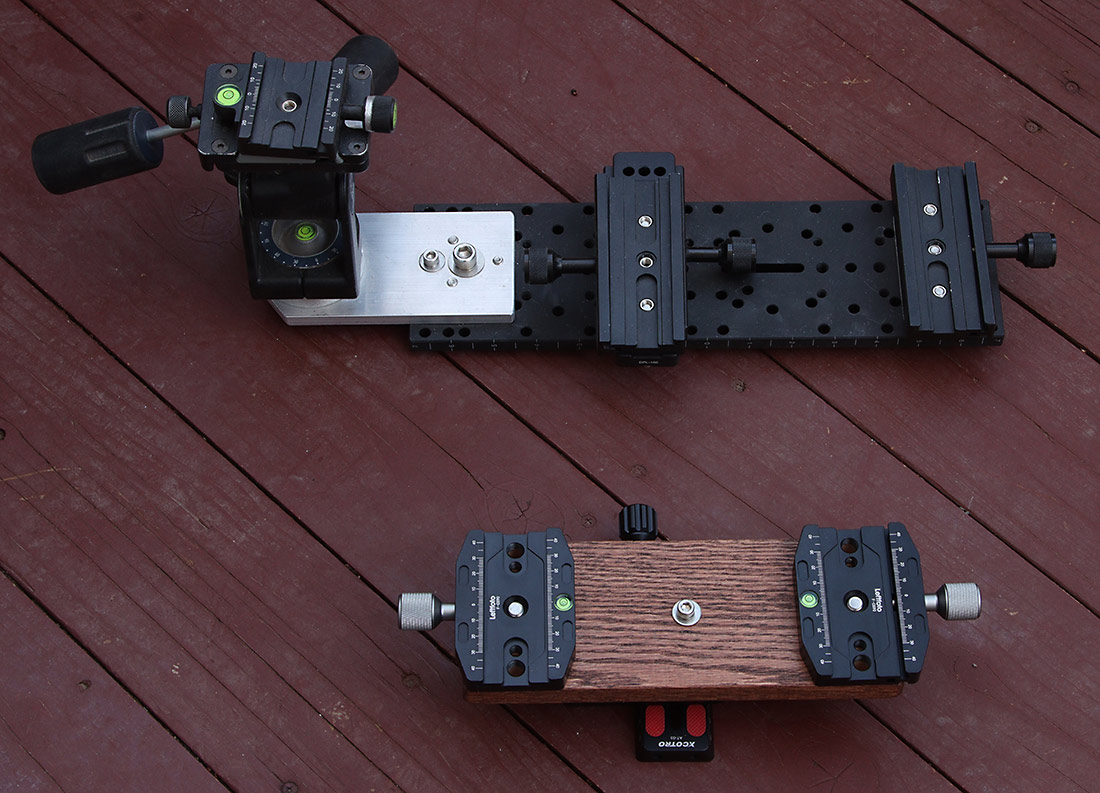
While telescopes often come with attachment rings/brackets, e.g. to attach an autoguider, lenses do not. A simple way to mount two or more lenses/telescopes is illustrated in Figure 1a, left panel which shows two cameras mounted side by side (autoguider and telephoto lens). Basically, get a bare dovetail and mount clamps on it. I use arc-swiss compatible clamps and rails for cameras and camera lenses, and these were mounted on a Losmandy large rail, Figure 1a, 4 (it is a Losmandy mount). Note to the right of the camera and telephoto in Figure 1a, is a tripod head; sometimes I put a camera with a wide field lens and run two cameras, or one could add a finderscope.
Example brackets are shown in Figures 4, 5, and 6. The top image in Figure 4 is the same bracket that is shown in Figure 1a left panel. The bottom bracket in Figure 4 is shown expanded in Figure 5. This bracket is used on the HSE29EC shown in Figure 1b, right panel. Because the HAE29EC computerized "GoTo" pointing of lenses/telescopes must be parallel with the mounting plate on the mount, a cross bracket needed to be assembled, (Figure 5, top). A long rail was purchased so the position could be changed to achieve good balance (Figure 5, bottom image). On the top of the board are Arca-Swiss compatible clamps for attaching lenses, cameras, finderscope, or an autoguider. This bracket is shown mounted on the HAE29EC in Figure 6.

First, you can get an idea of what the periodic error is of a mount by doing a search online for:
(your_mount_model) periodic error
You can measure it yourself with simple steps like this:
1) Set the polar axis about 10 degrees off the pole, either east or west.
2) Choose a field with several stars of varying brightness but well separated near the meridian and celestial equator.
3) set ISO to its lowest value and do a 1-minute exposure. Look at the stars and some should not be overexposed. If so, close your aperture some. For example, the 10 minute exposure in Figure 7 was made with a stock Canon 90D and 600 mm focal length, f/11, iso 100, and Figure 8 was made with a stock Canon 90D and 100 mm focal length, f/11, iso 100.
4) Make a 10-minute single exposure.
Analyze the results:
You will likely see the trailed star image showing a sinusoidal pattern (e.g. Figures 7b, 8). Measure the distance between peaks. The distance divided by the total linear track length times ten is the period in minutes. If you don't see a complete sinusoid, then increase to twenty minutes. Then it would be period length divided by the total track length times 20.
The examples in Figures 7a, 7b and 8 show the extremes of tracking mounts. With the real-time periodic error correction in the iOptron HAE29EC strain-wave mount with high resolution encoders (Figure 7a), there is no measurable error within the seeing conditions of the test. Compare the HAE29EC to a similar cost classic German equatorial mount (Losmandy G11) driven by a worm gear (Figure 7b). Even with excellent engineering, with gear errors of less than 8 microns, an autoguider is needed with the G11, even on short exposures. This is typical of this class of mount, but lower cost German equatorial mounts tend to have greater tracking errors due to smaller, low cost gears. The Losmandy handles autoguiding very well, as shown in this Veil Nebula image or this M13 Globular Cluster image where autoguiding root-mean square error was 1/2 arc-second (peak-to-peak error ~ 2 arc-seconds over many minutes). The HAE29EC achieves that with no autoguiding! Note, the G11 has a higher payload capacity than the HAE29EC.
Tangent-arm trackers have large effective diameter gears that help increase tracking accuracy. For example, compare the tracking accuracy of the Fornax Lightrack II in Figure 7c with the Losmandy G11 in Figure 7b. The Fornax Lightrack II work very well with minute or so exposures at long focal lengths (plate scales of 1 to 2 arc-seconds per pixel) as demonstrated in this Omega Centauri, NGC 5139 image.
The periodic error shown in Figure 8 is for a basic low cost wind-up star tracker (Omegon minitrack LX3) and works very well with short focal length lenses for use in nightscapes and constellation photography. Obviously, the 100 mm lens on a camera with 3.2 micron pixels (Canon 90D) is too much resolution for long exposures of more than about ten or so seconds. Most mounts will fall between the extremes shown here with only the long tangent arm trackers like the Fornax Lightrack II or Astrotrac or mounts with high resolution encoders and Real-time Periodic Error Correction (RPEC) having the performance with long focal lengths to not need autoguiders.
Compute the plate scale (arc-seconds/pixel):
plate scale = 206265 * pixel size in mm / focal length in mm.
For example, with a 300 mm lens and 4 micron pixels (4 microns = 0.004 mm) = 206265 * 0.004 / 300 = 2.75 arc-seconds.
Now measure the peak-to-peak distance about the mean track length in pixels. Multiply the plate scale by this measurement to get the peak-to-peak distance in arc-seconds. Say it was 9 pixels in the above example, and the period was measured as 4 minutes. Then the result is 2.75 * 9 = 25 arc-seconds per 4 minutes.
Some reported periodic error (remember tracking accuracy needs to be in the sub 2-arc-second range or better for deep sky photography at telephoto focal lengths):
An astrophotography mount performance overview, reports from end-users
Omegon Minitrack LX3: 60 to 90 arc seconds peak-to-peak in ~ 10 minute interval (Figure 8).
Star Adventurer 2i: 40 arc seconds peak-to-peak. reference1 , reference2.
Star Adventurer Gti: 50-80 arc-seconds peak-to-peak.
Star Adventurer Wave 150i Strain Wave Mount: ~ 27 arc-seconds peak-to-peak. reference.
Fornax LighTrack II: 2 arc-seconds peak-to-peak, reference. However, my unit shows 7 arc-seconds (Figure 7c).
Celestron CGE Pro mount: 10 - 15 arc-seconds peak-to-peak, reference.
HEQ5 or EQ6, have PE in the range 10-30 arc-seconds, peak-to-peak. reference.
OG star tech, open source 3D printed tracker: PE ~ 10 - 15 arc-seconds peak-to-peak. OG star tech. More info on reddit here.
CALL FOR Periodic Error Measurements. If you measure your mount's periodic error with the above method star trail, record full resolution jpegs, and provide me with a full resolution crop of a typical periodic error star trail, I'll analyze it for you and include a figure here. I'll need camera used, focal length, and length of exposure. Be sure the cropped jpeg is full resolution so I can properly calculate the image scale.
In general, the more massive the mount, the better it holds tracking in windy conditions. Another factor is the size of the optical tube assembly (OTA). Larger OTAs will catch more wind. The small lightweight trackers, like the Fornax Lightrack II and Astrotrac are very susceptible to wind shake.
The strain wave mounts improve the wind problem, and have goto. But strain wave mounts show another problem in windy conditions. Strain wave mounts, being quite rigid, a gust of wind can push the view a few arc-seconds, then the autoguider, being delayed due to exposure time and guide image analysis, would see the change and project a correction. But the mount is so rigid that in the time the autoguider "found a problem" the mount had already snapped back into place. The bottom line is the autoguider did an over correction, often 15+ arc-seconds.
The wind gust problem is mitigated by strain wave mounts with Real-time Periodic Error Correction (RPEC) by using high resolution encoders. The RPEC, being real time, responds faster than autoguiders can. Ditching the autoguider can produce very smooth tracking in windy when the gusts were so small and brief that the results were much better without autoguiding. Some examples made in windy conditions with an iOptron HAE29EC strain wave mount with RPEC:
Thor's Helmet, NGC 2359, imaged atr 1.1 arc-second per pixel.
The Leo Triplet: Galaxies M65, M66, and NGC 3628, imaged atr 1.1 arc-second per pixel.
Classical equatorial mounts, like German equatorial mounts that can be low cost, tend to have smaller gears which contribute to high periodic tracking error. When one gets into longer focal lengths (above about 200 to 300 mm), autoguiders are often needed. This adds bulk, mass and complexity.
There are tracking designs that are low to moderate cost and very high precision tracking, typically limited only by polar alignment accuracy. Tangent-arm trackers have the advantage of low to moderate cost but very large equivalent gear diameters (or roller bearings) that enable accurate tracking. The lightweight nature of these mounts are susceptible with wind shake. And with trackers like the Fornax Lightrack II without goto capability, one needs to find objects in the sky by hand, moving the lens/telescope to point at the object. If you do not know the sky, this can be challenging until you do learn your way around the sky.
Another option, that just came on the market, circa 2022, is strain wave mounts. Strain wave mounts have high and sometimes erratic tracking error that are only pseudo periodic, and generally larger tracking errors than classical mounts. Their advantage is very light weight, able to carry a large mass without counterweights, and are more solid against wind. But I would not recommend buying a bare strain wave mount. Instead, some mounts are now outfitted with high resolution encoders and have Real-time Periodic Error Correction (RPEC), which provides corrections faster than an autoguider. If you want a strain wave mount, I recommend only purchasing strain wave mounts with RPEC. The advantage of an RPEC strain wave mount is great portability, a solid mount against wind, computerized with goto positioning (enables commanding to send the telescope to a specific object) and can include an autoguider on both axes. The disadvantage is cost about 3 times more than the tangent-arm trackers.
References and Further Reading
Clarkvision.com Astrophoto Gallery.
If you want to do certain types of imaging, choose the right tools. Sometimes
gear matters.
Before choosing cameras and lenses, see:
Does Gear Matter in Photography?
For more general low light, night, and astro photography, see this article:
Characteristics of Best Digital Cameras and Lenses for Nightscape and Astro Photography
For specific recommendations on lenses and cameras for low light, night, and astro photography, for a variety of manufacturers, see: Recommended Digital Cameras and Lenses for Nightscape and Astro Photography
The Night Photography Series:
| Home | Galleries | Articles | Reviews | Best Gear | Science | New | About | Contact |
http://clarkvision.com/articles/portable-astro-landscape-wildlife-setup/
First Published February 22, 2023
Last updated June 21, 2025